
Advantech routers are highly versatile and support a wide range of applications. This chapter describes several common deployment scenarios step by step. Each use case explains what it solves, shows the network topology, lists the prerequisites, and guides you through the configuration and its verification.
The configuration examples provided in this chapter are based on IPv4 networks. Each use case assumes that you have completed the Initial Setup and can log in to the router's web interface.
Access to the Internet from LAN
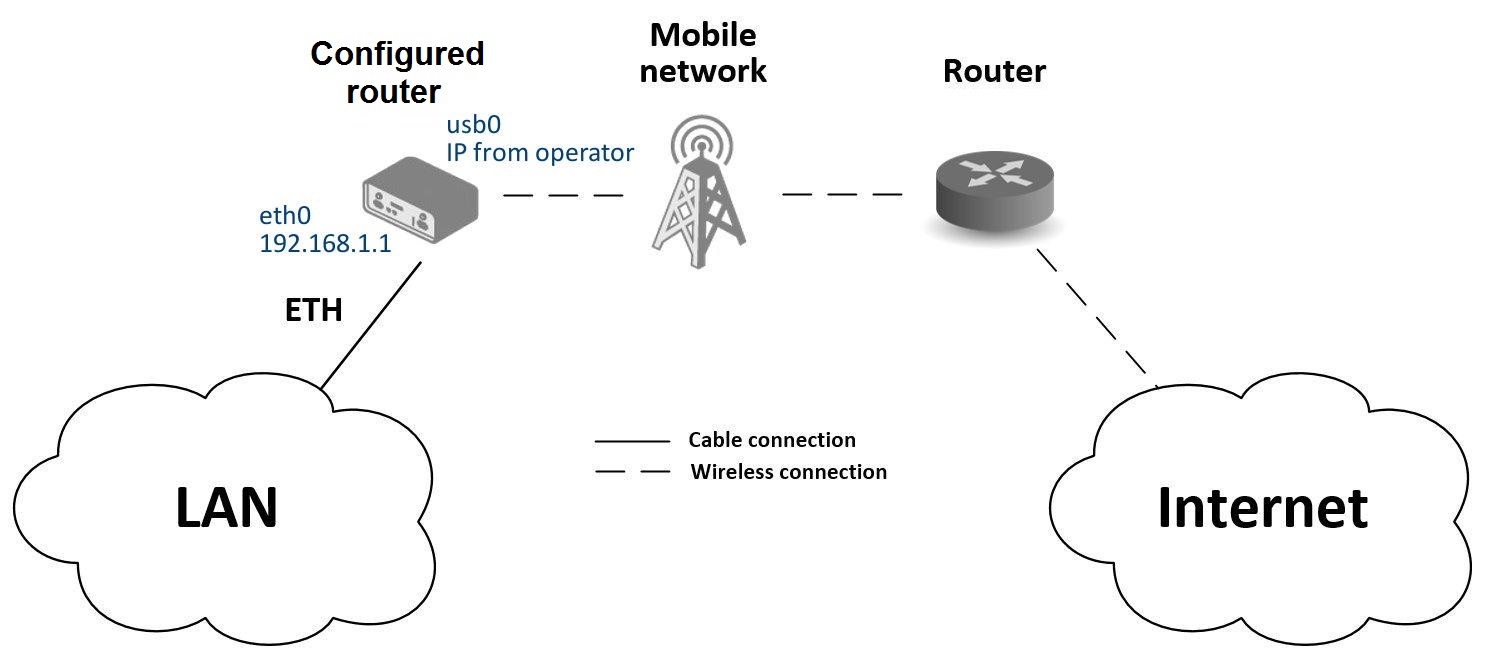
What it solves: Devices on a local area network (LAN) need Internet access at a site without a wired Internet connection. The router provides Internet access to the entire LAN through its cellular connection.
Prerequisites
- An active SIM card with a data plan from a mobile network operator, inserted into the SIM1 slot.
- An antenna attached to the ANT connector.
- A computer or a LAN switch connected to the router's
eth0interface. - The router connected to the power supply.
Configuration
You can configure additional settings in the LAN and Mobile WAN items in the Configuration section of the web interface.
LAN Configuration
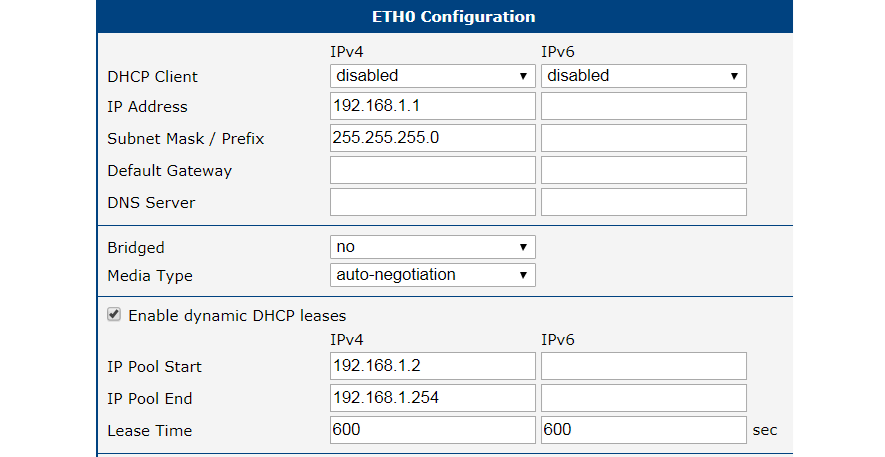
The factory default IP address of the router's eth0 interface is 192.168.1.1. To change it, navigate to the LAN item in the Configuration section. No additional configuration is required for this use case. The DHCP server is enabled by default, so the first connected device receives 192.168.1.2, and so on.
Mobile WAN Configuration
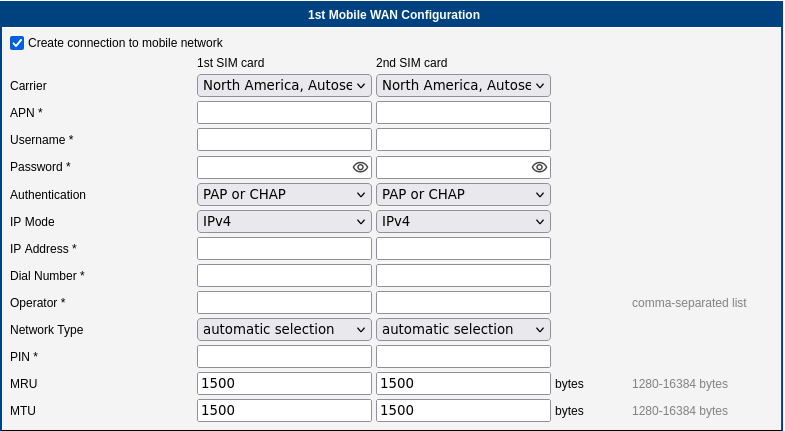
Use the Mobile WAN item in the Configuration section to configure the cellular connection. Depending on the SIM card, the configuration form can be left blank. Ensure that Create connection to mobile network is checked (the factory default).
Verification
After powering on, wait for the router to register on the mobile network. A successful connection is indicated by the WAN and DAT LEDs on the front panel.
Navigate to Mobile WAN in the Status section. You should see the Connection successfully established message. The Network item displays information about the newly created usb0 interface, its IP address, and the route table. The LAN now has Internet access.
Backup Access to the Internet from LAN
What it solves: A single Internet connection is a single point of failure. With the Backup Routes feature, the router uses several Internet sources with defined priorities and automatically switches to a lower-priority connection if a higher-priority one fails, ensuring continuous Internet access for the LAN. Depending on the router model, the sources can include a wired Ethernet connection, a PPPoE connection, a Wi-Fi connection, and the cellular connection.
A typical scenario is LTE failover, where the cellular (Mobile WAN) connection automatically backs up the primary wired or Wi-Fi WAN connection.
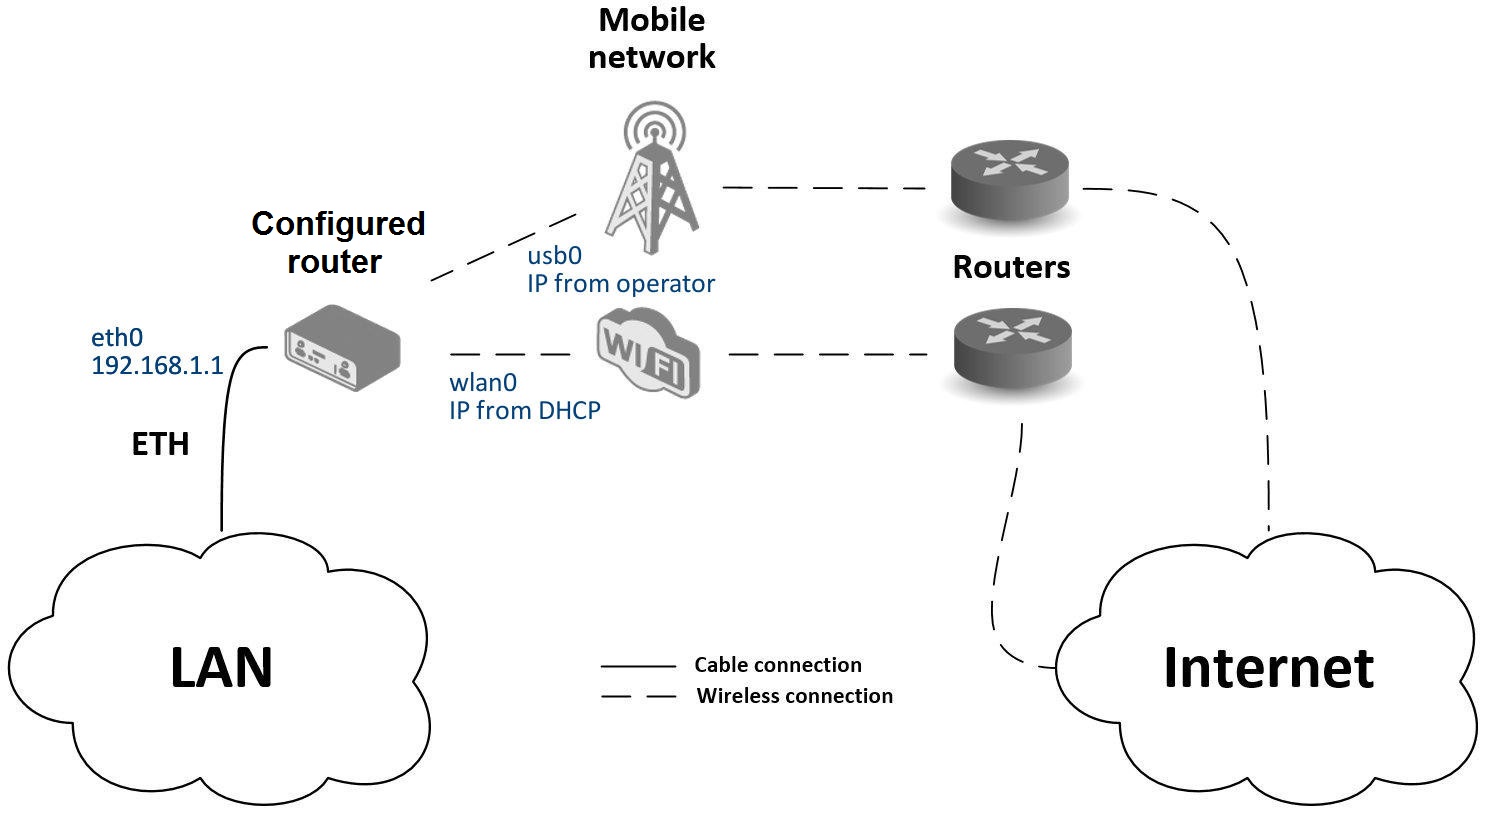
In this example, the Wi-Fi connection is the primary Internet source and the cellular connection is the backup.
Prerequisites
- The LAN interface at its factory default settings, as in the previous use case. Detailed Ethernet configuration is described in the Configuration chapter.
- Access to a Wi-Fi network that provides an Internet connection.
- An active SIM card inserted into the SIM1 slot and an antenna attached to the ANT connector.
Configuration
The Backup Routes page lets you back up the primary connection with alternative connections and assign each one a priority.
Wi-Fi WAN Configuration
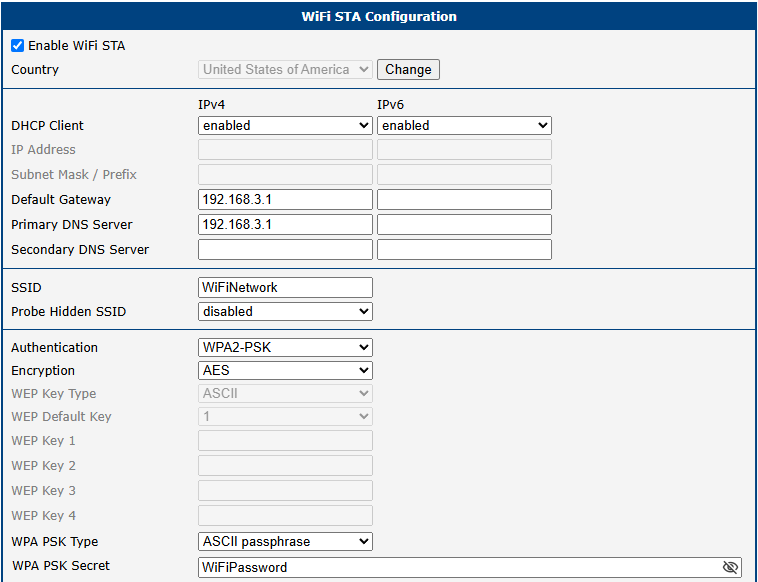
Configure the Wi-Fi station in Configuration → WiFi → Station. Check Enable WiFi STA, enable the DHCP client, and enter the addresses of the default gateway and DNS server. Then fill in the connection data: SSID, authentication, encryption, WPA PSK type, and password. Click Apply to confirm.
Mobile WAN Configuration
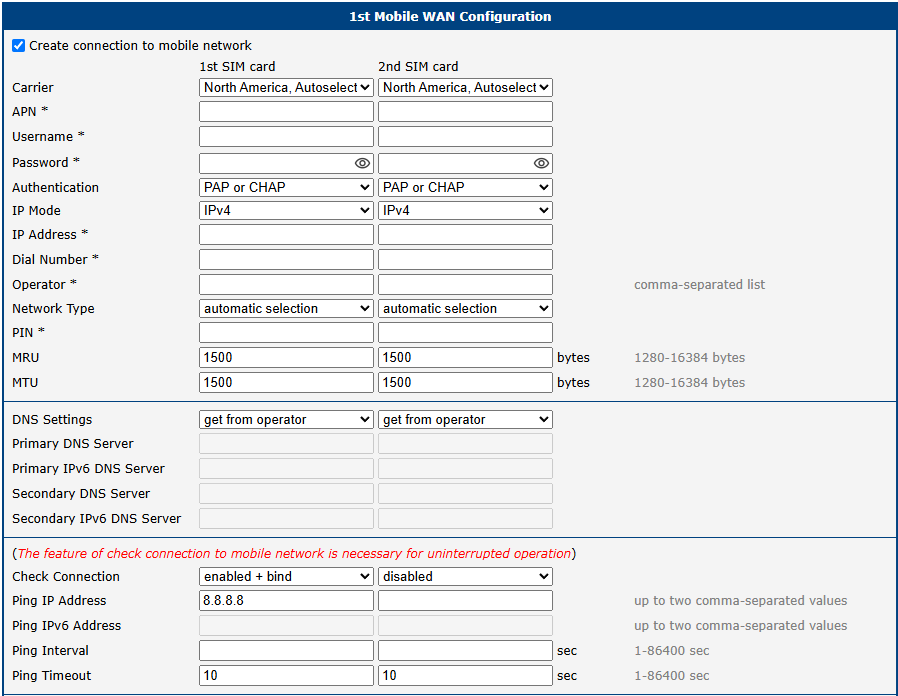
To integrate the cellular connection into the backup system, navigate to Configuration → Mobile WAN, set Check connection to enabled + bind, and enter a reliable IP address to ping and the check interval.
Backup Routes Configuration
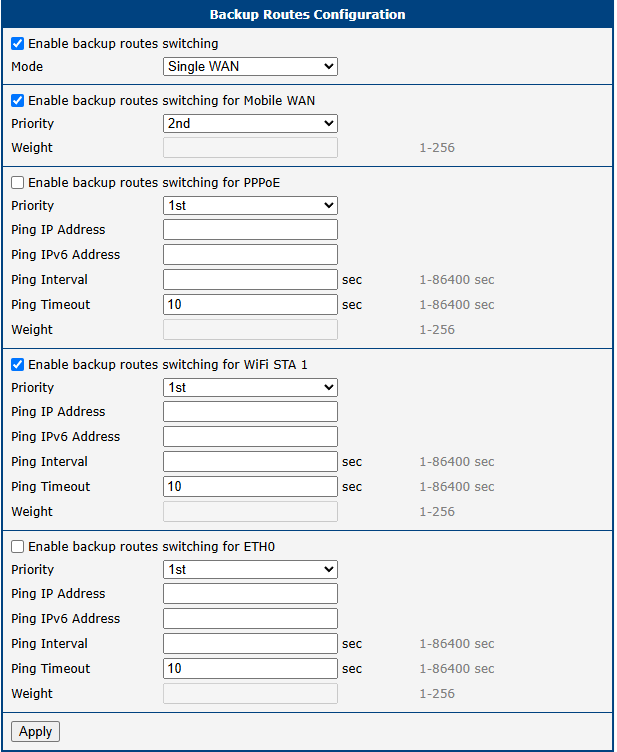
After setting up the backup connections, configure their priorities in Configuration → Backup Routes. In this example, the Wi-Fi connection (wlan0) has the highest priority and the mobile connection (usb0) has the lowest. Enable backup routes switching for each route and click Apply.
Tips
Backup routes work even if they are not activated in the Backup Routes item — the router then uses the factory default backup route behavior.
Verification
To verify the Wi-Fi connection, check the WiFi item in the Status section. A successful connection shows wpa_state=COMPLETED.
You can verify the configured network interfaces in Status → Network. The route table at the bottom of the page shows which interface is currently active as the default route. If the Wi-Fi connection fails, the router automatically switches to the mobile connection.
Secure Network Interconnection with VPN
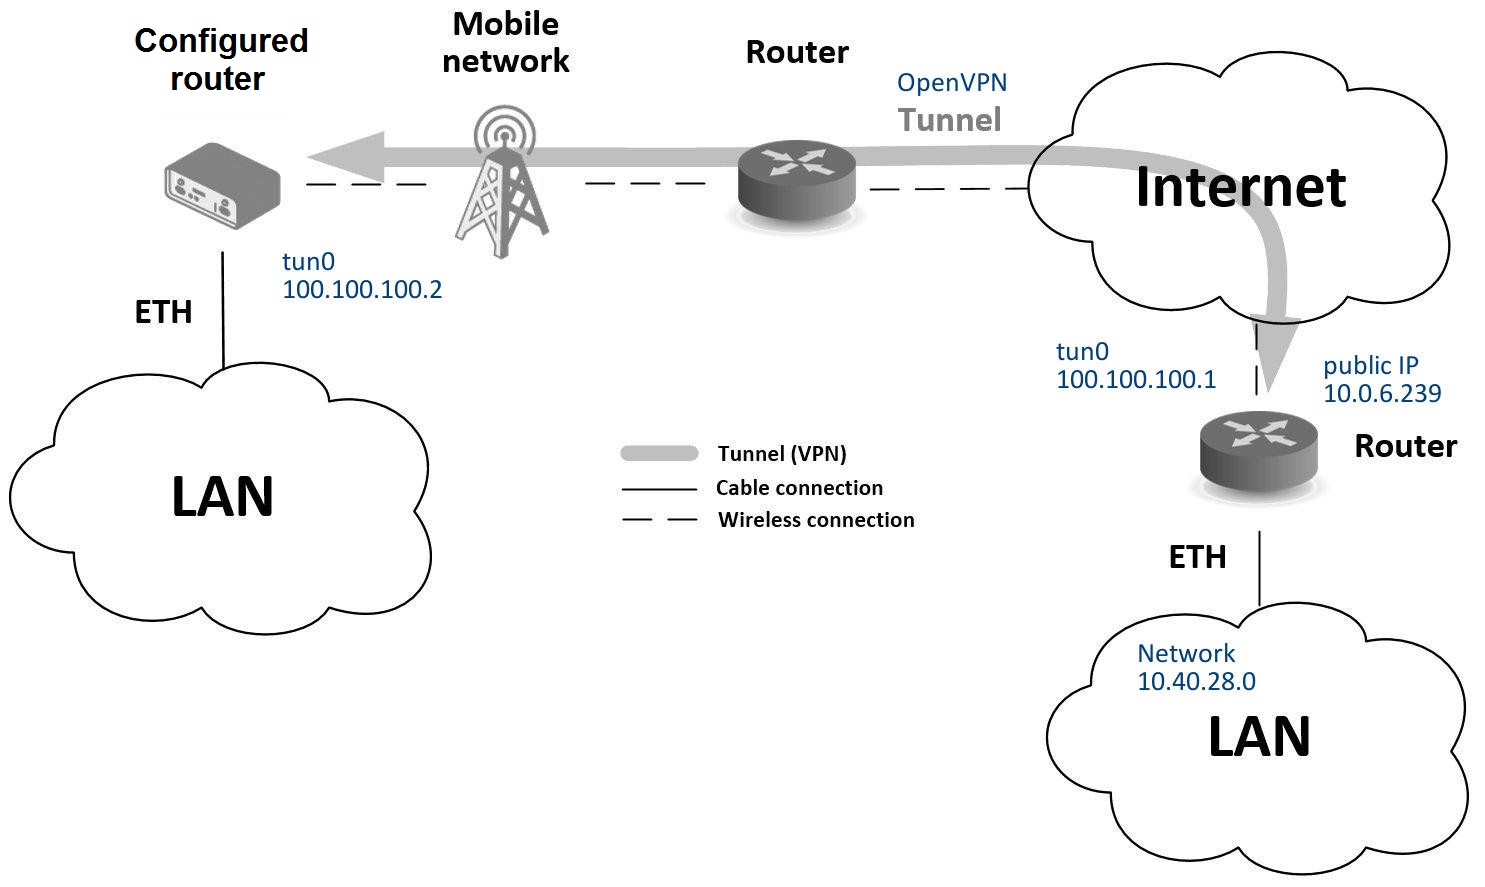
What it solves: Two or more separate LANs need to communicate securely over an untrusted public network, such as the Internet. A Virtual Private Network (VPN) creates an encrypted tunnel between the routers, so the LANs communicate as if they were a single private network. This ensures both the confidentiality and integrity of the exchanged data.
Advantech routers support several VPN protocols, including:
- OpenVPN: A highly flexible and secure SSL/TLS-based VPN.
- IPsec: A standards-based framework for securing IP communications.
The router also supports non-encrypted tunneling protocols such as GRE, PPTP, and L2TP, which can be combined with IPsec to create secure VPNs.
This example demonstrates how to establish an OpenVPN tunnel between two routers using a pre-shared secret key for authentication.
Prerequisites
- A stable Internet connection on both routers. In this example, the router connects through the cellular network: insert an active SIM card, attach the antenna, and make sure that the mobile connection is established, as described in Access to the Internet from LAN.
- The public IP address of the remote router.
- The tunnel settings of the remote router (protocol and port) and its pre-shared secret key.
Configuration
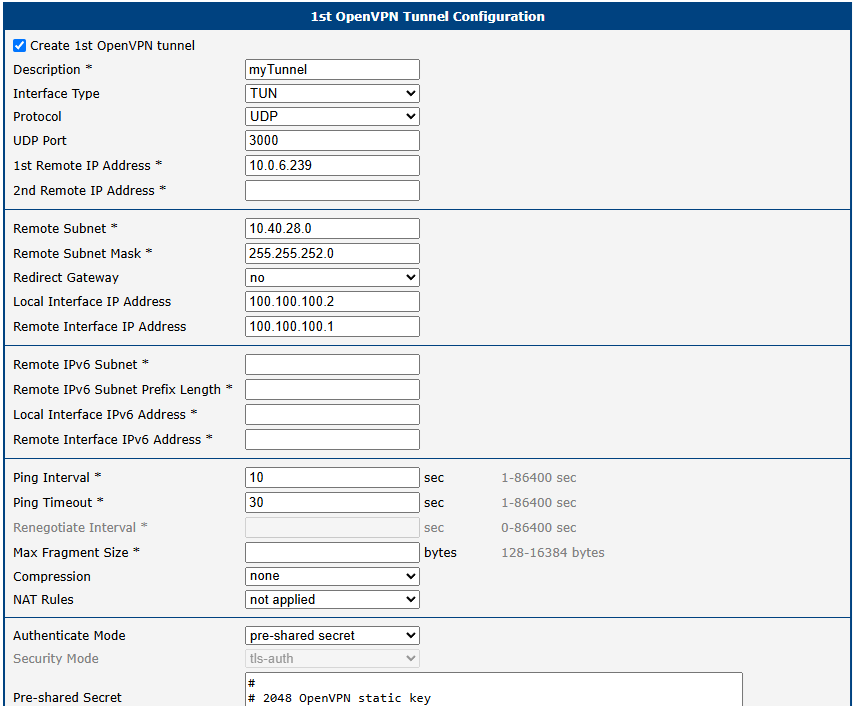
- Navigate to Configuration → OpenVPN.
- Enable one of the available tunnels by checking Create 1st OpenVPN tunnel.
- Set the Protocol and UDP/TCP port to match the settings of the remote router.
- In the 1st Remote IP Address field, enter the public IP address of the remote router.
- In the Authenticate Mode dropdown, select pre-shared secret.
- Paste the pre-shared secret key into the Pre-shared Secret field.
- Define the virtual IP addresses for the tunnel endpoints in Local Interface IP Address and Remote Interface IP Address. These must form a mini-subnet for the tunnel (e.g.,
10.8.0.1and10.8.0.2). - Click Apply to save the configuration.
Verification
Confirm that the VPN tunnel is active:
- Network Status: Navigate to Status → Network. A new virtual interface
tun0should be listed with the IP address you configured. - System Log: Navigate to Status → System Log. Look for an
Initialization Sequence Completedentry, confirming the OpenVPN tunnel is established.
Once the tunnel is active, you can verify it by pinging the remote tunnel endpoint's IP address from the router's command-line interface via SSH.
Serial Gateway
What it solves: Serial devices, such as PLCs, meters, or sensors, have no network interface of their own. The Serial Gateway feature encapsulates serial data into IP packets and creates a virtual serial port across the Internet, so a central SCADA system or a remote PC can collect data from or control the serial equipment.
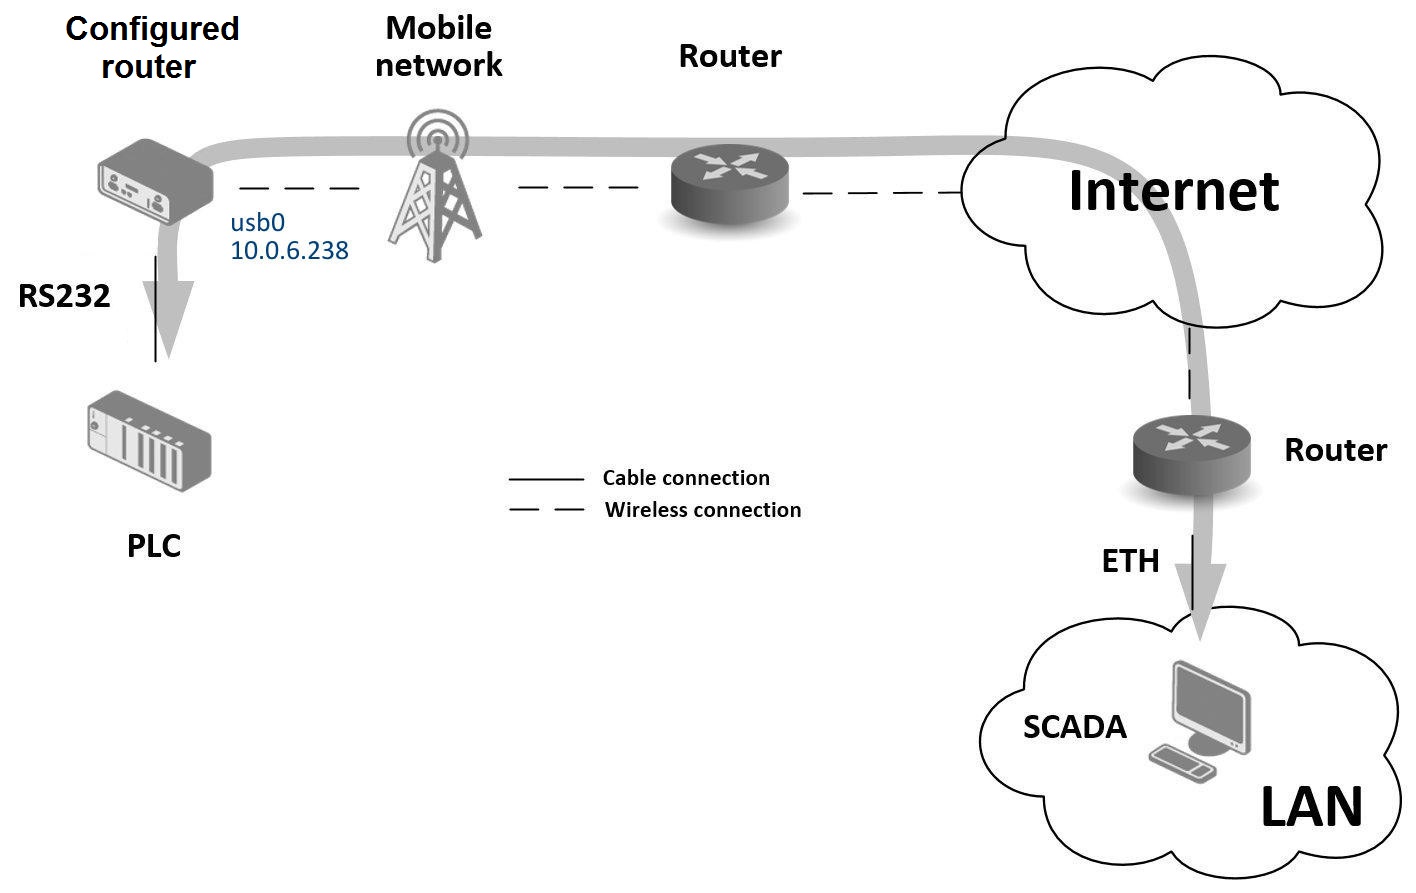
In this example, the router's Expansion Port is connected to a PLC, and the router is configured as a TCP server. A remote PC (SCADA) connects as a TCP client to communicate with the PLC.
Prerequisites
- A working cellular connection, set up as in the previous use cases: insert the SIM card into the SIM1 slot and attach the antenna to the ANT connector. No additional configuration is required. For more details, see Mobile WAN.
- The PLC connected to the router's Expansion Port.
- The router's public IP address, which the remote PC uses to connect.
Configuration
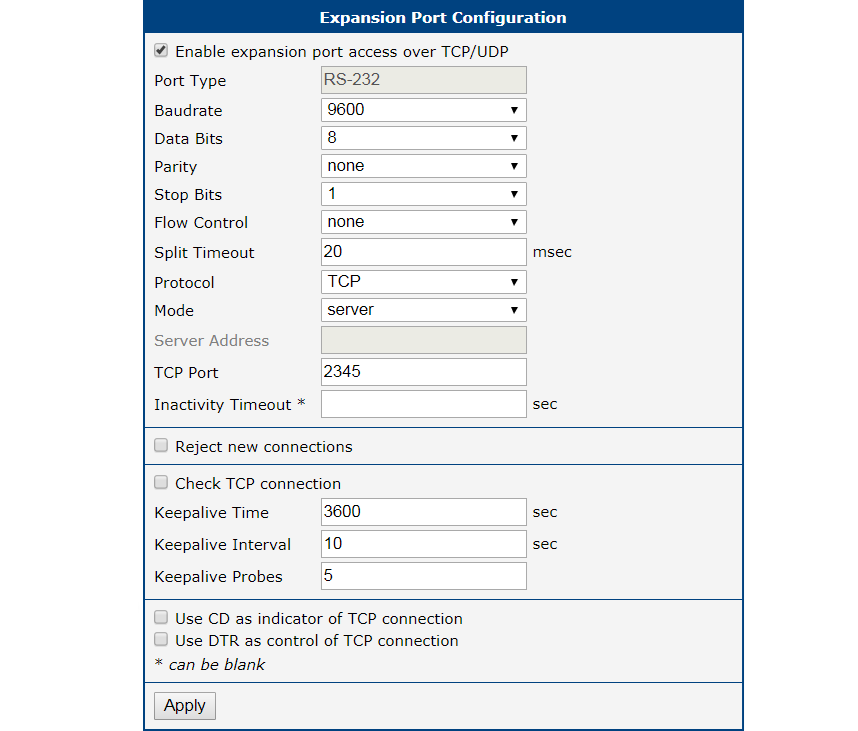
Navigate to Configuration → Expansion Port. Check Enable expansion port 1 access over TCP/UDP. Edit the serial communication parameters if needed. Set Protocol to TCP and Mode to server — the router will listen on the configured TCP port. Click Apply to confirm.
Verification
To communicate with the PLC, connect from the remote PC (SCADA) as a TCP client to the router's public IP address (e.g., 10.0.6.238) on the configured port (e.g., 2345). To verify the connection, navigate to Status → System Log and look for the TCP connection established message.