Configuration Environments
Caution
To ensure a secure deployment, it is crucial to evaluate the potential risks associated with your specific implementation and to configure the router accordingly to minimize these threats. We strongly recommend consulting the Security Guidelines, which outlines fundamental security risks and provides recommended settings for their mitigation.
Warning
If you are unsure about the correctness of your configuration or its potential impact on the router's longevity, consult our technical support for guidance.
Before putting the router into operation, make sure to connect all the components required for running your applications. Refer to the Hardware and Connectivity and Mounting and Installation chapters for details. Do not operate the router without an antenna connected to the main antenna connector. Transmitting energy into an open connector may cause damage to the equipment.
For security reasons, we recommend regularly updating the router's firmware to the latest version. Downgrading the firmware to an older version than the production version or uploading firmware intended for a different device may cause the device to malfunction.
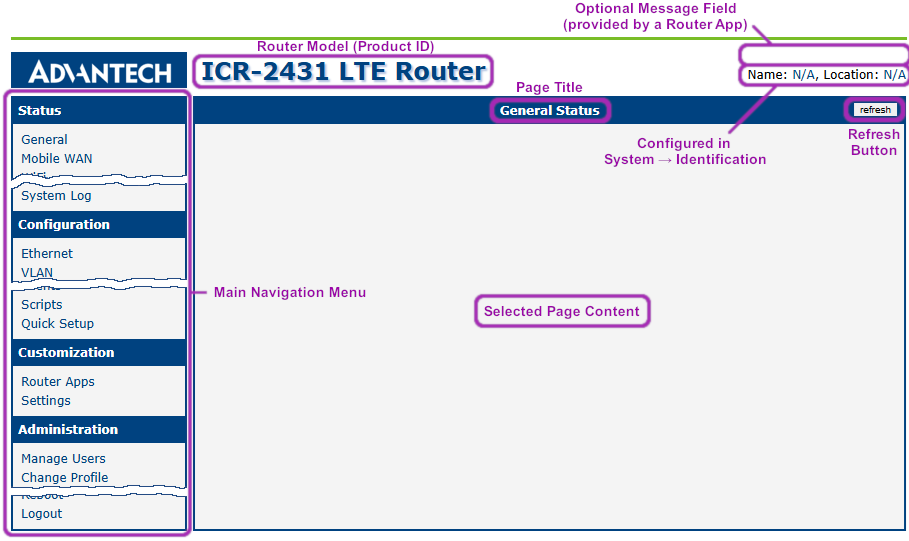
Enable JavaScript in your browser; otherwise, field validation and some functions are disabled.
Three unsuccessful login attempts will block HTTP(S) access from the IP address for one minute.
All routers have the WebAccess/DMP client pre-installed by default. The activated client periodically uploads router identifiers and configuration to the WebAccess/DMP server. See Remote Management Platform for more information.
You can use one of the following environments to configure an Advantech router:
Via a graphical interface accessible in a web browser. This option is primarily covered in this manual, start with Web Interface Initial Setup.
Via a console interface accessing the router by Secure Shell (SSH). For console configuration commands, refer to the Command Line Interface.
Via Advantech's remote device management platform, WebAccess/DMP, which provides extensive management and monitoring capabilities to ensure devices remain secure and up-to-date. For more information, refer to Remote Management Platform.
For more information on enhancing the router's basic functionality, refer to the Extending Router Functionality.
Web Interface Initial Setup
Caution
Starting with firmware version 6.5.0, both IPv4 and IPv6 firewalls are enabled by default. These firewalls permit only traffic originating from the default 192.168.1.0/24 network. Proper configuration of these settings is critical to avoid unintentionally blocking router communication during initial setup.
Tips
- Users with the User role have read-only access to the web interface, except for the Modify User functionality. Certain menu items remain unavailable to non-admin users.
- On a new router, or after a factory reset, the Quick Setup page is displayed immediately after login, allowing for a streamlined initial configuration; see Quick Setup for details.
- When configuring text fields in the web interface, consult Allowed and Restricted Input Characters for permitted character sets.
- The router's Name and Location fields in SNMP settings control the display in the interface's upper-right corner — detailed in SNMP.
GUI Tips
- Throughout the web interface, helpful information is displayed to the right of many input fields. For numeric items, this includes the valid range and unit.
- When you hover over an input field, a tooltip shows the item's internal configuration name — useful for scripting or remote configuration via WebAccess/DMP.
Advantech routers feature a secure web-based configuration interface accessible via HTTPS. This interface provides real-time network statistics, signal strength monitoring, system log access, and comprehensive device management capabilities. The web interface enforces TLS 1.2 or higher for all connections, with certificate validation required to prevent man-in-the-middle attacks.
To establish initial web interface access on a factory-default router:
First, ensure proper hardware preparation. For cellular models, insert an active SIM card that is compatible with your carrier's frequency bands and verify the required APN configuration. See SIM Card Slots for SIM card insertion instructions.
Attach all required antennas before powering the device, including Wi-Fi antennas for dual-function models. For connector locations and antenna types, see Antenna Connections. Connect the power supply using only Advantech-approved adapters specified in Power Supply and Grounding.
During the boot process, the router initializes its DHCP server on the ETH0 interface. Configure connected devices to obtain IP addresses automatically via DHCP.
The default LAN interface (ETH0) assigns addresses from the
192.168.1.0/24pool, with the router itself at192.168.1.1. Access the web interface by navigating to https://192.168.1.1 in a modern browser, noting that HTTP connections are strictly prohibited.The factory-default administrator account uses the username
root. The password for this account appears on the router's product label, withrootserving as the fallback credential if no label information exists.Upon first login, you must change the default password. After setting a new password, you are automatically directed to the Quick Setup page for the initial configuration.
To prevent certificate warnings, install the router's self-signed certificate or a third-party CA-signed certificate using the procedures outlined in Managing HTTPS Certificates.
Managing HTTPS Certificates
The router includes a self-signed HTTPS certificate. Since the identity of this certificate cannot be validated, web browsers may display a warning message. To avoid this warning, you can upload your own certificate—signed by a Certification Authority—to the router. If you wish to use your own certificate (for example, in combination with a dynamic DNS service), replace the /etc/certs/https_cert and /etc/certs/https_key files on the router. You can do this on the HTTP configuration page, as detailed in HTTP.
To use the router's self-signed certificate without encountering the security warning (due to a domain name mismatch) each time you log in, follow these steps:
- Add a DNS record to your system. For Linux/Unix systems, edit
/etc/hosts; for Windows, navigate toC:\WINDOWS\system32\drivers\etc\hosts; or configure your own DNS server. Insert a new record pairing the router's IP address with a domain name derived from its MAC address (specifically, the MAC address of the first network interface, as shown in the Network Status on the router's web interface), using dashes instead of colons for separation. For example, a router with the MAC address 00:11:22:33:44:55 would use the domain name00-11-22-33-44-55. - Access the router via this new domain name (e.g.,
https://00-11-22-33-44-55). If a security warning appears, add an exception to prevent it from recurring (for example, in the Firefox web browser). If the option to add an exception is unavailable, export the certificate to a file and import it into your browser or operating system.
Note: Using a domain name based on the router's MAC address may not be compatible with all operating system and browser combinations.
Allowed and Restricted Input Characters
When configuring the router via the web interface, it is crucial to avoid using forbidden characters in any input field—not just in password fields. Below are the valid and forbidden characters for input. Note that, in some cases, the space character may also be disallowed.
Valid characters include: 0-9 a-z A-Z * , + - . / : = ? ! # % @ [ ] _ { } ~
Forbidden characters include: " $ & ' ( ) ; < > \ ^ ` |
Warning
Although the system may allow saving non-ASCII characters after confirming a warning message, using them — especially in passwords — is not recommended, as it can cause compatibility issues with other systems.
Follow these guidelines; entering invalid characters can lead to errors or unintended behavior.
Supported Certificate Formats
All web interface forms for uploading certificate files support the following file types:
- CA, Local/Remote Certificate:
*.pem,*.crt,*.p12 - Private Key:
*.pem,*.key,*.p12
Remote Management Platform
WebAccess/DMP is an advanced, enterprise-grade platform for provisioning, monitoring, managing, and configuring Advantech's routers and IoT gateways. It offers zero-touch enablement for each remote device. For more information, refer to the WebAccess/DMP webpage.
New routers come pre-installed with the WebAccess/DMP client, which by default activates the connection to the WebAccess/DMP server. Disable this connection on the Welcome page upon initial login or under Customization → Router Apps → WebAccess/DMP Client.
Warning
The activated client periodically uploads router identifiers and configurations to the WebAccess/DMP server.
Device
Persistent Storage
The device's persistent storage consists of three partitions, combined into a single directory structure:
- System Data:
System data distributed with firmware upgrades. - User Data:
Separate storage for user data, accessible at/var/data. - Router Apps Installed:
Separate storage for Router Apps data, accessible at/opt.
Reset
Warning
Before performing a factory reset on the router, consider creating a backup of its configuration, refer to Backup Configuration.
The reset button on the router, labeled as RST, serves three different purposes:
Reset:
- Hold the RST button for less than 4 seconds.
- The router reboots, applying its customized configuration.
- You can also trigger a reboot by selecting the Reboot option in the web interface.
Configuration Reset¹:
Press and hold the RST button for more than 4 seconds.
The PWR LED turns off and back on. Hold the RST button for an additional second after the PWR LED turns back on.
The router resets to its default factory configuration, including RA configurations.
Emergency Reset¹:
- Use this option if the router fails to boot due to incorrect configuration or a filesystem error.
- Power off the router by disconnecting its power supply. Then, while holding the RST button, power on the router and continue holding the RST button for at least 10 seconds.
- The router resets its configuration, including RA configurations, similar to the Configuration Reset.
¹ Upon first login after a reset, you are prompted to change your password.
The following table summarizes which storage areas are retained and which are deleted during different reset procedures.
| Storage | Reset | Configuration Reset | Emergency Reset |
|---|---|---|---|
| Router & Router Apps Configuration | Keep | Reset to default | Reset to default |
| System Data | Keep | Keep | Reset to default |
| User Data | Keep | Keep | Keep |
| Installed Router Apps | Keep | Keep | Keep |
| User Account Locks | Keep | Keep | Remove |
| Factory Reset of Cellular Module | No | No | Yes |
Reset Storage Actions