IPsec Tunnel
Tips
For an introduction to IPsec, tunnel configuration, VPN modes, configuration scenarios, and authentication options, see the IPsec chapter in the Configuration Pages of the respective Router Manual.
Certificate Generation
The following procedure describes how to generate certificates and keys without a passphrase:
******************** certification authority ************************
openssl rand -out private/.rand 1024
openssl genrsa -des3 -out private/ca.key 2048
openssl req -new -key private/ca.key -out tmp/myrootca.req
openssl x509 -req -days 7305 -sha1 -extensions v3_ca -signkey private/ca.key -in tmp/myrootca.req -out ca.crt

******************** server cert *************************************
openssl genrsa -out private/server.key 2048
openssl req -new -key private/server.key -out tmp/server.req
openssl x509 -req -days 7305 -sha1 -extensions v3_req -CA ca.crt -CAkey private/ca.key -in tmp/server.req -CAserial ca.srl -CAcreateserial -out server.crt

******************** client cert **************************************
openssl genrsa -out private/client.key 2048
openssl req -new -key private/client.key -out tmp/client.req
openssl x509 -req -days 7305 -sha1 -extensions v3_req -CA ca.crt -CAkey private/ca.key -in tmp/client.req -CAserial ca.srl -CAcreateserial -out client.crt
Below are examples of certificate generation using a passphrase ("router") for the server and client certificates (the CA remains unchanged):
******************** server cert *************************************
openssl genrsa -des3 -passout pass:router -out private/server.pem 2048
openssl req -new -key private/server.pem -out tmp/server.req
openssl x509 -req -days 7305 -sha1 -extensions v3_req -CA ca.crt -CAkey private/ca.key -in tmp/server.req -CAserial ca.srl -CAcreateserial -out server.crt

******************** client cert **************************************
openssl genrsa -des3 -passout pass:router -out private/client.pem 2048
openssl req -new -key private/client.pem -out tmp/client.req
openssl x509 -req -days 7305 -sha1 -extensions v3_req -CA ca.crt -CAkey private/ca.key -in tmp/client.req -CAserial ca.srl -CAcreateserial -out client.crt
The IPsec configuration supports the following identifier (ID) types for the Remote ID and Local ID parameters:
- IP address (for example,
192.168.1.1) - DN (for example,
C=CZ,O=CompanyName,OU=TP,CN=A) - FQDN (for example,
@director.companyname.cz) — the@symbol precedes the FQDN. - User FQDN (for example,
director@companyname.cz)
Tips
Certificates and private keys must be in PEM format. Use only certificates that contain the standard -----BEGIN CERTIFICATE----- and -----END CERTIFICATE----- tags.
The interval after which the router renegotiates new keys is randomized as follows:
Lifetime − (Rekey Margin + random value in range ⟨0, Rekey Margin × Rekey Fuzz / 100⟩)
With default settings, the key renegotiation occurs within the following time range:
- Minimum time: 1 h − (9 min + 9 min) = 42 min
- Maximum time: 1 h − (9 min + 0 min) = 51 min
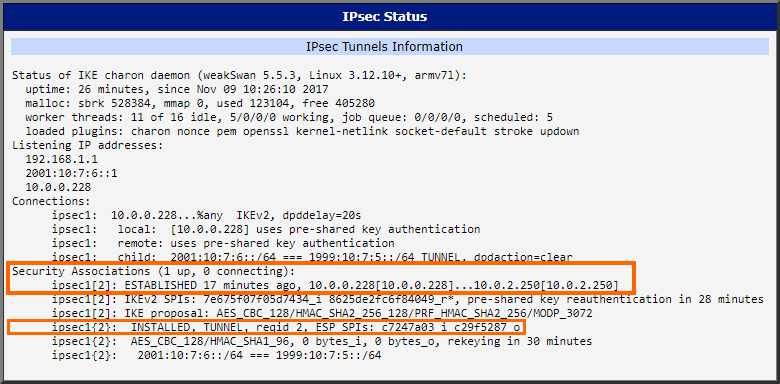
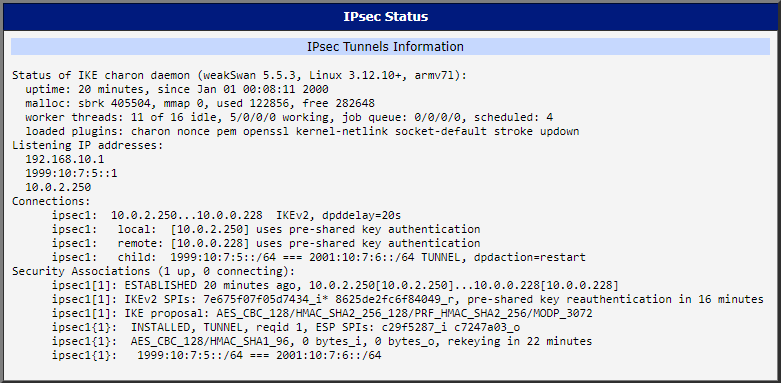
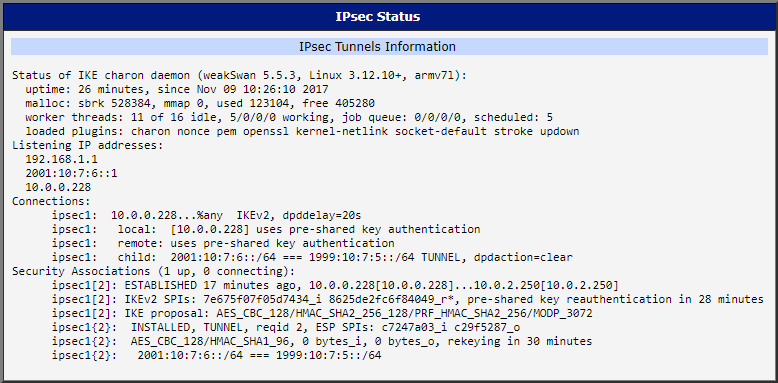
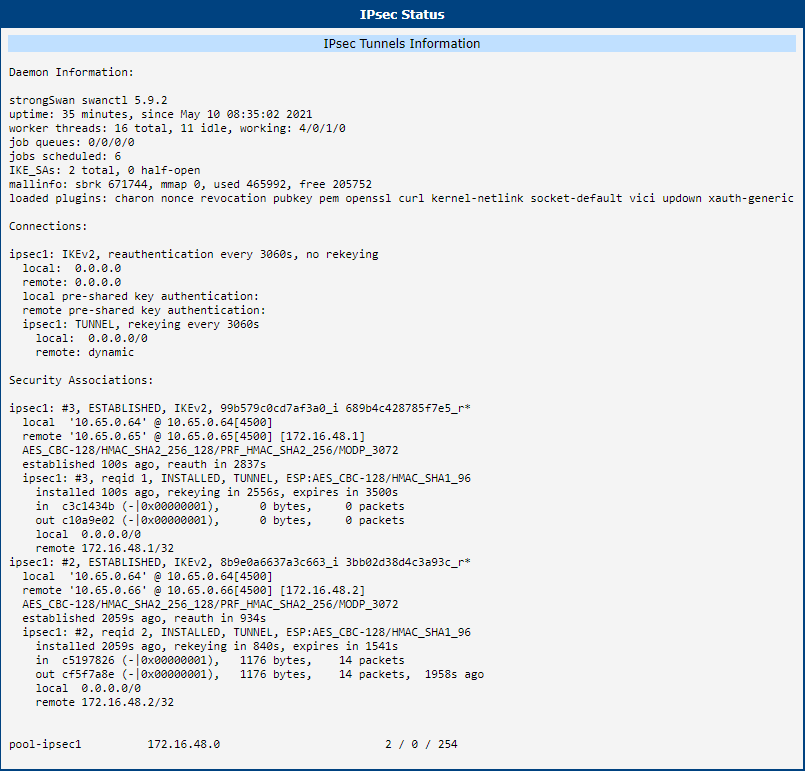
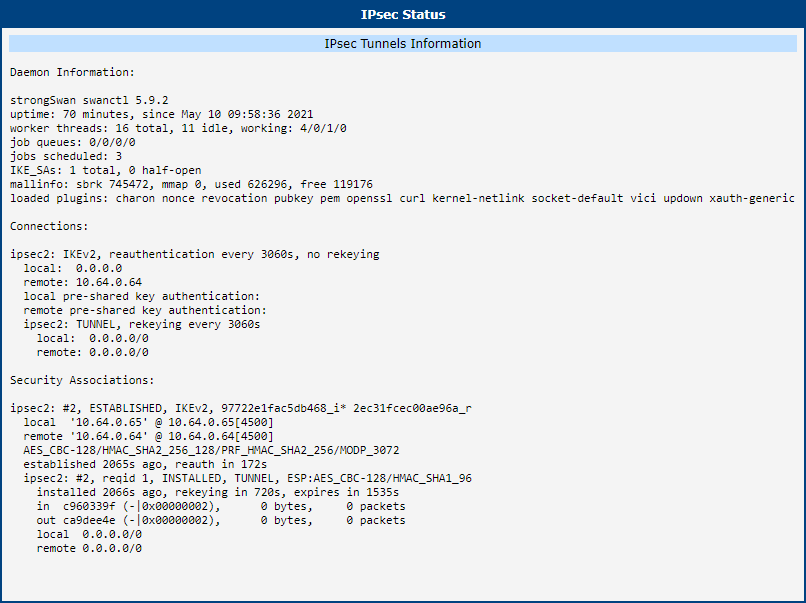
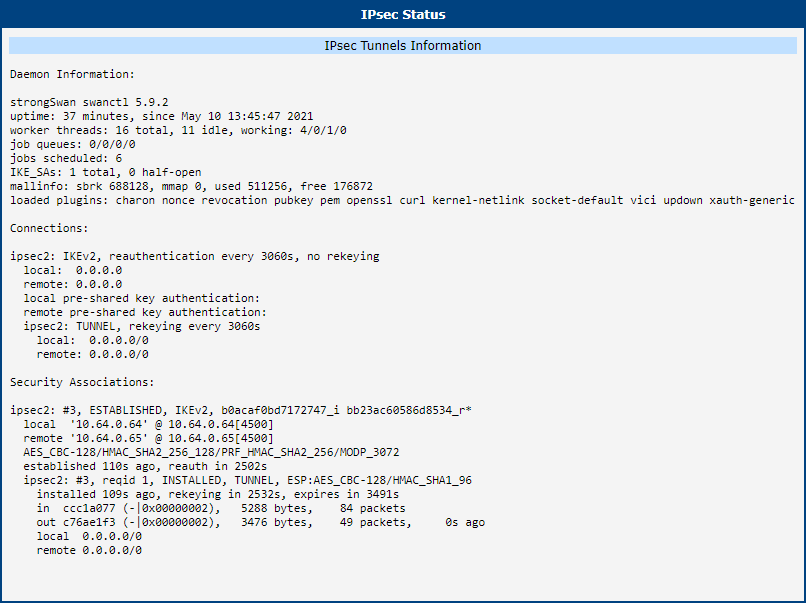
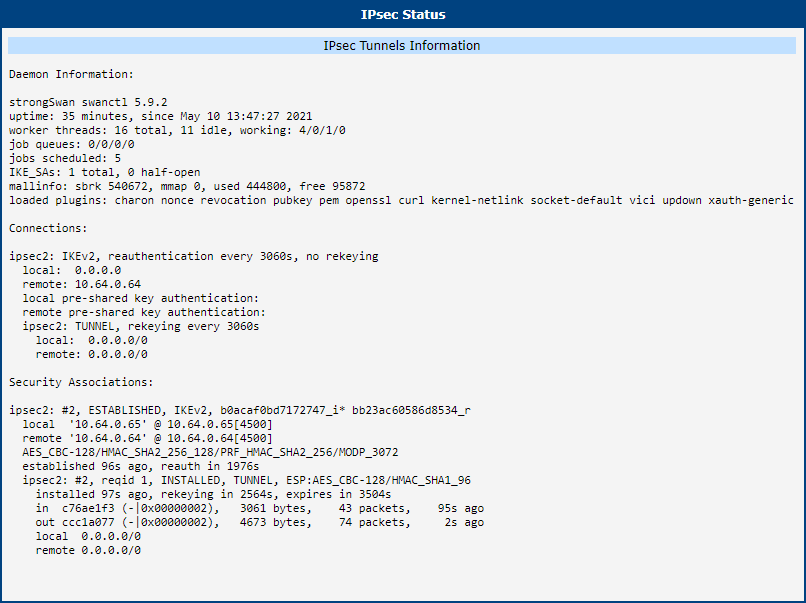
IPsec Status — Tunnel Established
Selecting the IPsec option in the Status menu of the web interface displays information about established IPsec tunnels. If a tunnel is built correctly, the screen will show ESTABLISHED and indicate that 1 up IPsec connection is active (highlighted in orange in the figure below). If the log shows "0 up," the tunnel was not created!
Examples of Use
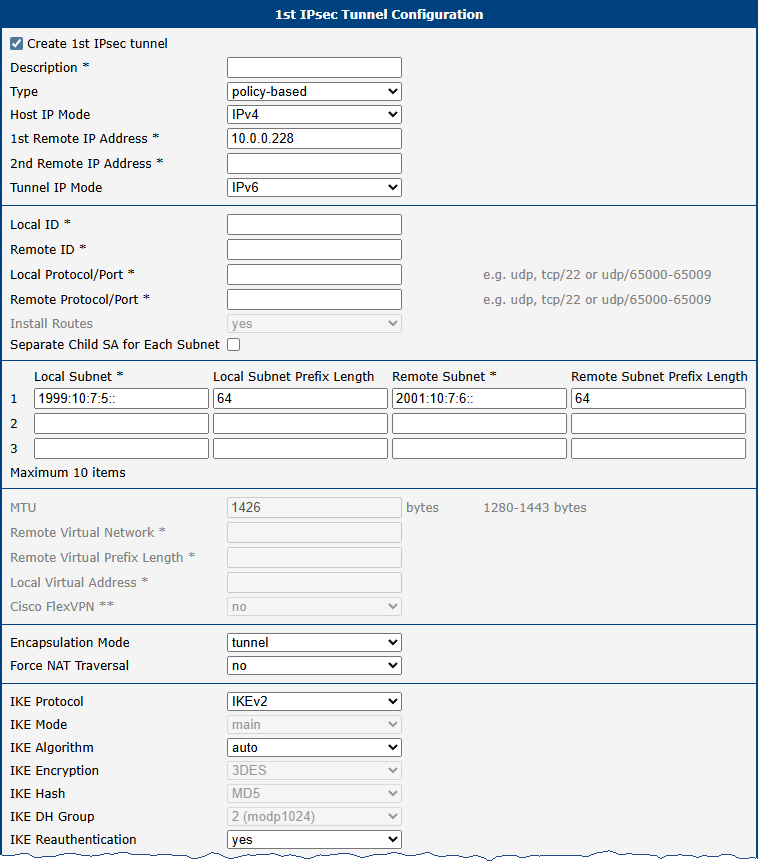
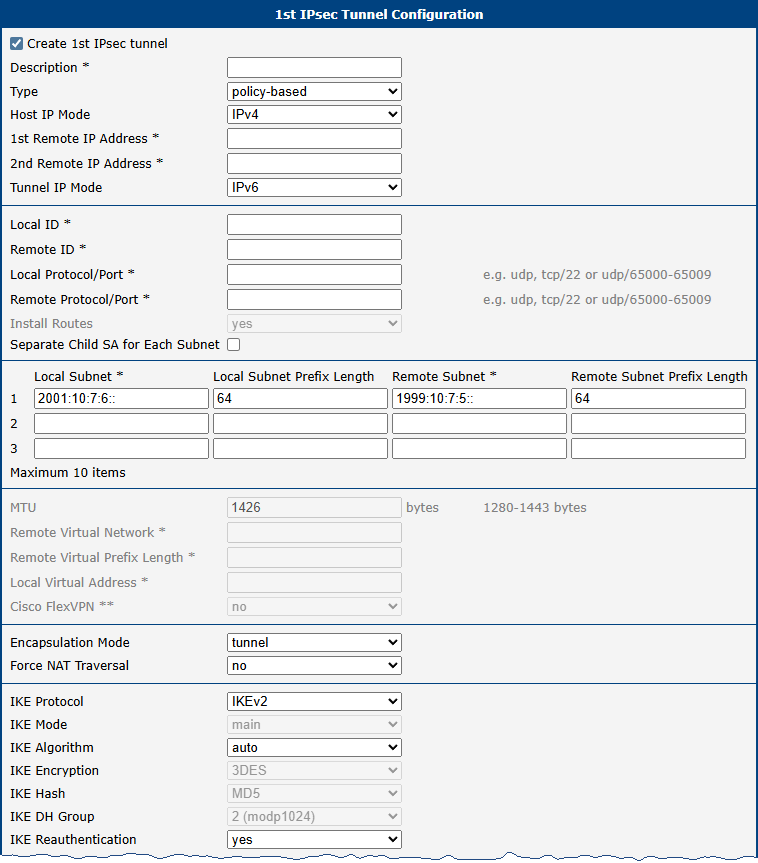
IPv6 IPsec Tunnel over IPv4 Internet

This example demonstrates the establishment of an IPsec tunnel for an IPv6 network. Two Advantech v3 routers are used—one as the IPsec initiator and one as the IPsec responder. Although both routers connect to the Internet via IPv4, the communication within the established tunnel is IPv6, thereby connecting IPv6 networks on both sides.
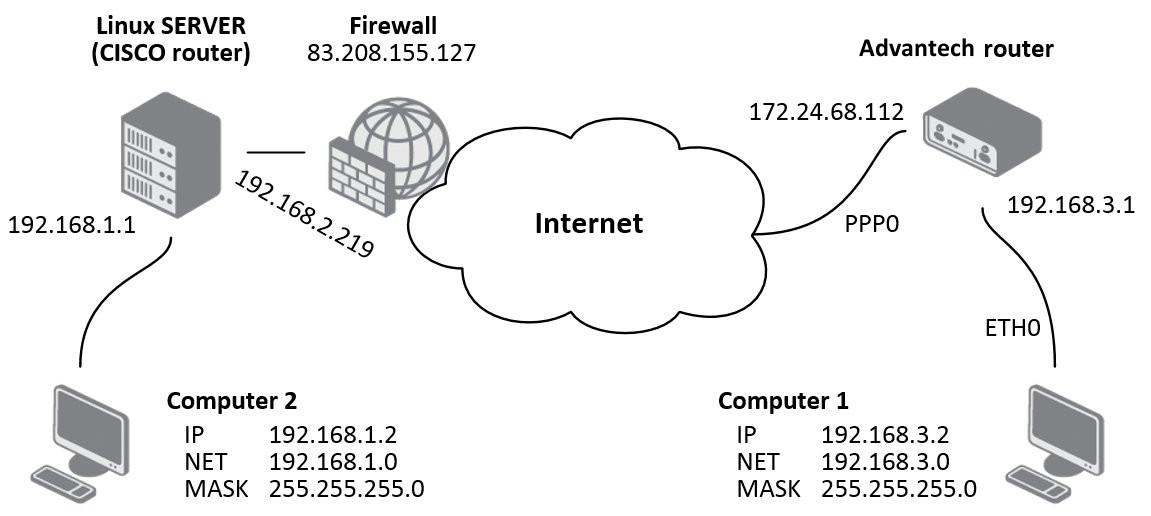
Advantech Router and Cisco Basic IPsec Tunnel Configurations
Warning
There is a known bug in Cisco ASA 5500-X Series Firewalls: IKEv2 between ASA and strongSwan (using IKEv2 with AES256/SHA256) does not work. More information is available at Cisco Bug CSCvb21927.
IKEv1 Pre-shared Key Tunnel
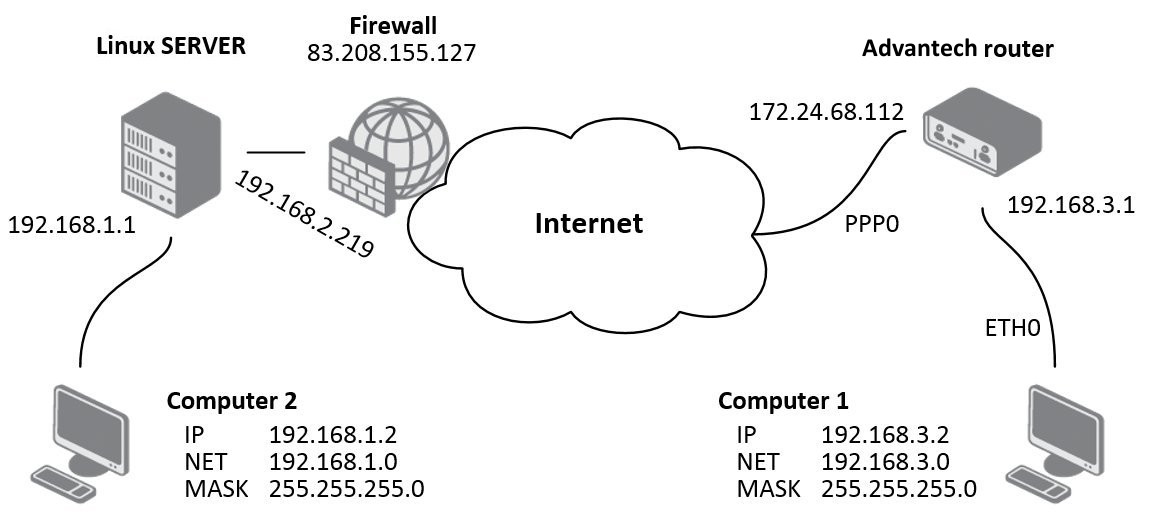
Advantech Router as IPsec Initiator
The IP address of the SIM card in the Advantech router can be static or dynamic since the IPsec tunnel is initiated by the router. In this configuration, the Linux server (Cisco router) offers IPsec tunnel services and must have a static IP address or a resolvable domain name.
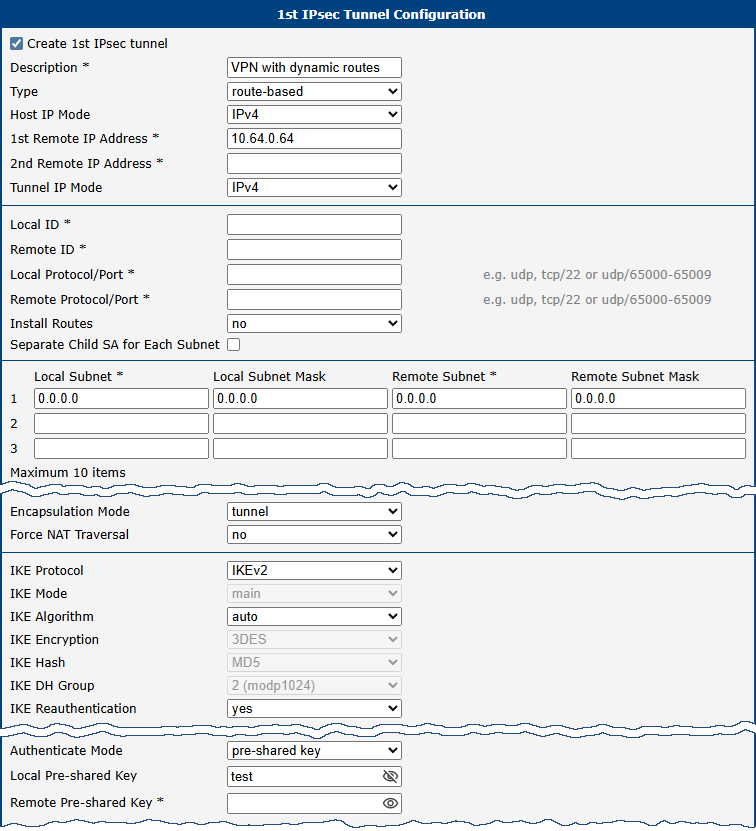
If the tunnel endpoints are directly visible, specify these items: Description, Remote IP Address, First Remote Subnet, First Remote Subnet Mask, First Local Subnet, and First Local Subnet Mask. If one end is behind a private network, enable Force NAT Traversal by setting it to yes.
If NAT Traversal is active, you must also set Remote ID to the fully qualified domain name (FQDN) of the remote device. Certificate-based authentication can also be used; in that case, Remote ID is not required.
Below is an example of IPsec tunnel settings for an initiator:
| Item | Value |
|---|---|
| Remote IP Address | 83.208.155.127 |
| Remote ID | ciscoasa@default.domain |
| First Remote Subnet | 192.168.1.0 |
| First Remote Subnet Mask | 255.255.255.0 |
| First Local Subnet | 192.168.3.0 |
| First Local Subnet Mask | 255.255.255.0 |
| Force NAT Traversal | yes |
| Pre-shared Key | test |
Other parameters may be left at their default values. If the Remote IP Address field is empty on one side of the tunnel, that side will wait for a connection rather than initiating one.
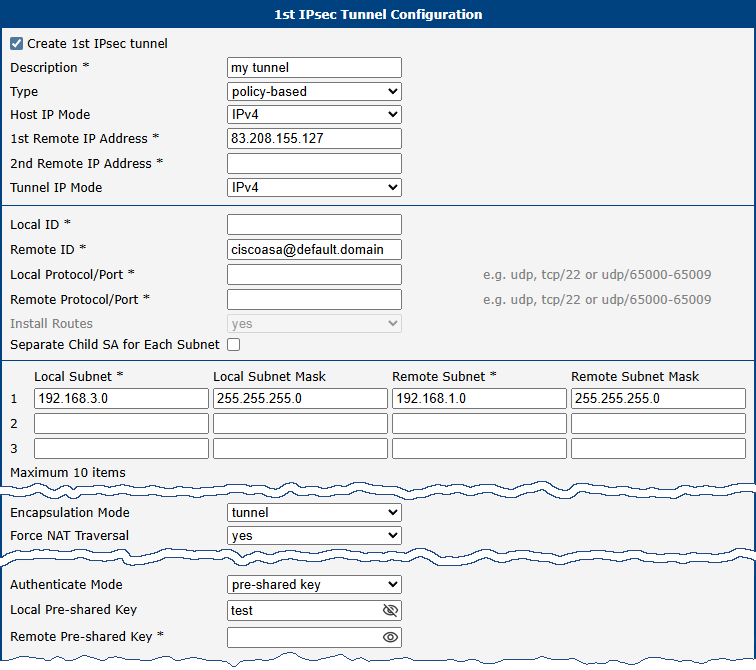
Information about the active IPsec tunnel can be viewed in the Status section of the IPsec page on the router’s web interface.
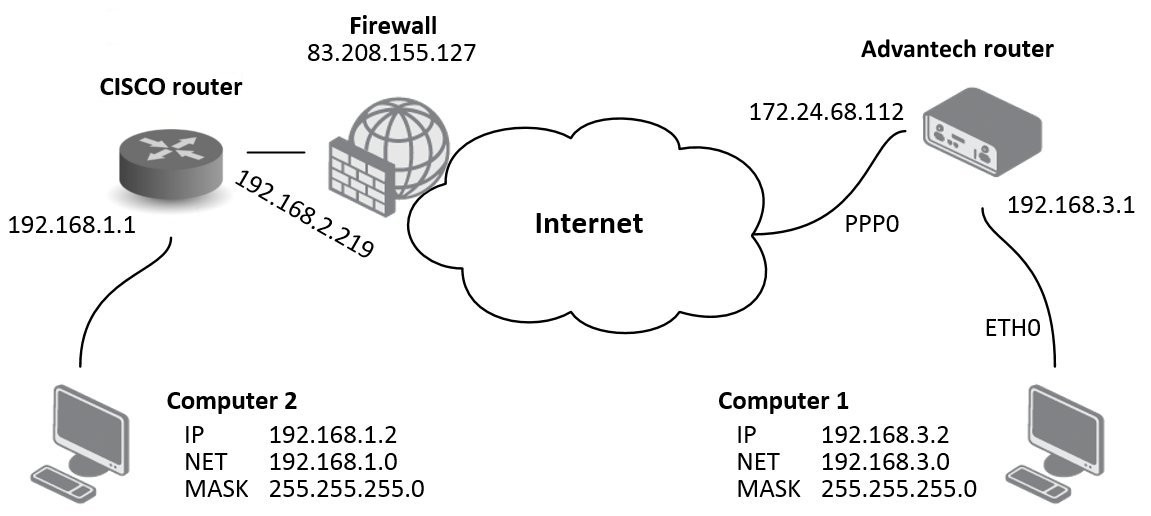
Advantech Router as IPsec Responder
When the Advantech router acts as the responder, it must have an available static IP address or use a dynamic IP (with DynDNS translation). In this case, the Linux server (Cisco router) initiates the tunnel.
If the endpoints are directly visible, specify these items: Description, First Remote Subnet, and First Remote Subnet Mask. If one end is behind a private network, enable Force NAT Traversal (set to yes).
If NAT Traversal is enabled, you must also set Remote ID (FQDN format). Certificate-based authentication is an alternative that does not require entering a Remote ID.
Below is an example of IPsec tunnel settings for a responder:
| Item | Value |
|---|---|
| Remote ID | ciscoasa@default.domain |
| First Remote Subnet | 192.168.2.219 |
| First Remote Subnet Mask | 255.255.255.255 |
| Force NAT Traversal | yes |
| Pre-shared Key | test |
Other parameters may be left at their default values. If the Remote IP Address field is empty, that side will wait for a connection rather than initiating one.
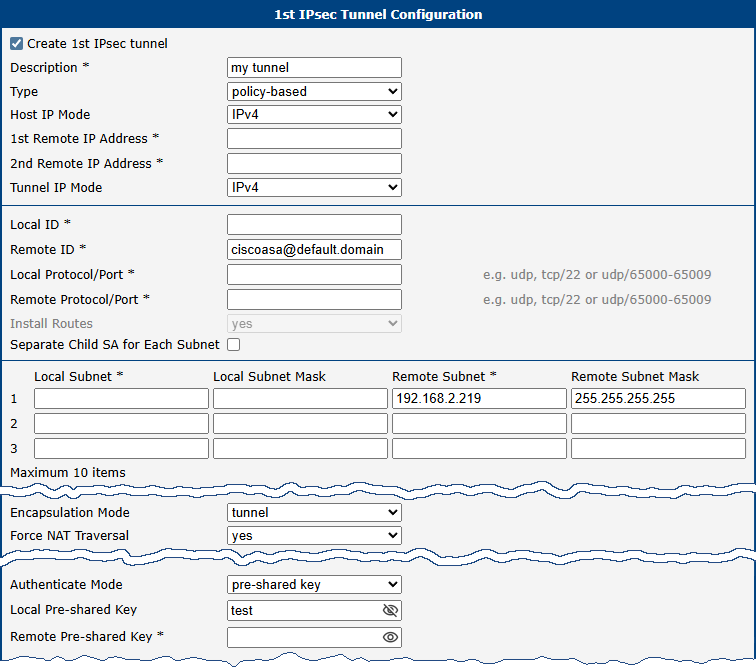
Active IPsec tunnel information is available in the Status section on the IPsec page of the router’s web interface.
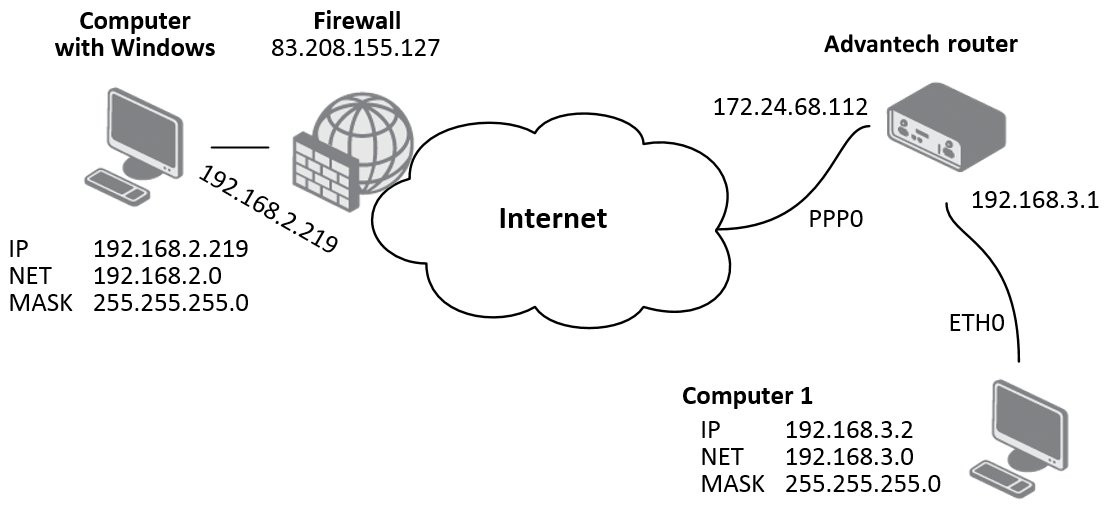
Linux Server IPsec Configuration
On the Linux server, configure the ipsec.conf and ipsec.secrets files. For example, an ipsec.conf file might look like this:
conn advantechrouter
   authby=secret
   type=tunnel
   left=83.208.155.127
   leftsubnet=192.168.1.0/24
   right=172.24.68.112
   rightsubnet=192.168.3.0/24
   ikelifetime=3600s
   keylife=3600s
   pfs=no
   auto=add
The ipsec.secrets file should contain:
83.208.155.127 172.24.68.112: PSK "test"Cisco Router as Initiator — IPsec Configuration
Warning
Cisco routers support IPsec protocol starting with IOS version 7.1.
Below is an example Cisco configuration for an IPsec tunnel as initiator:
access-list outside_2_cryptomap extended permit ip 192.168.1.0 255.255.255.0 192.168.3.0 255.255.255.0
crypto ipsec transform-set ESP-DES-MD5 esp-des esp-md5-hmac
crypto ipsec transform-set ESP-DES-SHA esp-des esp-sha-hmac
crypto ipsec transform-set ESP-3DES-SHA esp-3des esp-sha-hmac
crypto ipsec transform-set ESP-AES-128-SHA esp-aes esp-sha-hmac
crypto ipsec transform-set ESP-AES-256-MD5 esp-aes-256 esp-md5-hmac
crypto ipsec transform-set ESP-AES-256-SHA esp-aes-256 esp-sha-hmac
crypto ipsec transform-set ESP-AES-128-MD5 esp-aes esp-md5-hmac
crypto ipsec transform-set ESP-AES-192-MD5 esp-aes-192 esp-md5-hmac
crypto ipsec transform-set ESP-AES-192-SHA esp-aes-192 esp-sha-hmac
crypto ipsec transform-set UR1 esp-3des esp-none
crypto ipsec transform-set UR2 esp-des esp-none
crypto ipsec transform-set ESP-3DES-MD5 esp-3des esp-md5-hmac
crypto map outside_map 1 match address outside_2_cryptomap
crypto map outside_map 1 set connection-type answer-only
crypto map outside_map 1 set peer 172.24.68.112
crypto map outside_map 1 set transform-set ESP-3DES-MD5
crypto map outside_map interface outside
crypto isakmp identity hostname
crypto isakmp enable outside
crypto isakmp policy 10
authentication pre-share
encryption 3des
hash md5
group 2
lifetime 3600
crypto isakmp nat-traversal 20
group-policy DfltGrpPolicy attributes
banner none
wins-server none
dns-server none
dhcp-network-scope none
vpn-access-hours none
vpn-simultaneous-logins 3
vpn-idle-timeout none
vpn-session-timeout none
vpn-filter none
vpn-tunnel-protocol IPSec l2tp-ipsec webvpn
password-storage disable
ip-comp disable
re-xauth disable
group-lock none
pfs disable
ipsec-udp enable
ipsec-udp-port 10000
split-tunnel-policy tunnelall
split-tunnel-network-list none
default-domain none
tunnel-group DefaultL2LGroup ipsec-attributes
pre-shared-key *
isakmp keepalive threshold 20 retry 10
tunnel-group 172.24.68.112 type ipsec-l2l
tunnel-group 172.24.68.112 ipsec-attributes
pre-shared-key *
tunnel-group-map enable rules
tunnel-group-map default-group DefaultL2LGroup
prompt hostname contextCisco Router as Responder — IPsec Configuration
Warning
Cisco routers support IPsec protocol starting with IOS version 7.1.
Example configuration for a Cisco router acting as the responder:
access-list outside_2_cryptomap extended permit ip 192.168.1.0 255.255.255.0 192.168.3.0 255.255.255.0
crypto ipsec transform-set ESP-DES-MD5 esp-des esp-md5-hmac
crypto ipsec transform-set ESP-DES-SHA esp-des esp-sha-hmac
crypto ipsec transform-set ESP-3DES-SHA esp-3des esp-sha-hmac
crypto ipsec transform-set ESP-AES-128-SHA esp-aes esp-sha-hmac
crypto ipsec transform-set ESP-AES-256-MD5 esp-aes-256 esp-md5-hmac
crypto ipsec transform-set ESP-AES-256-SHA esp-aes-256 esp-sha-hmac
crypto ipsec transform-set ESP-AES-128-MD5 esp-aes esp-md5-hmac
crypto ipsec transform-set ESP-AES-192-MD5 esp-aes-192 esp-md5-hmac
crypto ipsec transform-set ESP-AES-192-SHA esp-aes-192 esp-sha-hmac
crypto ipsec transform-set UR1 esp-3des esp-none
crypto ipsec transform-set UR2 esp-des esp-none
crypto ipsec transform-set ESP-3DES-MD5 esp-3des esp-md5-hmac
crypto map outside_map 1 match address outside_2_cryptomap
crypto map outside_map 1 set connection-type originate-only
crypto map outside_map 1 set peer 172.24.68.112
crypto map outside_map 1 set transform-set ESP-3DES-MD5
crypto map outside_map interface outside
crypto isakmp identity hostname
crypto isakmp enable outside
crypto isakmp policy 10
  authentication pre-share
  encryption 3des
  hash md5
  group 2
  lifetime 3600
crypto isakmp nat-traversal 20

group-policy DfltGrpPolicy attributes
  banner none
  wins-server none
  dns-server none
  dhcp-network-scope none
  vpn-access-hours none
  vpn-simultaneous-logins 3
  vpn-idle-timeout none
  vpn-session-timeout none
  vpn-filter none
  vpn-tunnel-protocol IPSec l2tp-ipsec webvpn
  password-storage disable
  ip-comp disable
  re-xauth disable
  group-lock none
  pfs disable
  ipsec-udp enable
  ipsec-udp-port 10000
  split-tunnel-policy tunnelall
  split-tunnel-network-list none
  default-domain none

tunnel-group DefaultL2LGroup ipsec-attributes
  pre-shared-key *
  isakmp keepalive threshold 20 retry 10
tunnel-group 172.24.68.112 type ipsec-l2l
tunnel-group 172.24.68.112 ipsec-attributes
  pre-shared-key *
tunnel-group-map enable rules
tunnel-group-map default-group DefaultL2LGroup
prompt hostname contextDetailed Certificate Generation
This section describes how to generate certificates and keys on a Linux- or Windows-based machine.
1. Certification Authority — ca.key, ca.csr, ca.crt
- Create the working directory and initialize the certificate database:
mkdir certs; cd certs; touch index.txt - Copy the
openssl.confconfiguration file into the working directory (see Appendix A). - Generate the CA private key:
openssl genrsa -des3 -out ca.key 2048 - Generate the certificate signing request (CSR):
openssl req -verbose -new -key ca.key -out ca.csr -sha256 - Self-sign the CA certificate:
openssl ca -create_serial -extensions v3_ca -config ./openssl.conf -out ca.crt -keyfile ca.key -verbose -selfsign -md sha256 -enddate 301231235959Z -infiles ca.csr - Verify the CA certificate:
openssl x509 -noout -text -in ca.crt
2. Server Certificate — server_cisco.key, server_cisco.csr, server_cisco.crt
- Generate the server private key:
openssl genrsa -des3 -out server_cisco.key 2048 - Generate the certificate signing request (see Appendix B for an example
server_req.conf):openssl req -verbose -new -key server_cisco.key -out server_cisco.csr -config server_req.conf - Sign the server certificate using the CA:
openssl ca -config ./server_req.conf -extensions v3_req -enddate 301231235959Z -out server_cisco.crt -keyfile ca.key -infiles server_cisco.csr - Verify the server certificate:
openssl x509 -noout -text -in server_cisco.crt
3. Client Certificate — client_router.key, client_router.csr, client_router.crt
- Generate the client private key:
openssl genrsa -des3 -out client_router.key 2048 - Generate the certificate signing request (see Appendix C for an example
client_req.conf):openssl req -verbose -new -key client_router.key -out client_router.csr -config client_req.conf - Sign the client certificate using the CA:
openssl ca -config ./client_req.conf -extensions v3_req -enddate 301231235959Z -out client_router.crt -keyfile ca.key -infiles client_router.csr - Verify the client certificate:
openssl x509 -noout -text -in client_router.crt
4. Verify That the Certificates and Keys Match
The modulus hashes of the certificate and its corresponding private key must be identical:
openssl x509 -noout -modulus -in [client_router/server_cisco].crt | openssl md5
openssl rsa -noout -modulus -in [client_router/server_cisco].key | openssl md5
How to Import Certificates to Cisco
This section shows how to import the CA, server key, and server certificates to a Cisco device.
configure terminalcrypto pki trustpoint server.ciscono revocation-check enrollment terminal pem exitcrypto pki import server.cisco pem terminal password <password>paste ca certificate in PEM format paste encrypted private server key in PEM format paste server certificate in PEM format exitcrypto pki certificate map ike_v2_certmap 10subject-name co clientshow crypto pki trustpoint server.cisco statusTrustpoint server.cisco: Issuing CA certificate configured: Subject Name: e=advantech@advantech.com,cn=www.advantech.com,ou=Advantech CZ,o=Advantech, st=Czechia,c=CZ Fingerprint MD5: 20514117 B5B696F5 00375153 A9DC864C Fingerprint SHA1: 532AA251 EB16DAEC 89BB97C4 DDE0D3E3 F7A07270 Router General Purpose certificate configured: Subject Name: cn=server@cisco,ou=Advantech CZ,o=Advantech,st=Czechia,c=CZ Fingerprint MD5: 1712292C A41F36FE 56F12682 1A503577 Fingerprint SHA1: 01C99D4C 4064AFF6 123421A1 5A9F23BB 8DEA2D60 State: Keys generated ............. Yes (General Purpose, non-exportable) Issuing CA authenticated ....... Yes Certificate request(s) ..... Yes
Note: If Cisco is configured by copy/paste via terminal, private keys are not imported (only CA and cert are imported). In this case, use the following commands to import the private key:
crypto key import rsa <name> terminal <password>crypto pki trustpoint <name>rsakeypair <name>
IKEv1 Certificate-Based Tunnel
This section describes how to set up an IKEv1 certificate-based tunnel between a Cisco device (responder) and an Advantech router (initiator). See Detailed Certificate Generation for certificate generation and How to Import Certificates to Cisco for import instructions.
Cisco Device Configuration
configure terminalcrypto pki certificate map ikev1_map 10subject-name co clientcrypto isakmp policy 10encr aes 256 hash sha256 group 14crypto isakmp identity dn(identity is the DN of theserver.ciscocertificate)crypto isakmp profile ikev1ca trust-point server.cisco match certificate ikev1_map local-address <IP address>crypto map ike_v1_map 10 ipsec-isakmpset peer <IP address> set transform-set aeset set isakmp-profile ikev1 match address ike_v2_aclinterface GigabitEthernet0ip address <IP address> <mask> duplex auto speed auto no keepalive crypto map ike_v1_mapexitVerify the IKE security associations:
show crypto isakmp sa detailIPv4 Crypto ISAKMP SA C-id Local Remote I-VRF Status Encr Hash Auth DH Lifetime Cap. 2966 <IP address> <IP address> ACTIVE aes sha256 rsig 14 00:53:05 Engine-id:Conn-id = SW:966
Advantech Router Configuration
IPSEC_ENABLED=1
IPSEC_HOST_IPMODE=4
IPSEC_REMOTE_IPADDR=<IP address>
IPSEC_TUNNEL_IPMODE=4
IPSEC_REMOTE_ID=C=CZ,ST=Czechia,O=Advantech,OU=AdvantechCZ,CN=server@cisco
IPSEC_REMOTE_NETWORK=<IP address>
IPSEC_REMOTE_NETMASK=<mask>
IPSEC_LOCAL_ID=<IP address>
IPSEC_LOCAL_NETWORK=<IP address>
IPSEC_LOCAL_NETMASK=<mask>
IPSEC_IKE_PROTOCOL=ikev1
IPSEC_IKE_ALG=manual
IPSEC_IKE_ENC=aes256
IPSEC_IKE_HASH=sha2_256
IPSEC_IKE_DH=modp2048
IPSEC_ESP_ALG=manual
IPSEC_ESP_ENC=aes256
IPSEC_ESP_HASH=sha2_256
IPSEC_AUTHBY=rsa
IPSEC_CA_CERT=LS0tLS1CRUdJTiBDRVJUSUZJQ0FURS0tLS0tCk1.....
IPSEC_REMOTE_CERT=LS0tLS1CRUdJTiBDRVJUSUZJQ0FURS0tLS0.....
IPSEC_LOCAL_CERT=LS0tLS1CRUdJTiBDRVJUSUZJQ0FURS0tLS0t.....
IPSEC_LOCAL_KEY=LS0tLS1CRUdJTiBSU0EgUFJJVkFURSBLRVktL.....
IPSEC_LOCAL_PASS=password
IKEv2 Certificate-Based Tunnel
This section describes how to set up an IKEv2 certificate-based tunnel between a Cisco device (server/responder) and an Advantech router (client/initiator). See Detailed Certificate Generation and How to Import Certificates to Cisco.
Cisco Device Configuration
configure terminalcrypto ikev2 authorization policy ike_v2_policycrypto ikev2 proposal ike_v2_proposal encryption aes-cbc-256 integrity sha256 group 14crypto ikev2 policy ike_v2_policyproposal ike_v2_proposal crypto ikev2 profile ike_v2_profile match certificate ike_v2_certmap identity local [ fqdn server.cisco | email server@cisco | address XX.XX.XX.XX ] authentication remote rsa-sig authentication local rsa-sig pki trustpoint server.ciscocrypto ipsec transform-set aeset esp-aes 256 esp-sha256-hmacmode tunnelcrypto map ike_v2_map 10 ipsec-isakmpset peer <IP address> set transform-set aeset set ikev2-profile ike_v2_profile match address ike_v2_aclip access-list extended ike_v2_aclpermit ip <local subnet> 0.0.0.255 <remote subnet> 0.0.0.255interface GigabitEthernet0ip address <IP address> <mask> duplex auto speed auto no keepalive crypto map ike_v2_mapexitVerify:
show crypto ikev2 sessionandshow crypto ipsec sa
Advantech Router Configuration
IPSEC_ENABLED=1
IPSEC_HOST_IPMODE=4
IPSEC_REMOTE_IPADDR=<IP address>
IPSEC_TUNNEL_IPMODE=4
IPSEC_REMOTE_ID=server.cisco
IPSEC_REMOTE_NETWORK=<IP address>
IPSEC_REMOTE_NETMASK=<mask>
IPSEC_LOCAL_ID=client.router
IPSEC_LOCAL_NETWORK=<IP address>
IPSEC_LOCAL_NETMASK=<mask>
IPSEC_IKE_PROTOCOL=ikev2
IPSEC_IKE_ALG=manual
IPSEC_IKE_ENC=aes256
IPSEC_IKE_HASH=sha2_256
IPSEC_IKE_DH=modp2048
IPSEC_IKE_REAUTH=1
IPSEC_ESP_ALG=manual
IPSEC_ESP_ENC=aes256
IPSEC_ESP_HASH=sha2_256
IPSEC_AUTHBY=rsa
IPSEC_CA_CERT=LS0tLS1CRUdJTiBDRVJUSUZJQ0FURS0tLS0tCk1.....
IPSEC_REMOTE_CERT=LS0tLS1CRUdJTiBDRVJUSUZJQ0FURS0tLS0.....
IPSEC_LOCAL_CERT=LS0tLS1CRUdJTiBDRVJUSUZJQ0FURS0tLS0t.....
IPSEC_LOCAL_KEY=LS0tLS1CRUdJTiBSU0EgUFJJVkFURSBLRVktL.....
IPSEC_LOCAL_PASS=password
IKEv2 with Asymmetric Pre-Shared Key
This section describes how to set up an IKEv2 tunnel with an asymmetric pre-shared key between a Cisco device and an Advantech router. Each side authenticates using a different pre-shared key: the Cisco device uses cisco as its local key and expects router from the remote peer, while the Advantech router uses router as its local key and expects cisco from the remote peer.
Cisco Device Configuration
aaa new-model
aaa authorization network FLEXVPN-AAA-AUTHORIZATION local

crypto ikev2 authorization policy ike_v2_policy
crypto ikev2 authorization policy IKE-AUTH-POLICY
 pool VPN-SPLIT-TUNNEL-ADDRESSES
 route set interface

crypto ikev2 proposal ike_v2_proposal
 encryption aes-gcm-256
 prf sha256
 group 21

crypto ikev2 policy ike_v2_policy
 proposal ike_v2_proposal

crypto ikev2 profile ike_v2_profile
 match identity remote any
 identity local fqdn server.cisco
 authentication remote pre-share key router
 authentication local pre-share key cisco
 aaa authorization group psk list FLEXVPN-AAA-AUTHORIZATION IKE-AUTH-POLICY
 virtual-template 20

crypto ipsec transform-set aes-gcm esp-gcm 256
 mode transport

crypto ipsec profile FlexVPN
 set security-policy limit 100
 set transform-set aes-gcm
 set pfs group21
 set ikev2-profile ike_v2_profile
 responder-only

interface Loopback2
 ip address 172.16.100.1 255.255.255.255

interface GigabitEthernet0/0/0
 ip address 10.40.29.128 255.255.252.0
 ip nat outside
 ip access-group 101 in

interface Virtual-Template20 type tunnel
 ip unnumbered Loopback2
 no ip redirects
 tunnel source 10.40.29.128
 tunnel mode ipsec ipv4
 tunnel protection ipsec profile FlexVPN

ip local pool VPN-SPLIT-TUNNEL-ADDRESSES 172.16.100.2 172.16.100.200
ip route 0.0.0.0 0.0.0.0 10.40.30.1

ip access-list extended FlexVPN_ACL
 permit ip 192.168.202.0 0.0.0.255 192.168.133.0 0.0.0.255
access-list 101 permit ip any any
access-list 101 permit esp any any
access-list 101 permit icmp any any
Advantech Router Configuration
IPSEC_ENABLED=1
IPSEC_DESCRIPTION="FlexVPN with asym. PSK"
IPSEC_TYPE=route
IPSEC_HOST_IPMODE=4
IPSEC_REMOTE_IPADDR=10.40.29.128
IPSEC_TUNNEL_IPMODE=4
IPSEC_REMOTE_ID=server.cisco
IPSEC_LOCAL_ID=client@router
IPSEC_INSTALL_ROUTES=0
IPSEC_REMOTE_NETWORK=0.0.0.0
IPSEC_REMOTE_NETMASK=0.0.0.0
IPSEC_LOCAL_NETWORK=0.0.0.0
IPSEC_LOCAL_NETMASK=0.0.0.0
IPSEC_MTU=1426
IPSEC_LOCAL_VIRTUAL_IP=0.0.0.0
IPSEC_CISCO_FLEXVPN=1
IPSEC_IKE_PROTOCOL=ikev2
IPSEC_IKE_ALG=manual
IPSEC_IKE_ENC=aes256gcm128
IPSEC_IKE_HASH=sha2_256
IPSEC_IKE_DH=ecp521
IPSEC_IKE_REAUTH=1
IPSEC_ESP_ALG=manual
IPSEC_ESP_ENC=aes256gcm128
IPSEC_PFS=1
IPSEC_PFS_DH=ecp521
IPSEC_KEY_LIFE=3600
IPSEC_IKE_LIFE=3600
IPSEC_REKEY_MARGIN=540
IPSEC_REKEY_FUZZ=100
IPSEC_DPD_DELAY=10
IPSEC_DPD_TIMEOUT=20
IPSEC_AUTHBY=secret
IPSEC_PSK=router
IPSEC_REMOTE_PSK=cisco
Windows Computer IPsec Tunnel with Advantech Router
This example uses policy-based mode. For a comparison of both VPN modes, see Policy-based vs. Route-based VPN.
The recommended IPsec client for Windows is NCP Secure Entry Client, which is the basis for the following configuration description.
Windows IPsec Configuration — NCP Secure Entry Client

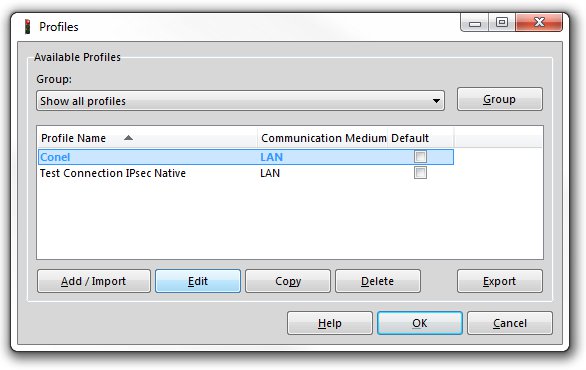
First, create a new profile for the IPsec tunnel. Select the Configuration tab and then select Profiles.
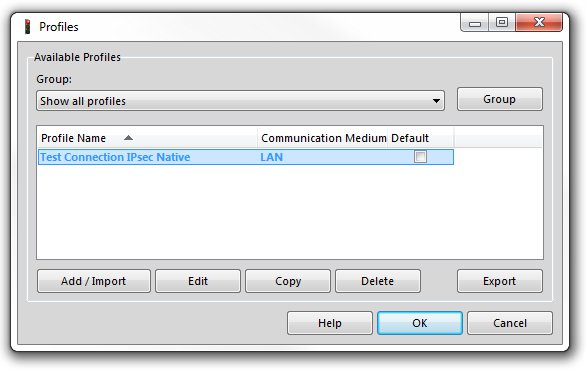
Click Add/Import to create a new profile. On the second screen, enter a profile name. The remaining screens can be confirmed with Next (or Finish on the last screen); configure all other settings later. To configure the IPsec tunnel, select the profile and click Edit.
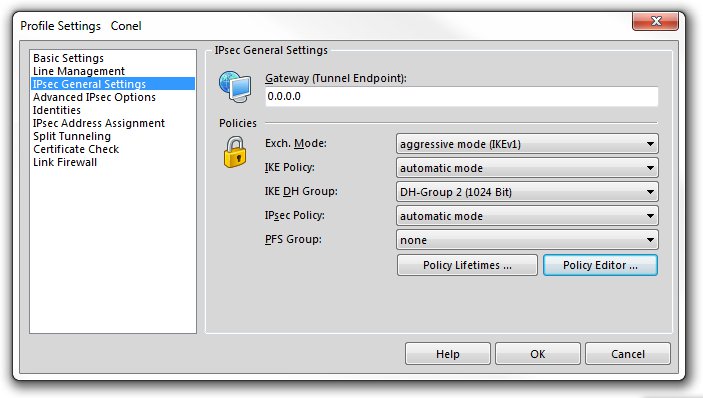
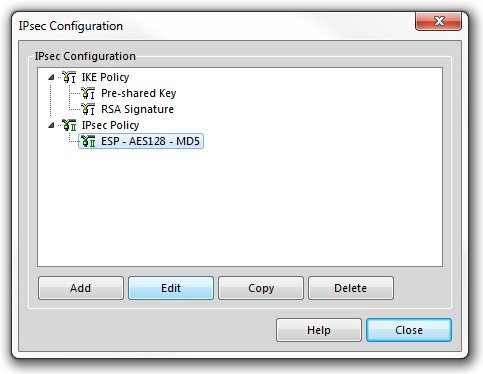
Select IPsec General Settings in the left-hand menu, then click the Policy Editor... button on the right.
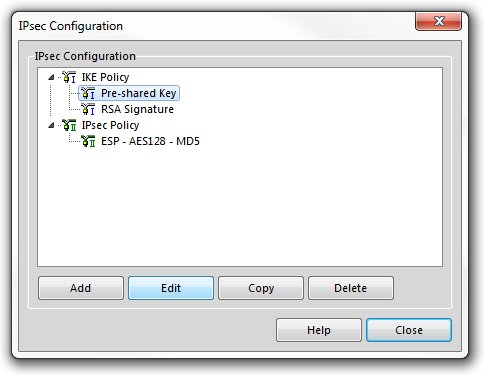
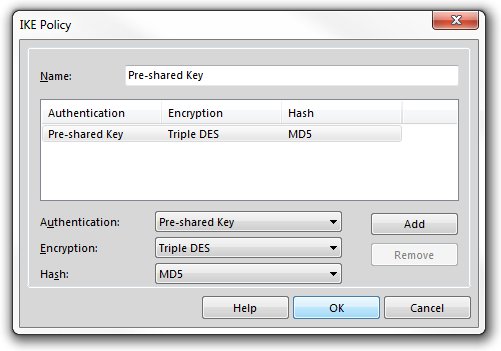
In the Policy Editor window, select the Pre-shared Key item under the IKE Policy section and click Edit.
In the window that opens, select the desired encryption and hash algorithms, then confirm by clicking OK.
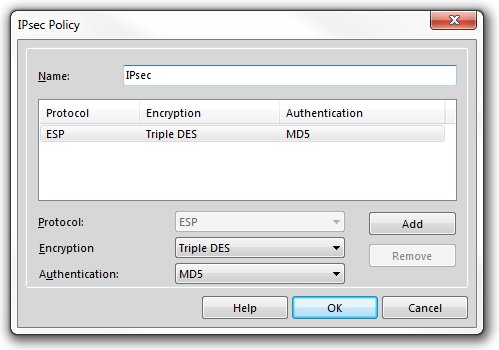
Next, select the ESP - AES128 - MD5 item in the IPsec Policy section and click Edit.
In the new window, enter the desired policy name and select the encryption and hash algorithms. Confirm by clicking OK.
Return to the main IPsec General Settings window and set the IKE Policy and IPsec Policy fields according to the configuration defined in the previous steps. Set IKE DH Group to DH-Group 2 (1024 bit).

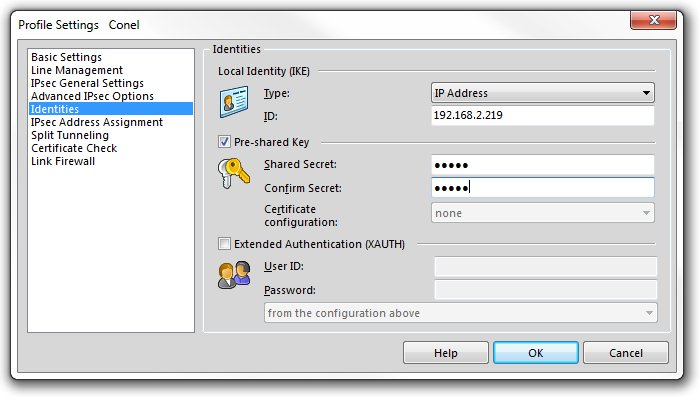
Select Identities in the left-hand menu and fill in the configuration form as shown below.
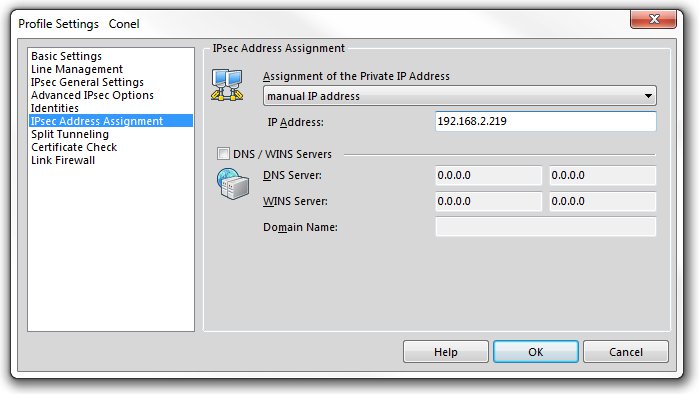
The same IP address must also be entered on the IPsec Address Assignment page.
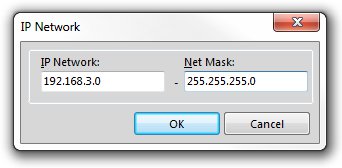
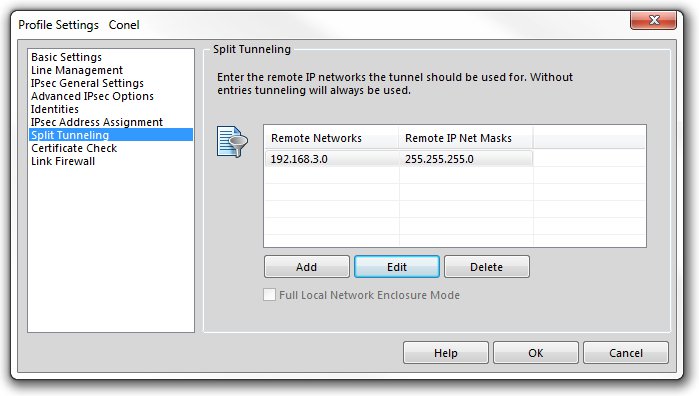
On the Split Tunneling page, click Add and enter the IP address of the subnet behind the Advantech router and the corresponding subnet mask. Confirm by clicking OK.
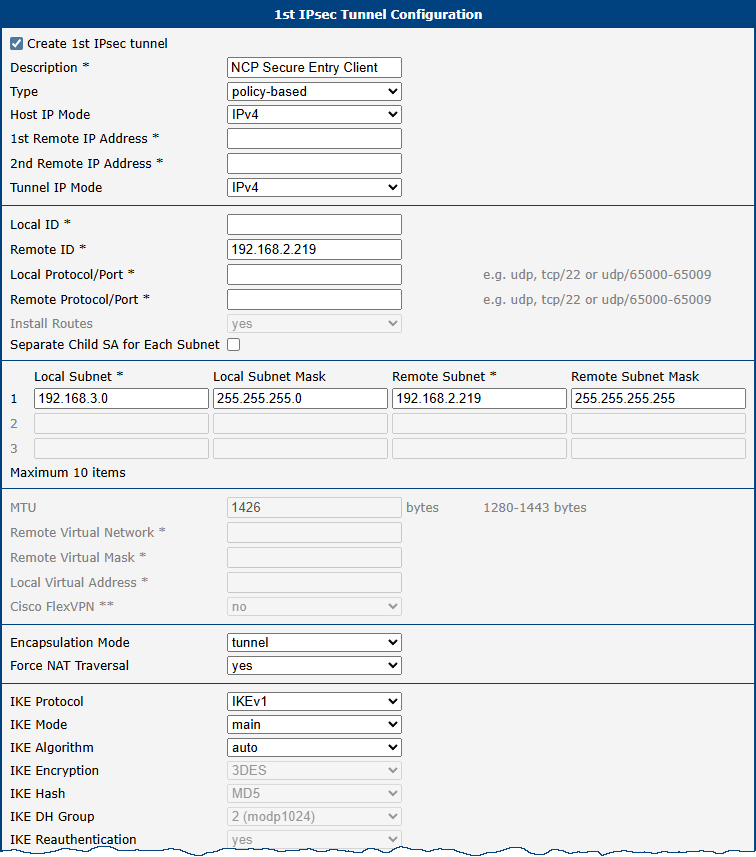
Advantech Router IPsec Configuration
Advanced IPsec Configurations
This section covers advanced IPsec configuration scenarios: Multiple Clients, Static Routes, and Dynamic Routing. The examples use route-based mode, but all scenarios are equally applicable to policy-based mode when the Enabled Installing Routes option is used.
For further background, refer to the Route-based VPNs page on the strongSwan website.
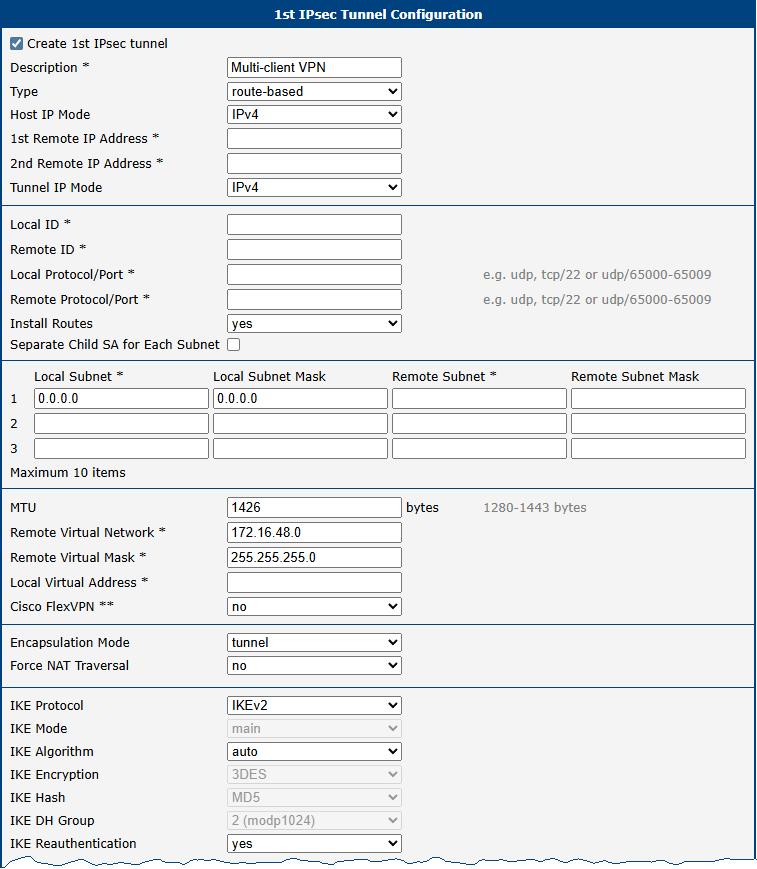
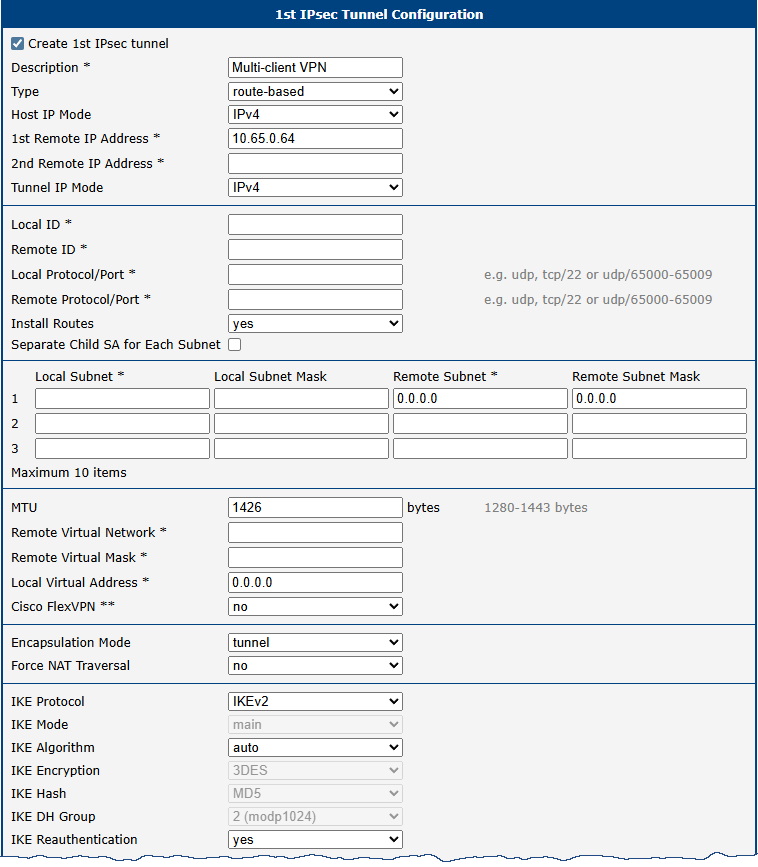
Multiple Clients
This example demonstrates the configuration of multiple IPsec clients, where one Advantech router acts as the server and assigns IP addresses to all clients. For more information, see the Virtual IP strongSwan webpage.


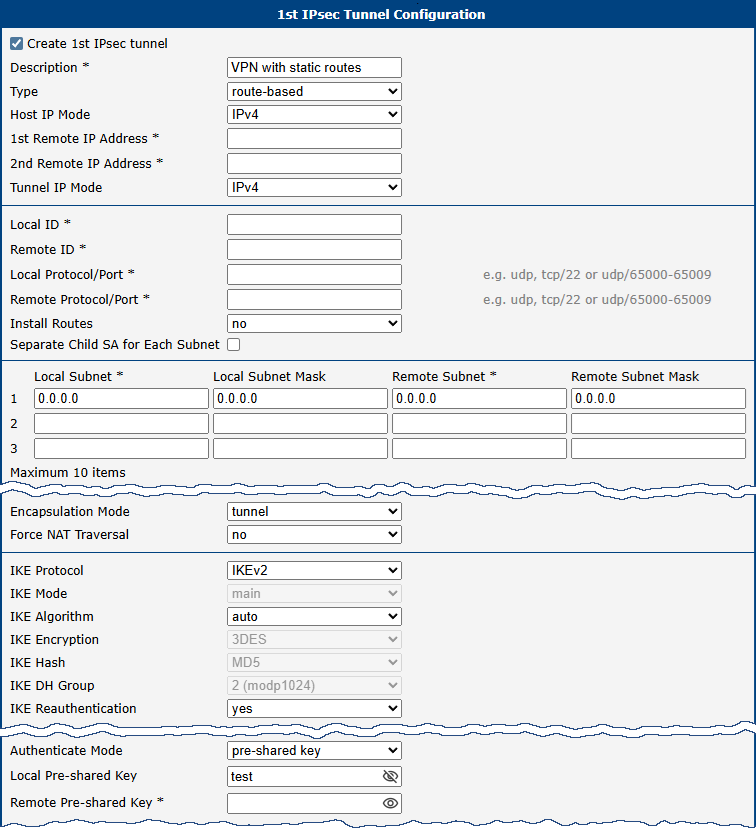
Static Routes
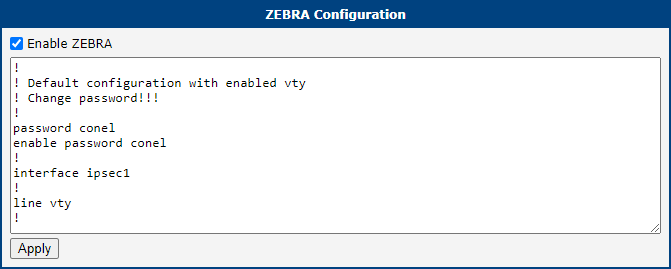
This example demonstrates the configuration of an IPsec server and client where routes are installed statically by the FRR/zebra and FRR/staticd applications configured in the FRR Router App, which must be installed and configured on both routers. For more information, see the FRRouting User Guide.


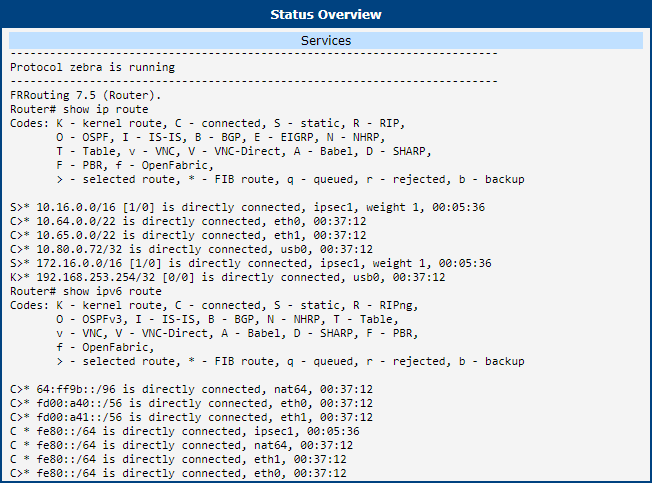
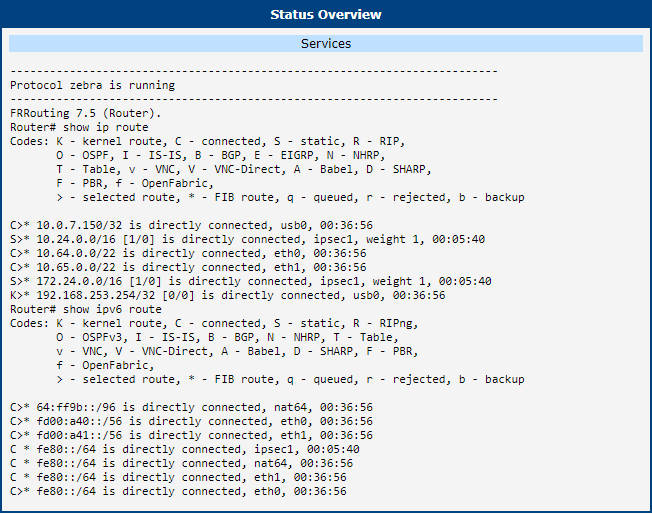


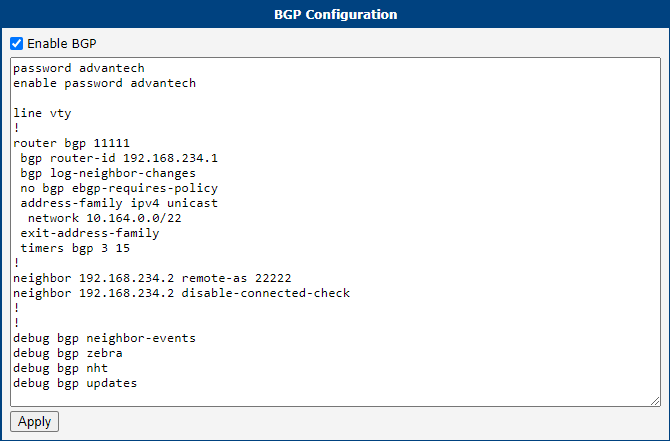
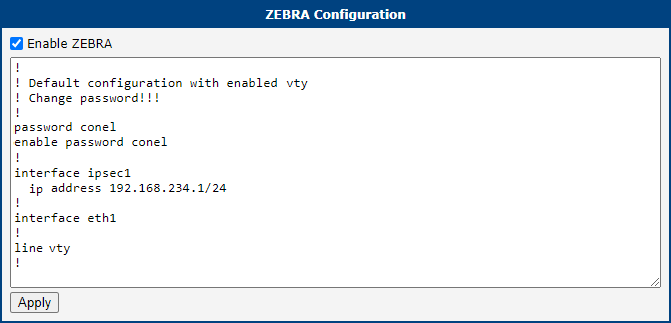
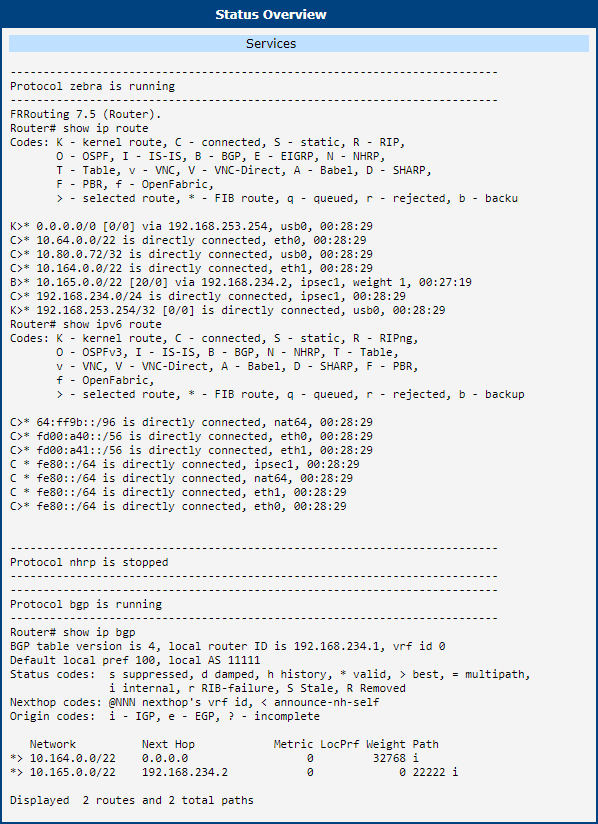
Dynamic Routing
This example demonstrates the configuration of two routers where routes are installed dynamically by the FRR/zebra and FRR/BGP applications configured in the FRR Router App, which must be installed and configured on both routers. For more information, see the FRRouting User Guide.


Known Issues
Several Subnets in one CHILD_SA
If you use IKEv2, some peers (for example, devices by Checkpoint, Cisco, and Fortinet) may not support multiple subnets within a single CHILD_SA. (For further details, see the Interoperability page.)
Tips
If you are using strongSwan with a different IPsec solution, consult Interoperability before contacting technical support.
Appendices
Appendix A: openssl.conf
Appendix A: openssl.conf
Below is an example OpenSSL configuration file used primarily for generating certificate requests.
#
# OpenSSL example configuration file.
# This is mostly being used for generation of certificate requests.
#

# Note that you can include other files from the main configuration
# file using the .include directive.
#.include filename

# This definition stops the following lines choking if HOME isn't
# defined.
HOME			= .
RANDFILE		= $ENV::HOME/.rnd

# Extra OBJECT IDENTIFIER info:
#oid_file		= $ENV::HOME/.oid
oid_section		= new_oids

# To use this configuration file with the "-extfile" option of the
# "openssl x509" utility, name here the section containing the
# X.509v3 extensions to use:
# extensions		=
# (Alternatively, use a configuration file that has only
# X.509v3 extensions in its main [= default] section.)

[ new_oids ]

# We can add new OIDs in here for use by 'ca', 'req' and 'ts'.
# Add a simple OID like this:
# testoid1=1.2.3.4
# Or use config file substitution like this:
# testoid2=${testoid1}.5.6

# Policies used by the TSA examples.
tsa_policy1 = 1.2.3.4.1
tsa_policy2 = 1.2.3.4.5.6
tsa_policy3 = 1.2.3.4.5.7

####################################################################
[ ca ]
default_ca	= CA_default		# The default ca section

####################################################################
[ CA_default ]

dir		= ./		# Where everything is kept
certs		= $dir		# Where the issued certs are kept
crl_dir		= $dir		# Where the issued crl are kept
database	= $dir/index.txt	# database index file.
#unique_subject	= no			# Set to 'no' to allow creation of
					# several certs with same subject.
new_certs_dir	= $dir		# default place for new certs.

certificate	= $dir/ca.crt 	# The CA certificate
serial		= $dir/serial 		# The current serial number
crlnumber	= $dir/crlnumber	# the current crl number
					# must be commented out to leave a V1 CRL
crl		= $dir/crl.pem 		# The current CRL
private_key	= $dir/private/ca.key# The private key
RANDFILE	= $dir/private/.rand	# private random number file

x509_extensions	= usr_cert		# The extensions to add to the cert

# Comment out the following two lines for the "traditional"
# (and highly broken) format.
name_opt 	= ca_default		# Subject Name options
cert_opt 	= ca_default		# Certificate field options

# Extension copying option: use with caution.
# copy_extensions = copy

# Extensions to add to a CRL. Note: Netscape communicator chokes on V2 CRLs
# so this is commented out by default to leave a V1 CRL.
# crlnumber must also be commented out to leave a V1 CRL.
# crl_extensions	= crl_ext

default_days	= 365			# how long to certify for
default_crl_days= 30			# how long before next CRL
default_md	= default		# use public key default MD
preserve	= no			# keep passed DN ordering

# A few different ways of specifying how similar the request should look.
policy		= policy_match

# For the CA policy
[ policy_match ]
countryName		= match
stateOrProvinceName	= match
organizationName	= match
organizationalUnitName	= optional
commonName		= supplied
emailAddress		= optional

# For the 'anything' policy
[ policy_anything ]
countryName		= optional
stateOrProvinceName	= optional
localityName		= optional
organizationName	= optional
organizationalUnitName	= optional
commonName		= supplied
emailAddress		= optional

####################################################################
[ req ]
default_bits		= 2048
default_keyfile 	= privkey.pem
distinguished_name	= req_distinguished_name
attributes		= req_attributes
x509_extensions	= v3_ca	# The extensions to add to the self signed cert

# Passwords for private keys; if not present, they will be prompted.
# input_password = secret
# output_password = secret

# This sets a mask for permitted string types.
string_mask = utf8only

[ req_distinguished_name ]
countryName			= Country Name (2 letter code)
countryName_default		= AU
countryName_min			= 2
countryName_max			= 2

stateOrProvinceName		= State or Province Name (full name)
stateOrProvinceName_default	= Some-State

localityName			= Locality Name (eg, city)

0.organizationName		= Organization Name (eg, company)
0.organizationName_default	= Internet Widgits Pty Ltd

organizationalUnitName		= Organizational Unit Name (eg, section)

commonName			= Common Name (e.g. server FQDN or YOUR name)
commonName_max			= 64

emailAddress			= Email Address
emailAddress_max		= 64

[ req_attributes ]
challengePassword		= A challenge password
challengePassword_min		= 4
challengePassword_max		= 20

unstructuredName		= An optional company name

[ usr_cert ]
basicConstraints=CA:FALSE
nsComment			= "OpenSSL Generated Certificate"
subjectKeyIdentifier=hash
authorityKeyIdentifier=keyid,issuer

[ v3_req ]
basicConstraints = CA:FALSE
keyUsage = nonRepudiation, digitalSignature, keyEncipherment
subjectAltName = @alt_names

[alt_names]
IP =  <IP address>

[ v3_ca ]
subjectKeyIdentifier=hash
authorityKeyIdentifier=keyid:always,issuer
basicConstraints = critical,CA:true

[ crl_ext ]
authorityKeyIdentifier=keyid:always

[ proxy_cert_ext ]
basicConstraints=CA:FALSE
nsComment			= "OpenSSL Generated Certificate"
subjectKeyIdentifier=hash
authorityKeyIdentifier=keyid,issuer

proxyCertInfo=critical,language:id-ppl-anyLanguage,pathlen:3,policy:foo

####################################################################
[ tsa ]
default_tsa = tsa_config1

[ tsa_config1 ]
dir		= ./demoCA
serial		= $dir/tsaserial
crypto_device	= builtin
signer_cert	= $dir/tsacert.pem
certs		= $dir/cacert.pem
signer_key	= $dir/private/tsakey.pem
signer_digest  = sha256
default_policy	= tsa_policy1
other_policies	= tsa_policy2, tsa_policy3
digests     = sha1, sha256, sha384, sha512
accuracy	= secs:1, millisecs:500, microsecs:100
clock_precision_digits  = 0
ordering		= yes
tsa_name		= yes
ess_cert_id_chain	= no
ess_cert_id_alg		= sha1
Appendix B: server_req.conf
Appendix B: server_req.conf
Below is an example configuration file for a server certificate request.
####################################################################
[ ca ]
default_ca	= CA_default		# The default ca section

####################################################################
[ CA_default ]

dir		= ./		# Where everything is kept
certs		= $dir		# Where the issued certs are kept
crl_dir		= $dir		# Where the issued crl are kept
database	= $dir/index.txt	# database index file.
new_certs_dir	= $dir		# default place for new certs.

certificate	= $dir/ca.crt 	# The CA certificate
serial		= $dir/serial 		# The current serial number
crlnumber	= $dir/crlnumber	# the current crl number
crl		= $dir/crl.pem 		# The current CRL
private_key	= $dir/private/ca.key
RANDFILE	= $dir/private/.rand
name_opt 	= ca_default
cert_opt 	= ca_default
default_days	= 365
default_crl_days= 30
default_md	= default
preserve	= no
policy		= policy_match

[ policy_match ]
countryName		= match
stateOrProvinceName	= match
organizationName	= match
organizationalUnitName	= optional
commonName		= supplied
emailAddress		= optional

[req]
distinguished_name = server
req_extensions = v3_req
prompt = no

[server]
C = CZ
ST = Czechia
L = Usti
O = Advantech
OU = Advantech CZ
CN = server@cisco

[v3_req]
extendedKeyUsage = serverAuth
subjectAltName = @alt_names

[alt_names]
IP = 85.207.4.118
DNS = server.cisco
email = server@cisco
Appendix C: client_req.conf
Appendix C: client_req.conf
Below is an example configuration file for a client certificate request.
####################################################################
[ ca ]
default_ca	= CA_default		# The default ca section

####################################################################
[ CA_default ]

dir		= ./
certs		= $dir
crl_dir		= $dir
database	= $dir/index.txt
new_certs_dir	= $dir
certificate	= $dir/ca.crt
serial		= $dir/serial
crlnumber	= $dir/crlnumber
crl		= $dir/crl.pem
private_key	= $dir/private/ca.key
RANDFILE	= $dir/private/.rand
name_opt 	= ca_default
cert_opt 	= ca_default
default_days	= 365
default_crl_days= 30
default_md	= default
preserve	= no
policy		= policy_match

[ policy_match ]
countryName		= match
stateOrProvinceName	= match
organizationName	= match
organizationalUnitName	= optional
commonName		= supplied
emailAddress		= optional

[req]
distinguished_name = client
req_extensions = v3_req
prompt = no

[client]
C = CZ
ST = Czechia
L = Usti
O = Advantech
OU = Advantech CZ
CN = client@router

[v3_req]
extendedKeyUsage = serverAuth
subjectAltName = @alt_names

[alt_names]
IP = 62.141.23.118
DNS = client.router
email = client@router