OpenVPN Tunnel
OpenVPN protocol
OpenVPN (Open Virtual Private Network) is a means of interconnecting several computers through an untrusted public network. It is easy to set up a situation where connected computers communicate as if they were on a single, closed, and trusted private network. Using a client-server architecture, OpenVPN can establish a direct connection between computers behind NAT without any special NAT configuration. It offers several methods for authenticating clients—using a pre-shared key, a certificate, or a username and password.
OpenVPN uses the officially assigned port 1194 (the default in newer versions). It offers two types of network interfaces: the universal TUN and TAP drivers. These enable the creation of an IP tunnel (TUN) at the third layer of the ISO/OSI model or a layer‑2 Ethernet TAP tunnel, which can transmit any type of data. OpenVPN uses common network protocols (TCP and UDP) and thus provides an alternative to the IPsec protocol.
Compatibility Notes
In firmware version 6.4.0, the OpenVPN software was updated from version 2.4.12 to 2.6.6. Additionally, the OpenSSL library was upgraded from version 1.1.1—which will no longer be supported after September 11, 2023—to version 3.0.11. These updates entail the following compatibility notes:
- If you are using OpenVPN version 2.4 on the remote tunnel side, you may encounter issues. We recommend upgrading these clients to OpenVPN version 2.6 or newer. For older versions, consider adding a specific configuration in Extra Options, such as
--cipher AES-256-CBC. If unsure, use the AES-256-CBC cipher on the remote tunnel side. - A general overview of deprecated features is available on the Deprecated Options in OpenVPN website.
- For details on expected behavior in OpenVPN Cipher Negotiation between common configurations of OpenVPN servers and clients, visit the OpenVPN Cipher Negotiation page.
- Option --comp-lzo: Compression is not recommended and should be avoided. This option is deprecated and, starting from version 2.5, will only enable compression framing (not the actual compression) to allow receipt of compressed packets.
- There are two solutions if you encounter the error "OpenSSL: error:0A00018E:SSL routines::ca md too weak":
- Secure Option: Regenerate the certificate using the Signature Hash Algorithm SHA256 or better. OpenSSL 3's default settings are sufficient. (See the certificate creation section for details.)
- Less Secure Option: Add the following configuration in Extra Options:
--tls-cipher "DEFAULT:@SECLEVEL=0"
Restrictions in Advantech routers
- Routers allow the creation of up to four OpenVPN tunnels simultaneously.
- Routers support both TUN and TAP adapters.
- Routers cannot be used as a multiclient server.
Configuration of OpenVPN tunnel
Caution
The OpenVPN server must have a known IP address accessible by the client(s).
The OpenVPN tunnel enables a protected connection of four LANs into one network. To open the OpenVPN tunnel configuration page, click OpenVPN in the Configuration section of the main menu. The menu expands to display four separate configuration pages: 1st Tunnel, 2nd Tunnel, 3rd Tunnel, and 4th Tunnel. A description of all items is provided in the table below.
Tips
In v3, v4, and v4i routers, both IPv4 and IPv6 tunnels are supported. In v2 routers, only IPv4 tunnels are supported.
| Item | Description |
|---|---|
| Create 1st/2nd/3rd/4th OpenVPN tunnel | If enabled, the tunnel is activated. |
| Description | Specifies the description or name of the tunnel. |
| Interface Type | TAP operates at the Ethernet level (layer 2) and acts as a switch, whereas TUN works at the network level (layer 3) and routes packets over the VPN. TAP is bridging, whereas TUN is routing. • TUN — Choose the TUN mode. • TAP — Choose the TAP mode (ensure you configure the bridge on the Ethernet interface). |
| Protocol | Specifies the communication protocol. • UDP — OpenVPN communicates using UDP. • TCP server — OpenVPN communicates using TCP in server mode. • TCP client — OpenVPN communicates using TCP in client mode. • UDPv6 — OpenVPN communicates using UDP over IPv6. • TCPv6 server — OpenVPN communicates using TCP over IPv6 in server mode. • TCPv6 client — OpenVPN communicates using TCP over IPv6 in client mode. |
| UDP/TCP port | Specifies the port for the respective protocol (UDP or TCP). |
| 1st Remote IP Address | Specifies the first IPv4, IPv6 address, or domain name of the opposite side of the tunnel. |
| 2nd Remote IP Address | Specifies the second IPv4, IPv6 address, or domain name of the opposite side of the tunnel. |
| Remote Subnet | IPv4 address of a network behind the opposite side of the tunnel. |
| Remote Subnet Mask | IPv4 subnet mask of the network behind the tunnel. |
| Redirect Gateway | Rewrites the default gateway. All packets are then sent to this gateway via the tunnel, if no other default gateway is specified. |
| Local Interface IP Address | Specifies the IPv4 address of a local interface. For proper routing, it is recommended to enter any IPv4 address from the local range, even when using an IPv6 tunnel only. |
| Remote Interface IP Address | Specifies the IPv4 address of the interface on the opposite side of the tunnel. For proper routing, it is recommended to enter any IPv4 address from the local range, even when using an IPv6 tunnel only. |
| Remote IPv6 Subnet | IPv6 address of the remote IPv6 network. Equivalent to Remote Subnet in the IPv4 section. |
| Remote IPv6 Prefix | IPv6 prefix of the remote IPv6 network. Equivalent to Remote Subnet Mask in the IPv4 section. |
| Local Interface IPv6 Address | Specifies the IPv6 address of a local interface. |
| Remote Interface IPv6 Address | Specifies the IPv6 address of the interface on the opposite side of the tunnel. |
| Ping Interval | Time interval after which the router sends a message to the opposite side to verify the tunnel’s existence. |
| Ping Timeout | Time interval the router waits for a response from the opposite side. For proper tunnel verification, set Ping Timeout greater than Ping Interval. |
| Renegotiate Interval | Specifies the reauthorization period of the tunnel. This parameter can only be set when Authenticate Mode is username/password or X.509 certificate. After this period, the router changes the tunnel encryption to maintain security. |
| Max Fragment Size | Maximum size of a sent packet. |
| Compression | Compression for data transmission: • none — No compression is used. • LZO — Lossless compression is used. Deprecated; scheduled for removal! |
| NAT Rules | Activates or deactivates NAT rules for the tunnel: • not applied — NAT rules are not applied. • applied — NAT rules are applied to the tunnel. |
| Authenticate Mode | Specifies the authentication mode: • none — No authentication. Deprecated; scheduled for removal! • Pre-shared secret — Uses a shared key for both sides. Deprecated; scheduled for removal! • Username/password — Uses a CA certificate, username, and password. Deprecated; scheduled for removal! • X.509 Certificate (multiclient) — Activates multi‑client X.509 authentication. • X.509 Certificate (client) — Activates client mode X.509 authentication. • X.509 Certificate (server) — Activates server mode X.509 authentication. |
| Security Mode | Choose between tls-auth and tls-crypt. It is recommended to use tls-crypt for enhanced security, as it encrypts all data with a pre-shared key and offers better protection against TLS denial-of‑service attacks. |
| Pre-shared Secret | Specifies the pre-shared secret for all authentication modes. |
| CA Certificate | Specifies the CA certificate for username/password and X.509 certificate modes. |
| DH Parameters | Specifies the Diffie‑Hellman key exchange protocol for X.509 authentication in server mode. |
| Local Certificate | Specifies the certificate used on the local device for X.509 authentication. |
| Local Private Key | Specifies the private key used on the local device for X.509 authentication. |
| Local Passphrase | Passphrase used during private key generation. |
| Username | Specifies the login name for username/password authentication. |
| Password | Specifies the password for username/password authentication. (Enter valid characters only; see the related section for details.) |
| User's Up Script[1] | Custom script executed when the tunnel is established. |
| User's Down Script[1:1] | Custom script executed when the tunnel is closed. |
| Extra Options | Specifies additional parameters (e.g., DHCP options) for the tunnel. Parameters are prefixed with two dashes. For possible options, see the help text in the router via SSH—run the openvpnd --help command. |
The changes in settings are applied after pressing the Apply button.

Tips
Tips for working with the configuration form:
- CLIENT routers must have the Remote IP Address item filled in.
- For SERVER routers, we recommend not filling in the Remote IP Address item.
- If two routers are situated against each other, one of them is CLIENT and the other is SERVER.
- It is always recommended to set the Ping Interval and Ping Timeout items.
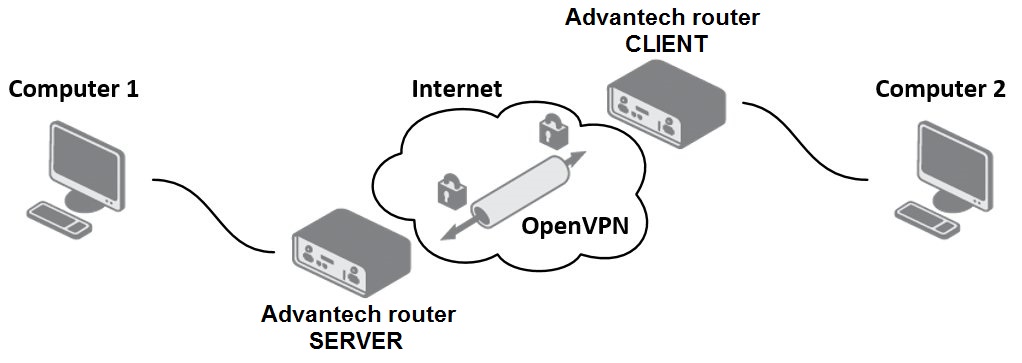
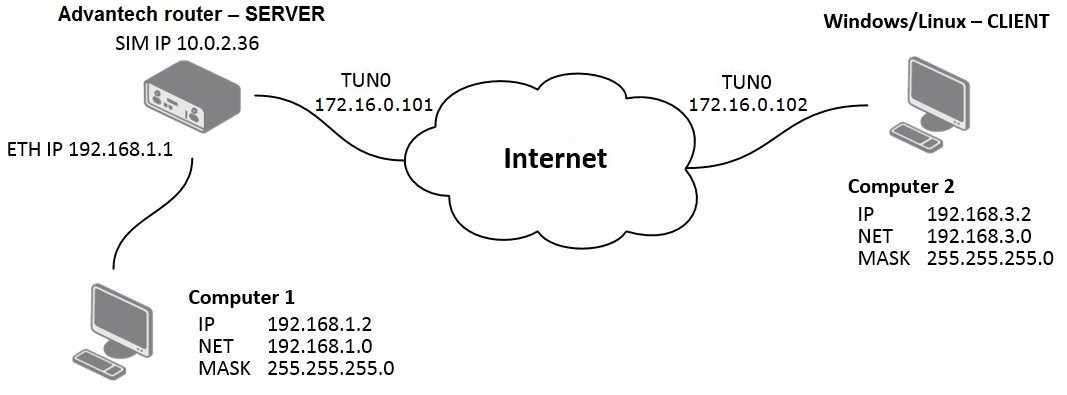
Router on both sides of tunnel
The figure below illustrates a scenario where the Advantech router is deployed on both sides of the OpenVPN tunnel. The SIM card’s IP address in the router can be static or dynamic.

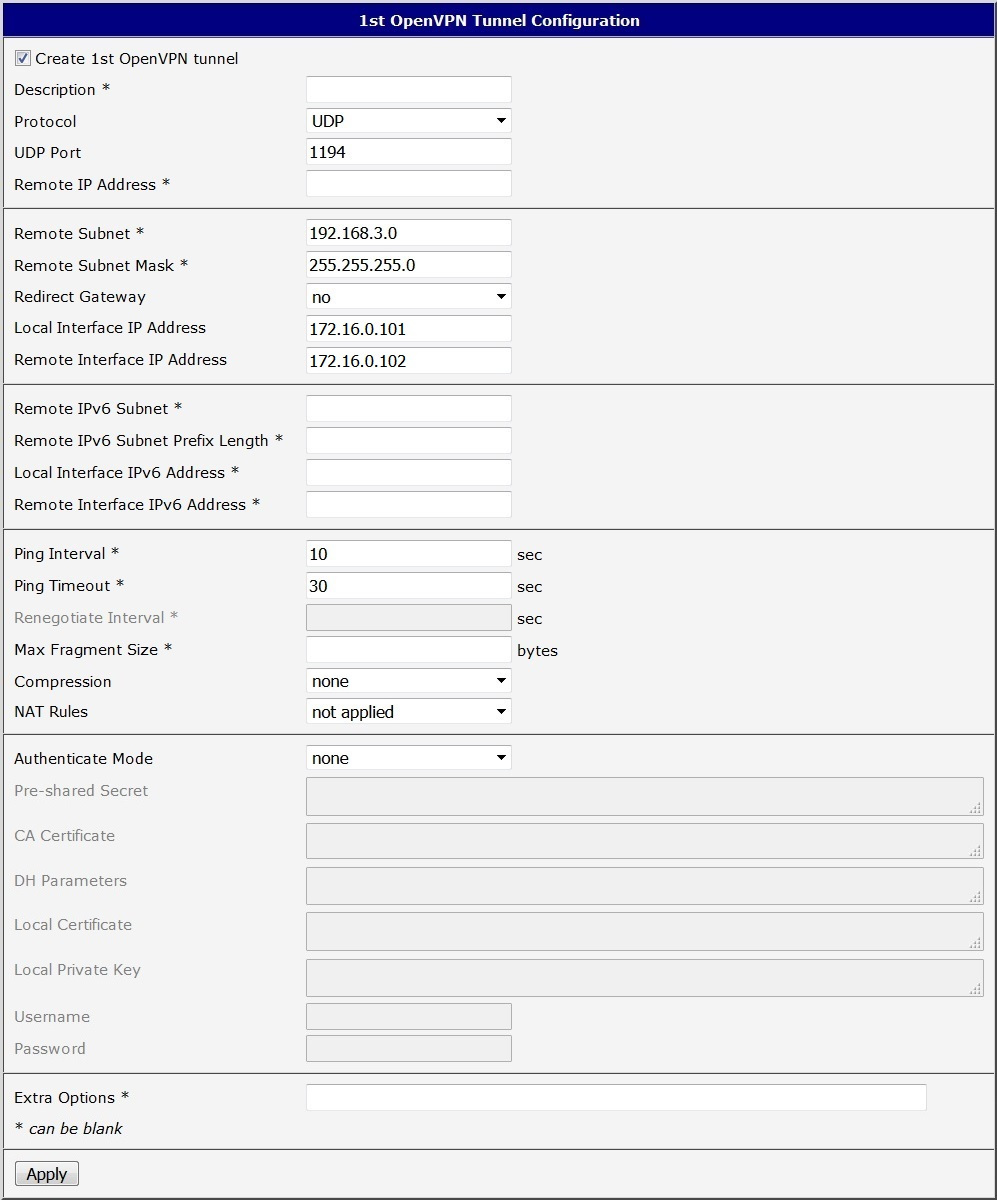
OpenVPN tunnel without authentication
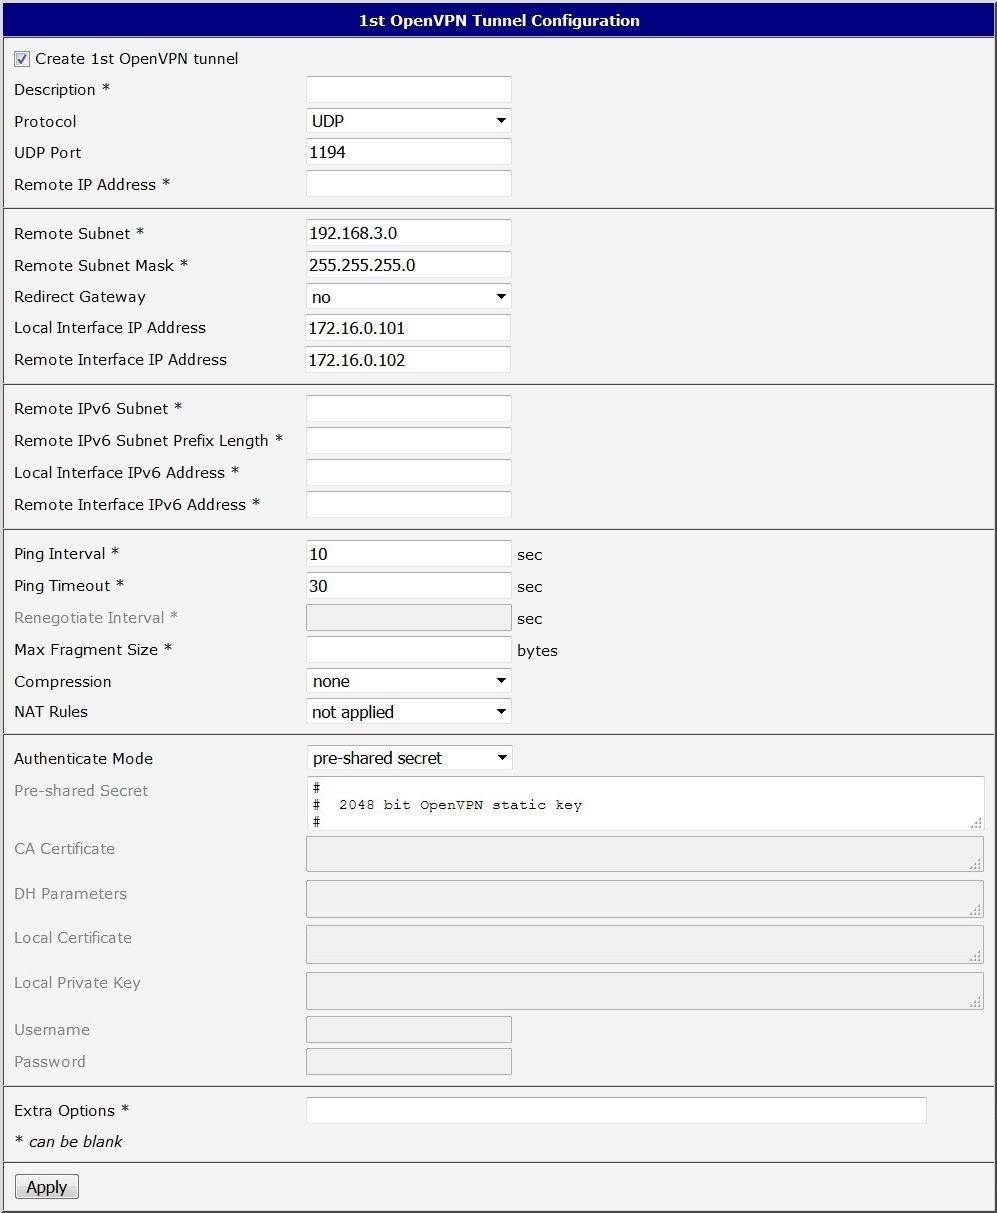
Configuration of the first router – SERVER:
| Item | Value |
|---|---|
| Remote Subnet | 192.168.3.0 |
| Remote Subnet Mask | 255.255.255.0 |
| Local Interface IP Address | 172.16.0.101 |
| Remote Interface IP Address | 172.16.0.102 |
Configuration of the first router (no authentication)
Configuration of the second router – CLIENT:
| Item | Value |
|---|---|
| Remote IP Address | 10.0.2.36 |
| Remote Subnet | 192.168.1.0 |
| Remote Subnet Mask | 255.255.255.0 |
| Local Interface IP Address | 172.16.0.102 |
| Remote Interface IP Address | 172.16.0.101 |
Configuration of the second router (no authentication)
Note: Configuration of the second router is similar; the difference is only in the items listed (see the table below). If the NAT Rules parameter is enabled, the specified rules in the NAT configuration form are applied to the OpenVPN tunnel.
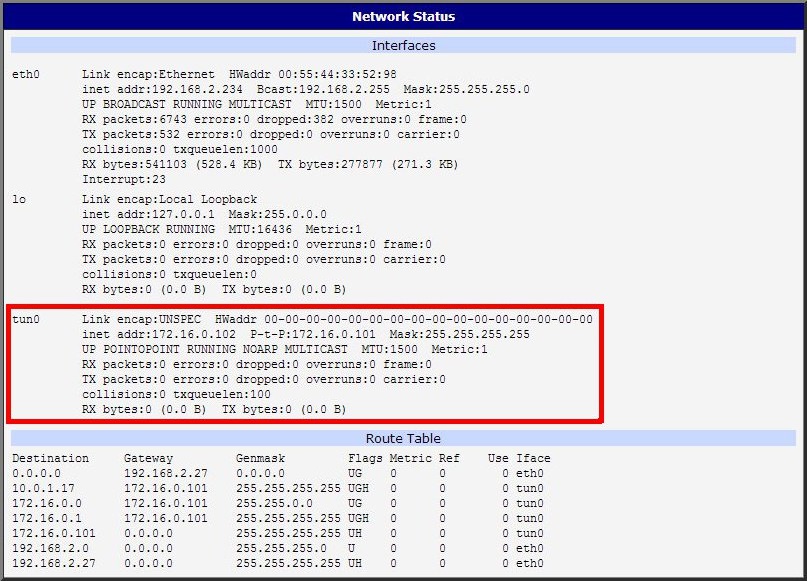
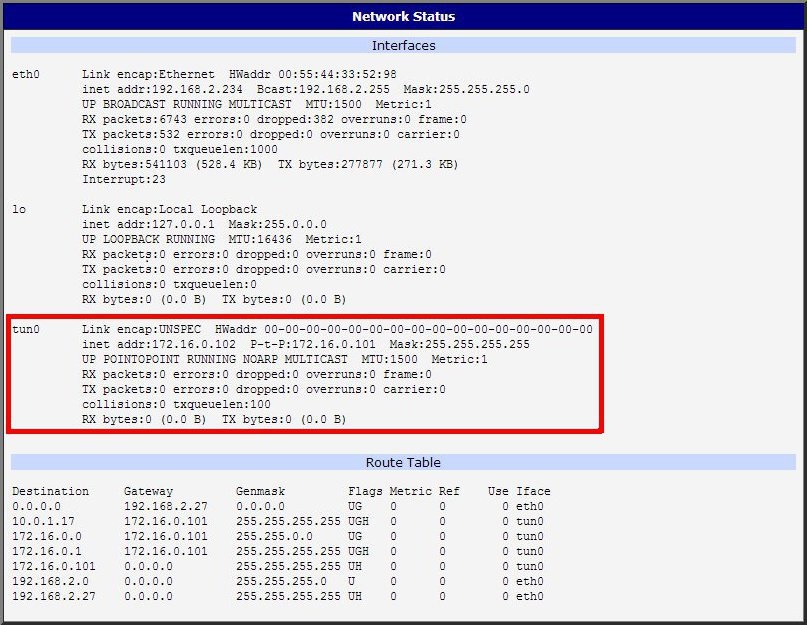
After establishing an OpenVPN tunnel, an interface tun0 and a route in the router’s routing table are displayed on the Network Status page.
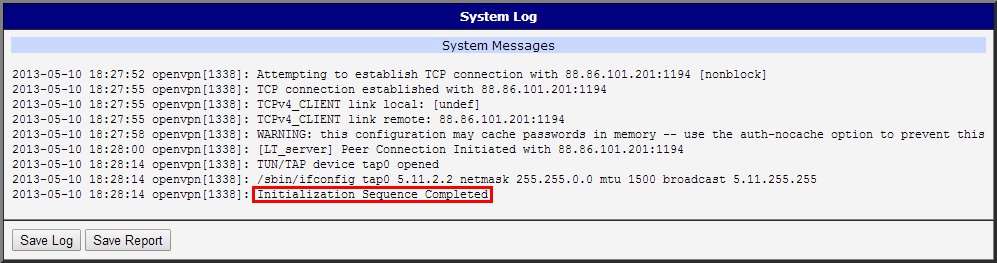
You can also check that the tunnel was successfully established in the system log (accessible via the System Log menu). The log should end with the line Initialization Sequence Completed.
OpenVPN tunnel with pre-shared secret authentication
Configuration of the first router – SERVER:
| Item | Value |
|---|---|
| Remote Subnet | 192.168.3.0 |
| Remote Subnet Mask | 255.255.255.0 |
| Local Interface IP Address | 172.16.0.101 |
| Remote Interface IP Address | 172.16.0.102 |
| Authenticate Mode | pre-shared secret |
| Pre-shared Secret | shared key for both routers |
Configuration of the first router (pre-shared secret)
Configuration of the second router – CLIENT:
| Item | Value |
|---|---|
| Remote IP Address | 10.0.2.36 |
| Remote Subnet | 192.168.1.0 |
| Remote Subnet Mask | 255.255.255.0 |
| Local Interface IP Address | 172.16.0.102 |
| Remote Interface IP Address | 172.16.0.101 |
| Authenticate Mode | pre-shared secret |
| Pre-shared Secret | shared key for both routers |
Configuration of the second router (pre-shared secret)
Tips
The procedure for creating a pre-shared key is described in the section Creation of pre-shared key in Windows.
Note: Configuration of the second router is similar; the difference is only in the items listed (see the table below). If the NAT Rules parameter is enabled, the specified rules in the NAT configuration form are applied to the OpenVPN tunnel.
After establishing an OpenVPN tunnel, an interface tun0 and the appropriate routing entry appear on the Network Status page.
You can also verify the tunnel’s successful establishment in the system log, which should end with Initialization Sequence Completed.
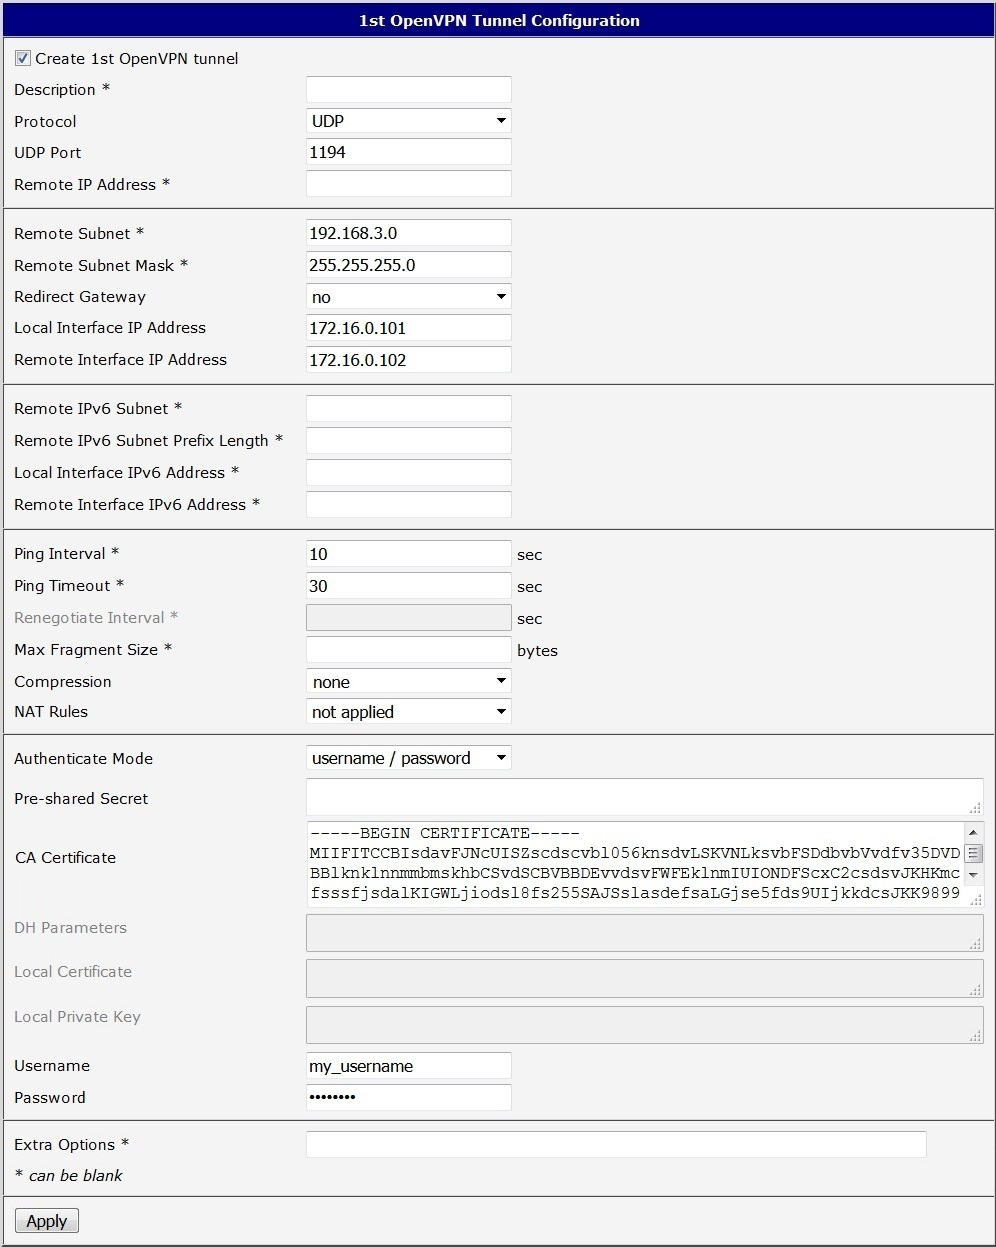
OpenVPN tunnel with username/password authentication
The router can operate only as a client when username/password authentication is configured.
Configuration of the router – CLIENT only:
| Item | Value |
|---|---|
| Remote IP Address | 10.0.2.36 |
| Remote Subnet | 192.168.1.0 |
| Remote Subnet Mask | 255.255.255.0 |
| Authenticate Mode | username/password |
| CA Certificate | generated certificate from VPN server |
| Username | username assigned by the VPN server |
| Password | password assigned by the VPN server |
Configuration of the router (username/password)
Tips
The procedure for creating a certificate is described in the section Creation of certificates in Windows.
Note: Configuration of the second router is similar; the difference is only in the items listed (see the table below). If the NAT Rules parameter is enabled, the specified NAT rules are applied to the tunnel.
After establishing an OpenVPN tunnel, an interface tun0 and the appropriate route appear on the Network Status page.
You can also verify the tunnel’s successful establishment in the system log, which should end with Initialization Sequence Completed.
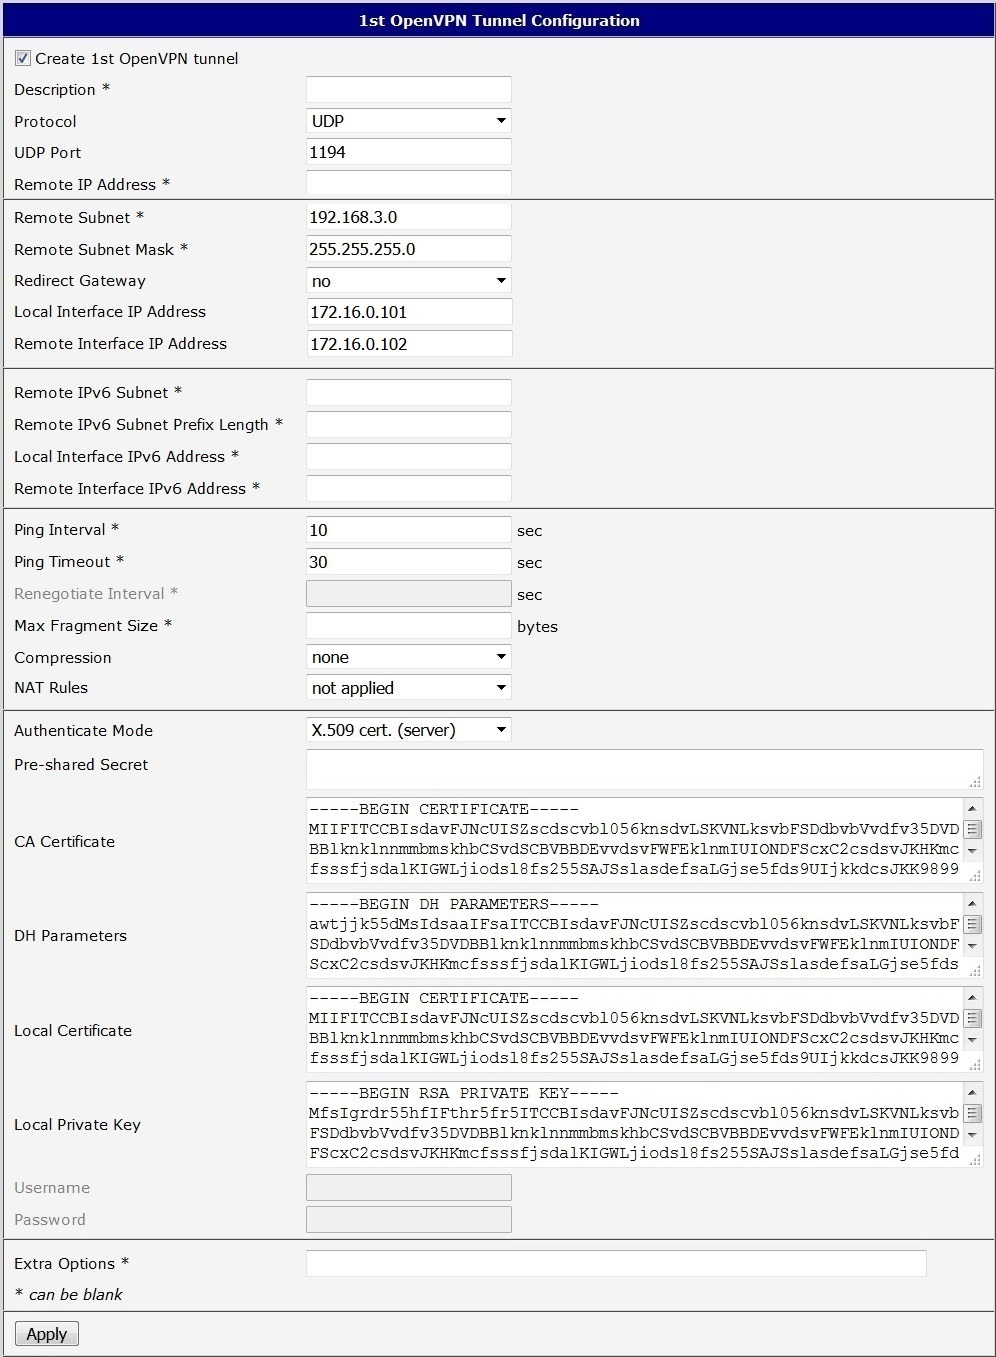
OpenVPN tunnel with X.509 certificate authentication
Configuration of the first router – SERVER:
| Item | Value |
|---|---|
| Remote Subnet | 192.168.3.0 |
| Remote Subnet Mask | 255.255.255.0 |
| Local Interface IP Address | 172.16.0.101 |
| Remote Interface IP Address | 172.16.0.102 |
| Authenticate Mode | X.509 Certificate (server) |
| CA Certificate | generated certificate from VPN server |
| DH Parameters | Diffie-Hellman protocol for key exchange |
| Local Certificate | local certificate assigned by the VPN server |
| Local Private Key | local private key assigned by the VPN server |
Configuration of the first router (X.509 certificate)
Configuration of the second router – CLIENT:
| Item | Value |
|---|---|
| Remote IP Address | 10.0.2.36 |
| Remote Subnet | 192.168.1.0 |
| Remote Subnet Mask | 255.255.255.0 |
| Local Interface IP Address | 172.16.0.102 |
| Remote Interface IP Address | 172.16.0.101 |
| Authenticate Mode | X.509 Certificate (client) |
| CA Certificate | generated certificate from VPN server |
| Local Certificate | local certificate assigned by the VPN server |
| Local Private Key | local private key assigned by the VPN server |
Configuration of the second router (X.509 certificate)
Tips
The procedure for creating a certificate is described in the section Creation of certificates in Windows.
Note: Configuration of the second router is similar; the difference is only in the items listed (see the table below). If the NAT Rules parameter is enabled, the specified NAT rules are applied to the tunnel.
After establishing an OpenVPN tunnel, an interface tun0 and the appropriate route appear on the Network Status page.
You can also verify the tunnel’s successful establishment in the system log, which should end with Initialization Sequence Completed.
Tunnel against WIN/Linux CLIENT
The figure below illustrates a scenario where an Advantech router is on one side of the tunnel and a Windows/Linux device in CLIENT mode is on the other side. The router’s SIM card IP address may be static or dynamic.
OpenVPN tunnel configuration on the router
| Item | Value |
|---|---|
| Remote Subnet | 192.168.3.0 |
| Remote Subnet Mask | 255.255.255.0 |
| Local Interface IP Address | 172.16.0.101 |
| Remote Interface IP Address | 172.16.0.102 |
| Authenticate Mode | X.509 Certificate (server) |
| CA Certificate | generated certificate from router (SERVER) |
| DH Parameters | Diffie-Hellman protocol for key exchange |
| Local Certificate | local certificate assigned by router (SERVER) |
| Local Private Key | local private key assigned by router (SERVER) |
Router configuration
Note: If the NAT Rules parameter is enabled, the specified NAT rules are applied to the tunnel.
After establishing an OpenVPN tunnel, an interface tun0 and the corresponding route appear on the Network Status page.
It is also possible to verify the tunnel’s successful establishment via the system log. The log should end with Initialization Sequence Completed.
OpenVPN tunnel configuration on Computer 1 with Windows
Configure the following on the computer (referred to as Computer 1 in the diagram):
remote 10.0.2.36
tls-client

dev tun

pull

ifconfig 172.16.0.102 172.16.0.101
route 192.168.2.0 255.255.255.0 172.16.0.102

mute 10

ca cacert.pem
cert client-cert.pem
key client-key2.pem

verb 3
Tunnel against WIN/Linux SERVER
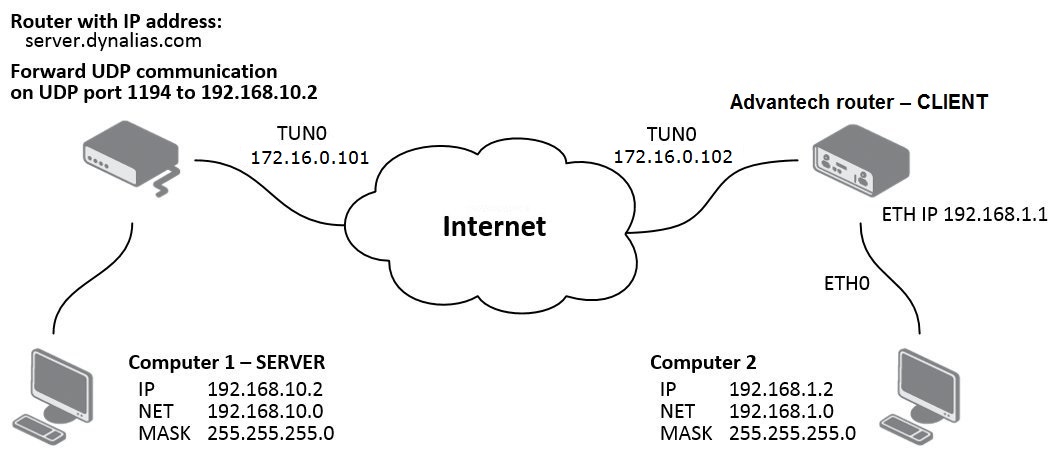
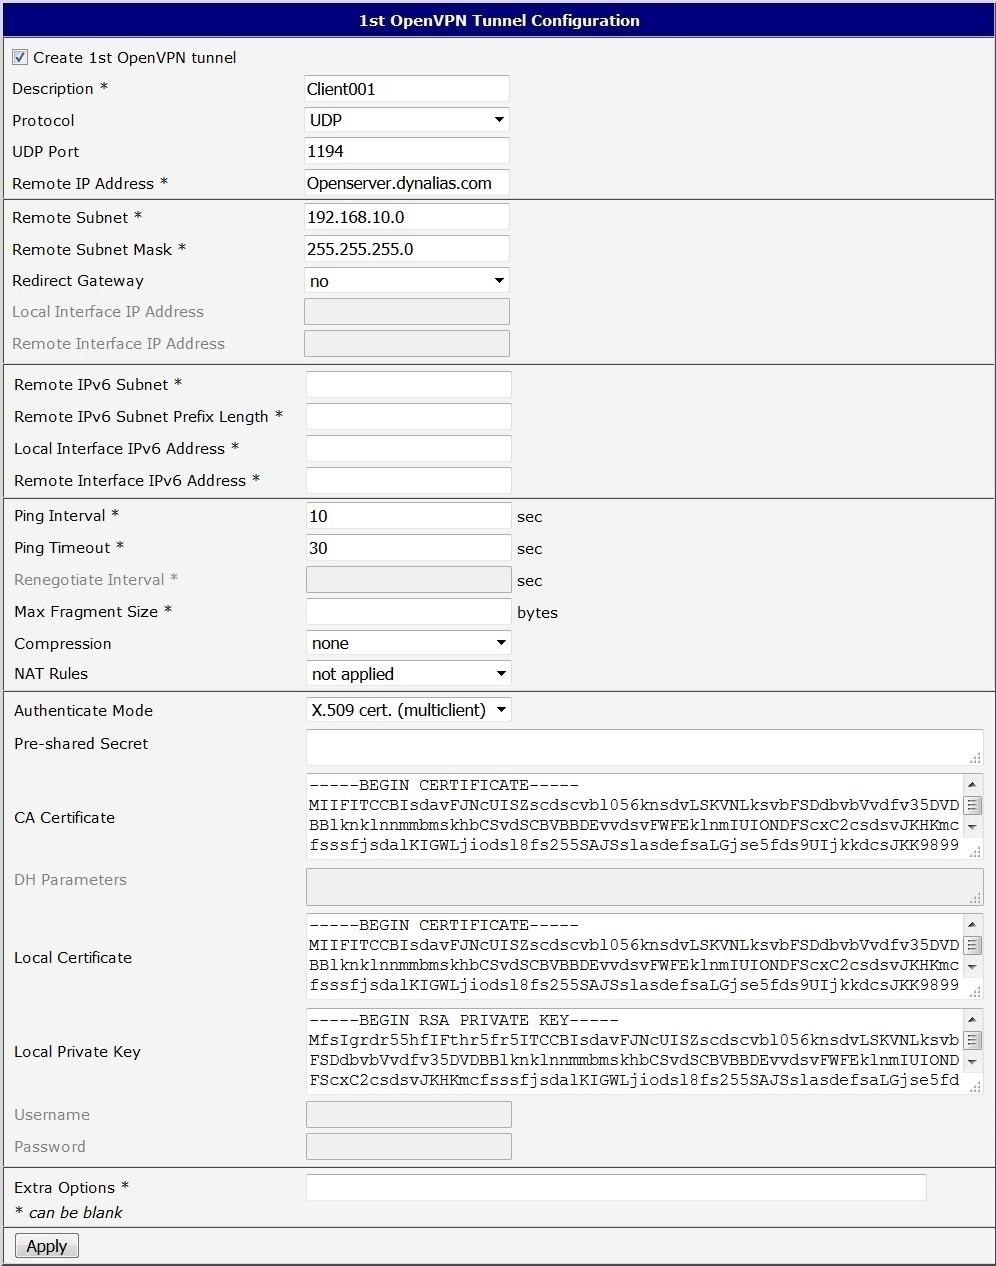
The figure below shows a scenario where an Advantech router is on one side of the tunnel and a Windows/Linux device in SERVER mode is on the other side. The router’s SIM card IP address may be static or dynamic.
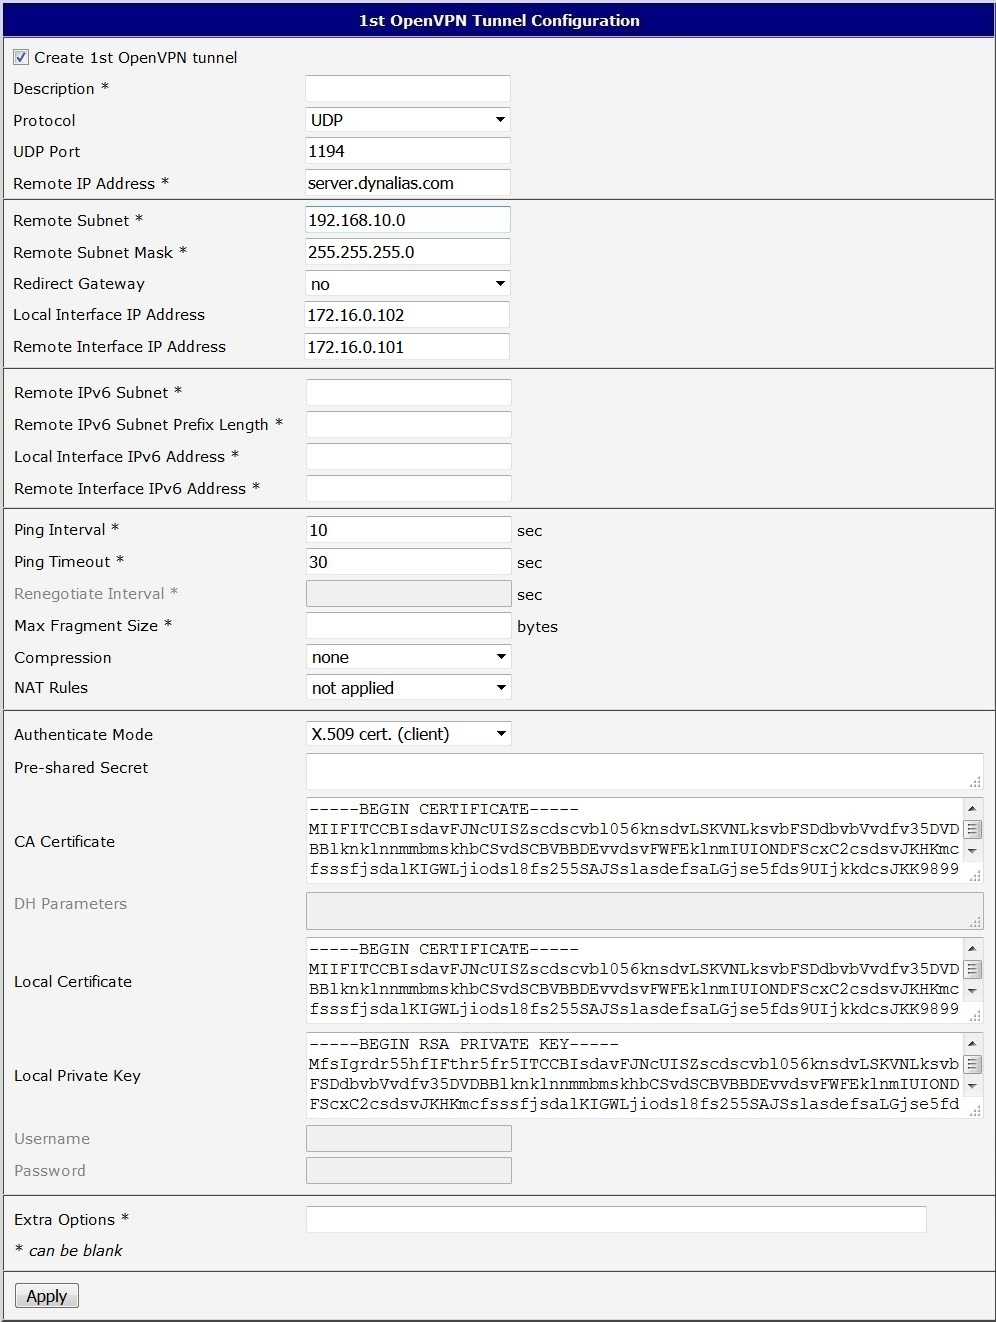
OpenVPN tunnel configuration on the router
| Item | Value |
|---|---|
| Remote IP Address | server.dynalias.com |
| Remote Subnet | 192.168.10.0 |
| Remote Subnet Mask | 255.255.255.0 |
| Local Interface IP Address | 172.16.0.102 |
| Remote Interface IP Address | 172.16.0.101 |
| Authenticate Mode | X.509 Certificate (client) |
| CA Certificate | generated certificate from router |
| DH Parameters | Diffie-Hellman protocol for key exchange |
| Local Certificate | local certificate assigned by router |
| Local Private Key | local private key assigned by router |
Router configuration
Note: If the NAT Rules parameter is enabled, the specified NAT rules are applied to the tunnel.
After establishing an OpenVPN tunnel, an interface tun0 and the corresponding route appear on the Network Status page.
It is also possible to verify the tunnel’s successful establishment via the system log. The log should end with Initialization Sequence Completed.
Tunnel configuration on Computer 1 — Server
Configure the following on the computer (referred to as Computer 1 — Server in the diagram):
local 192.168.10.2
tls-server

dev tun

pull

ifconfig 172.16.0.101 172.16.0.102
route 192.168.1.0 255.255.255.0 172.16.0.102

mute 10

ca cacert.pem
cert client-cert.pem
key client-key2.pem

verb 3
Multiclient-Server — Router (CLIENT)
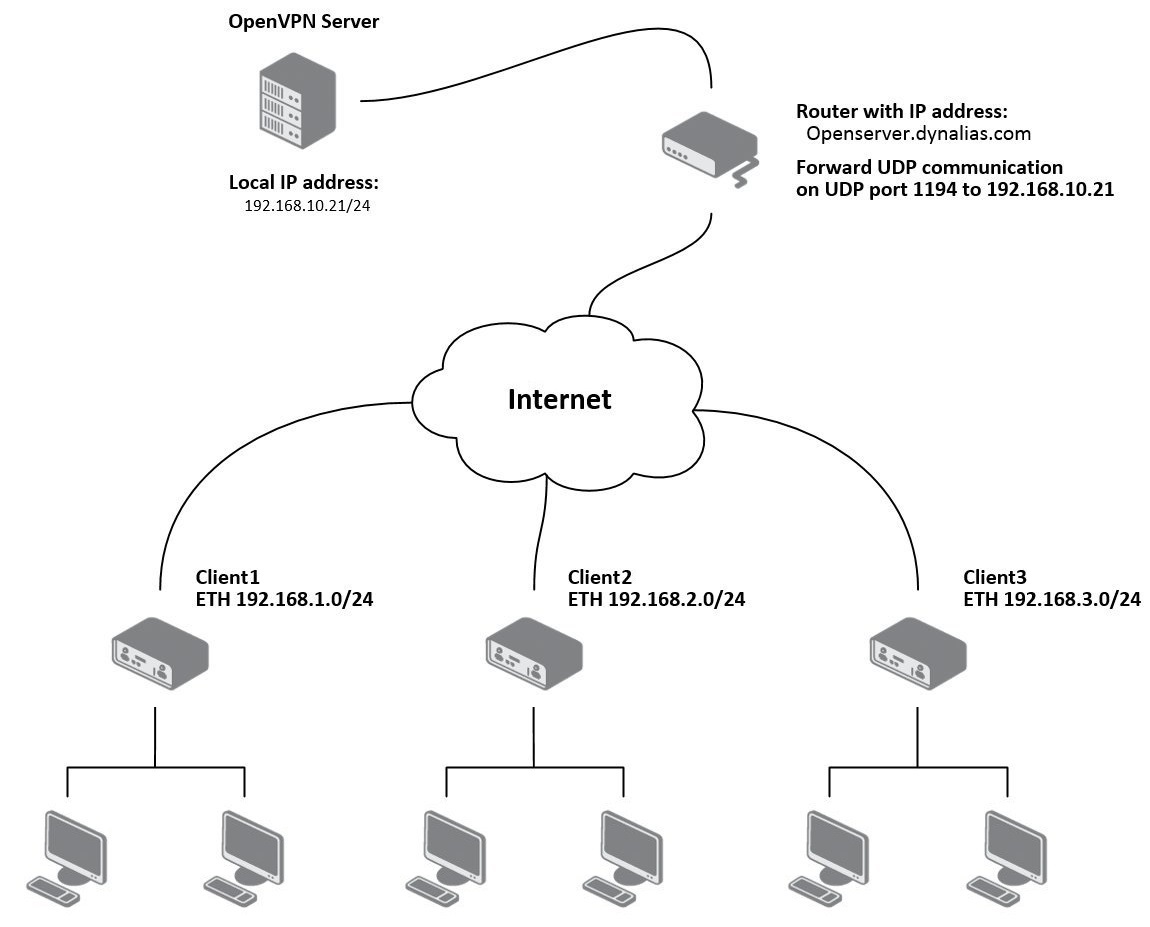
The figure below illustrates a scenario where an OpenVPN multiserver is on one side of the tunnel and several Advantech routers (three in this example) in CLIENT mode are on the other side. The SIM card IP addresses in the routers may be static or dynamic.
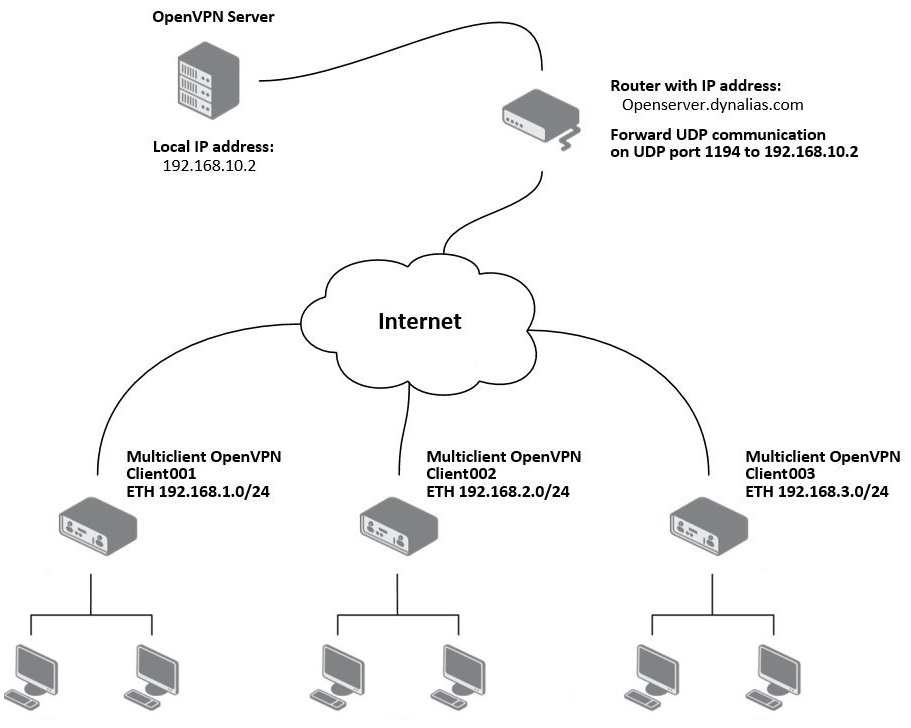
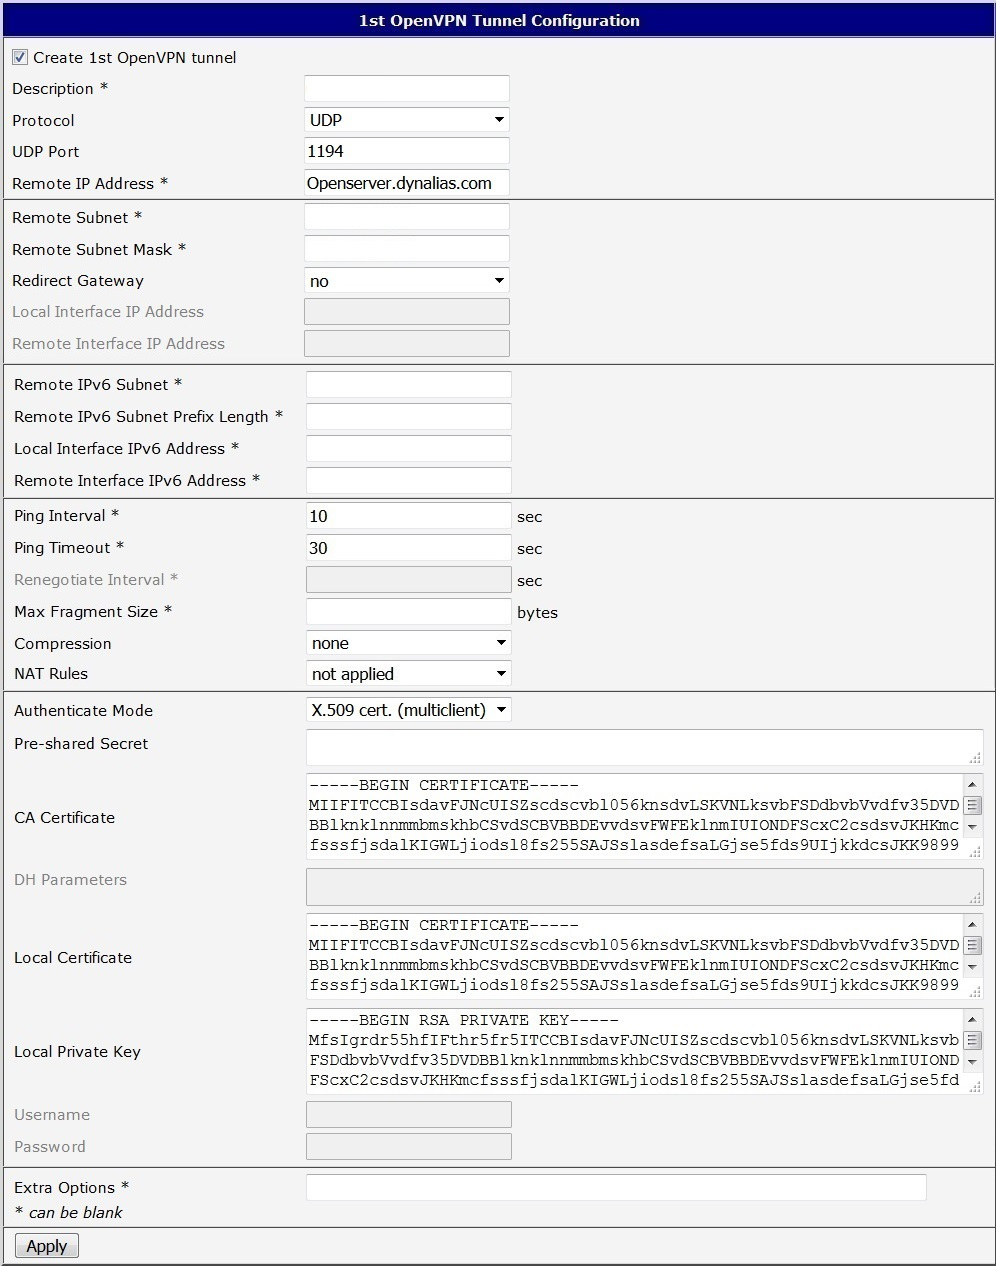
OpenVPN tunnel configuration on Advantech routers
Note: Configuration of the other routers is similar; the only difference is the Description field.
OpenVPN server configuration
The server’s configuration file (*.ovpn) includes:
server 10.8.0.0 255.255.255.0
port 1194
proto udp
dev tun
comp-lzo
keepalive 10 60
dh dh1024.pem
ca ca.crt
key server.key
cert server.crt
ifconfig-pool-persist ipp.txt
status openvpn-status.log
client-config-dir ccd
persist-key
persist-tun
verb 3
route 192.168.1.0 255.255.255.0
route 192.168.2.0 255.255.255.0
route 192.168.3.0 255.255.255.0
In the configuration above, the directory named ccd (client configuration directory) is specified. This directory is located in the root of the OpenVPN application on the server. The client configuration file names in this directory must match the names of the certificates generated for each client. In this example, there are three configuration files with the following contents:
File ccd\Client001:
iroute 192.168.1.0 255.255.255.0File ccd\Client002:
iroute 192.168.2.0 255.255.255.0File ccd\Client003:
iroute 192.168.3.0 255.255.255.0Multiclient-Server — Router (CLIENT to CLIENT)
The figure below shows a scenario where an OpenVPN server is on one side of the tunnel and several Advantech routers (three in this example) in CLIENT mode are on the other side. The SIM card IP addresses in the routers may be static or dynamic.
OpenVPN server configuration
The server’s configuration file (*.ovpn) includes:
server 10.8.0.0 255.255.255.0
port 1194
proto udp
dev tun
comp-lzo
keepalive 10 60
dh dh1024.pem
ca ca.crt
key server.key
cert server.crt
ifconfig-pool-persist ipp.txt
status openvpn-status.log
client-config-dir ccd
client-to-client
persist-key
persist-tun
verb 3
route 192.168.1.0 255.255.255.0
route 192.168.2.0 255.255.255.0
route 192.168.3.0 255.255.255.0
In this configuration, the ccd directory is specified. The names of the client configuration files in this directory must match the names of the certificates generated for each client. In this example, there are three configuration files with the following contents (routes between clients can be defined as needed):
File ccd\Client1:
iroute 192.168.1.0 255.255.255.0
push "route 192.168.2.0 255.255.255.0"
push "route 192.168.3.0 255.255.255.0"
push "route 192.168.10.0 255.255.255.0"
File ccd\Client2:
iroute 192.168.2.0 255.255.255.0
push "route 192.168.1.0 255.255.255.0"
push "route 192.168.3.0 255.255.255.0"
push "route 192.168.10.0 255.255.255.0"
File ccd\Client3:
iroute 192.168.3.0 255.255.255.0
push "route 192.168.1.0 255.255.255.0"
push "route 192.168.2.0 255.255.255.0"
push "route 192.168.10.0 255.255.255.0"
OpenVPN tunnel configuration on Advantech routers
After establishing an OpenVPN tunnel, an interface tun0 and a corresponding route appear on the Network Status page.
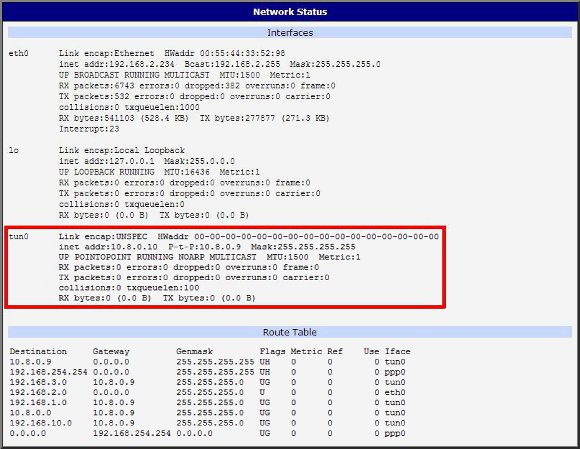
It is also possible to verify the tunnel’s successful establishment via the system log. The log should end with Initialization Sequence Completed.
Creation of pre-shared key in Windows
Caution
To create a pre-shared key, you must have the OpenVPN program installed. Installation instructions can be found in Appendix A: Installation of OpenVPN on Windows.
The figure below describes a simple method to generate a pre-shared key. The key is stored in a file called static.key; its contents should be entered into the Pre-shared Secret field in the router’s OpenVPN tunnel configuration form.

Example of pre-shared key:
#
# 2048 bit OpenVPN static key
#
-----BEGIN OpenVPN Static key V1-----
52dbd2b3380dabd210e8665cf0304de8
ac53ce6bf3ac2605bd3653fd66a113a4
373d57375763de58a38992f580efb97b
817e1b6d61ffbbf559ed9d2c927cef13
39baa06de34c7b4b05df6d4971aa97d0
ec72e4465af647a89e82b335db3dcbb8
a7dd9d190960215ac137e8e2456d2deb
4446b74b3360fe5bf0ac565d4a253a78
9823fd9891db70e190926dbf557c5ad9
cbdb7c0a649a1948b3e5dccce838fc4c
fd6e12b69b7d6bea95c87ee670e85fb1
8ac594f8a9a56921bb2e423dbcd3cbad
650d1543e486ffb956e7a9780925adfe
369e32c5913674bb655b414bde5eb6a0
184c6f2a51f648285f0ab91ea2fe8a20
a9bc715fe96301af90f41f17432e79e3
-----END OpenVPN Static key V1-----
Creation of certificates in Windows
Caution
To create certificates, you must have both the OpenVPN program and the Easy-RSA utility installed. Installation instructions can be found in Appendix A: Installation of OpenVPN on Windows and Appendix B: Installation of Easy-RSA on Windows.
Introduction
Digital certificates are digitally signed public encryption keys issued by a certification authority (CA). They are stored in X.509 format and contain information such as the owner’s public key, the issuer’s identity, and the digital signature. Certificates are used to verify the counterparty when establishing a secure connection (HTTPS, VPN, etc.). Trust is transferred through a hierarchical model, allowing unknown certificates signed by trusted CAs to be accepted.
Generating certificates
Easy-RSA first initializes a directory for the Public Key Infrastructure (PKI). Although multiple PKIs can be managed with a single Easy-RSA installation, the default directory is named "pki" unless specified otherwise.
- Open an Easy-RSA console by executing the
EasyRSA-Start.batfile located in the Easy-RSA root folder. - To create or reinitialize a PKI, run:This creates a new, blank PKI structure.
./easyrsa init-pki - Create a certificate authority (CA) with:
./easyrsa build-ca - Generate certificates and keys for network elements. For a server, run:For clients, run:
./easyrsa build-server-full server(Replace./easyrsa build-client-full clientXYclientXYwith the appropriate client identifier, e.g., client01.) - Finally, generate Diffie-Hellman parameters with:Note that this step may take some time.
./easyrsa gen-dh
Overview of the generated files
| File location | Description | To be uploaded to |
|---|---|---|
| issued/server.crt | Signed certificate of the VPN server | server |
| private/server.key | Private RSA key of the VPN server | server |
| reqs/server.req | Certificate signing request (not required) | server (not required) |
| issued/client01.crt | Signed certificate of the VPN client | client |
| private/client01.key | Private RSA key of the VPN client | client |
| reqs/client01.req | Certificate signing request (not required) | server (not required) |
| private/ca.key | CA key (keep this secret in a secure repository) | — |
| ca.crt | CA certificate | clients and server |
| dh.pem | Diffie-Hellman parameters | server only |
Appendix A: Installation of OpenVPN on Windows
The OpenVPN installation file can be downloaded from OpenVPN Community Downloads.
Open the downloaded installation file. The following window will appear:
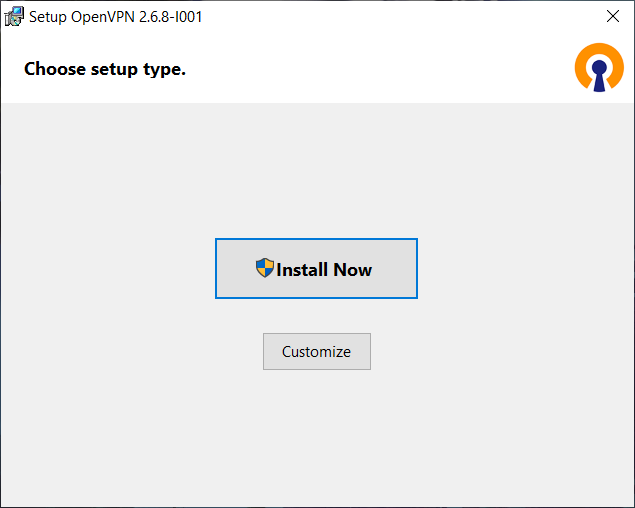
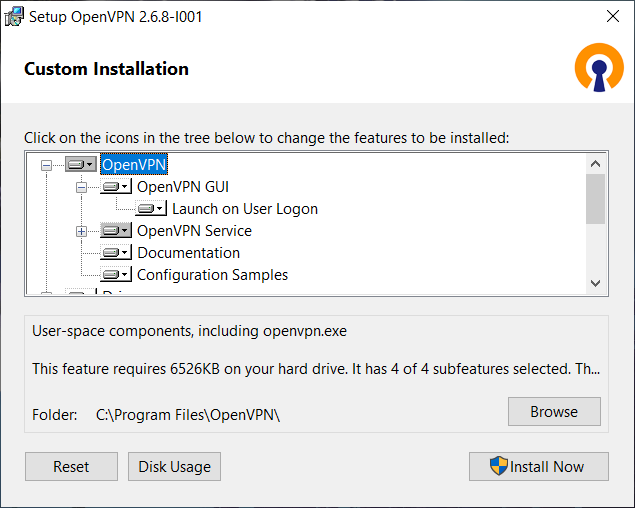
You can either press the Install Now button or choose Custom Installation by clicking Customize (see the figure below), then press Install Now. Once the installation is complete, press Close.
Appendix B: Installation of Easy-RSA on Windows
Easy-RSA is a utility for managing an X.509 Public Key Infrastructure (PKI). The official Windows release includes the programs necessary to run Easy-RSA, with cryptographic functions provided by openssl.
For OpenVPN version 2.3.x and later, Easy-RSA must be installed separately. It can be downloaded from Easy-RSA on GitHub.
Since Easy-RSA is a script supported by configuration files, no formal installation is required. Simply download the compressed package and extract it to a location of your choice. Run Easy-RSA as a non-administrator, as root privileges are not needed. The package also includes a doc folder with documentation.
A clean PKI initially contains only directories. When you build a CA, several important files are created:
ca.crt— The CA certificate.index.txt— The master database of issued certificates.serial— Contains the next serial number (which increments).private/ca.key— The CA private key (critical for security).certs_by_serial/— Directory containing all CA-signed certificates organized by serial number.issued/— Directory containing issued certificates organized by common name.
Easy-RSA 3 no longer requires a configuration file by default; however, the provided vars.example file contains many commented options for non-default behavior. To use custom settings, rename and edit this file to vars (without an extension). To invoke Easy-RSA, use the shell provided by EasyRSA-Start.bat and run commands in the format:
./easyrsa <command> [options]For general help, run:
./easyrsa help [command]Parameters passed to the script are
cmd tun_dev tun_mtu link_mtu ifconfig_local_ip ifconfig_remote_ip [ init | restart ]. See the Reference manual for OpenVPN. ↩︎ ↩︎