
Router Apps
Getting Started with Router Apps
What are Router Apps
Router App (formerly known as User Module) refers to a software application specifically designed to run on Advantech routers. These applications allow users to extend the router's built-in functionality, customize its behavior, and add new features tailored to specific needs. This guide describes the structure, development process, and technical considerations necessary for creating your own Router Apps that integrate correctly with the Advantech router environment.
Advantech routers run a Linux-based operating system (ICR-OS). While using a Linux environment for Router App development is recommended for ease of use with toolchains and testing, it is not strictly required. Router Apps can be developed using languages such as C, C++, or Python, provided they can be compiled or executed within the router's environment. This guide focuses on the general structure, scripting conventions, configuration management, and system integration rules applicable across different development approaches.
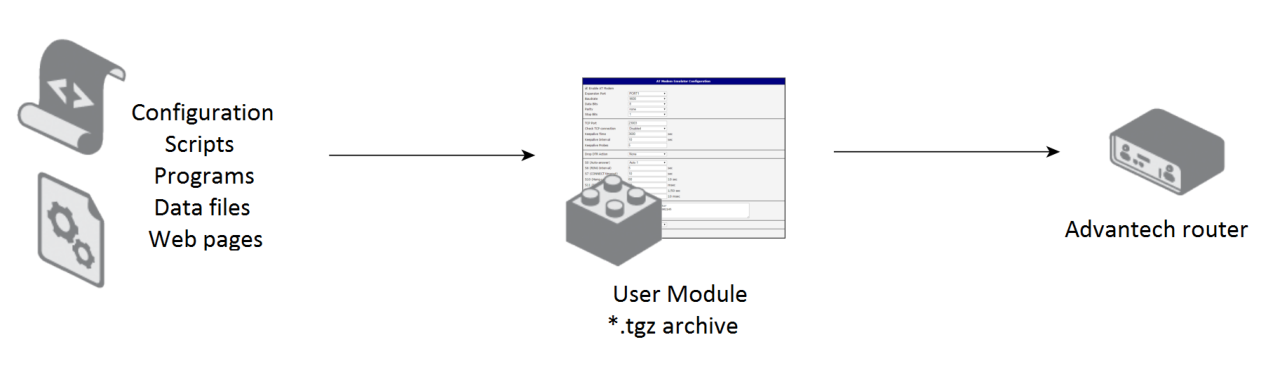
Overview of Development Approaches
Router Apps can broadly be categorized into:
- Compiled Applications: Typically written in C or C++, these applications are cross-compiled on a development machine to produce binaries that run directly on the router's processor. They offer maximum performance and low-level system access.
- Scripted Applications: Often written in Python or shell scripts, these applications are interpreted at runtime on the router. They offer faster development cycles and ease of use for many tasks.
Refer to the section on SDK for information on available Software Development Kits (SDKs) and cross-compilers for C/C++ and Python for Python development.
General Development Workflow and Tools
The general workflow for developing a Router App involves:
- Setting up the development environment (SDK, toolchains).
- Writing the application code (C/C++, Python, scripts).
- Creating necessary control scripts (
init,install, etc.) and configuration files. - Packaging the application into a
*.tgzarchive. - Uploading and testing the application on the target router.
- Debugging and iterating.
Recommended General Tools
- Basic familiarity with the Linux command line and shell scripting is beneficial for creating installation and initialization scripts.
- A text editor suitable for programming and script creation (ensuring Unix-style line endings, e.g., LF).
- Tools for creating TAR archives and Gzip compression (standard on most Linux distributions, readily available for other operating systems).
Available Commands
Router Apps can leverage many standard Linux commands and utilities provided by the router's BusyBox-based environment. To explore available commands, connect to the router's console (via SSH or Telnet) and press the TAB key twice for shell completion suggestions, or run busybox --list. For help on a specific BusyBox command, you can often use <command> --help. For details on both standard and Advantech-specific commands, refer to the Command Line Interface Application Note.
Login Events in the System Log
To aid in debugging your scripts, you can add logging statements that write messages to the router's System Log (viewable in the web interface under Status → System Log). Use the logger utility for this purpose. Add a line like the following near the beginning of each script (e.g., install, uninstall, init, etc.):
/usr/bin/logger -t mymodule "DEBUG: $0 $@"Here:
-tmymodule sets the tag name for the log entry (typically the name of your module or application).$0expands to the script's name.$@expands to all arguments passed to the script.
This will log a message such as:
DEBUG: /etc/rc.d/init.d/myscript start verboseRouter App Structure
Directory Structures for Applications
Router Apps, once installed, primarily reside in the /opt/<RAname> directory on the router, where <RAname> is the name of your Router App (RA).
Recommended location for persistent runtime data generated by your app is /var/data/<RAname> directory. This directory is usually cleaned up upon app uninstallation.
Internal Archive Structure
The schema below illustrates the typical internal structure of the RA directory structure.
<RAname>                    The base directory for installed RA.
|
|--- /etc/                  Subdirectory for scripts, information, and configuration files.
|    |
|    |--- defaults          File containing default configuration entries for the RA.
|    |--- depends           File listing other RAs this app depends on.
|    |--- description       A more detailed description of the RA, written in several sentences.
|    |--- init              Initialization script (handles start, stop, etc.).
|    |--- install           Script executed during the installation process.
|    |--- ip-up             Script executed when a WAN connection (IPv4) is established.
|    |--- ip6-up            Script executed when a WAN connection (IPv6) is established.
|    |--- ip-down           Script executed when a WAN connection (IPv4) is lost.
|    |--- ip6-down          Script executed when a WAN connection (IPv6) is lost.
|    |--- name              File containing the human-readable name for the RA, shown in the web interface.
|    |--- report            Script executed during the creation of the report file.
|    |--- requires          File specifying the minimum compatible router firmware version.
|    |--- settings          Actual configuration file (not included in the *.tgz archive).
|    |--- summary           A brief one-sentence summary of the RA.
|    |--- uninstall         Script executed during the uninstallation process.
|    |--- version           File containing the RA version, shown in the web interface.
|
|--- /bin/                  Subdirectory for auxiliary files, binaries, daemons, or *.cgi scripts.
|--- /lib/                  For private shared libraries used only by your app (if not statically linked).
|
|--- /www/                  Subdirectory containing web interface files (HTML, CGI, etc.).
All subdirectories and files within the top-level /opt/<RAname> directory are optional, except for those necessary for the app's functionality and integration, e.g. init script if the app needs to start/stop/restart.
Information Files
These optional plain text files provide metadata about the Router App, used by the router's management interface.
depends
This file lists dependencies, specifying any other Router Apps required for this app to function correctly. List one Router App name per line. The name must match the directory name (<RAname>) of the dependency as it appears in its *.tgz archive.
Python
otherModuleName
description
This file contains a more detailed description of the Router App, written in several sentences. This description is not visible in the router GUI.
name
This file contains the full, human-readable name of the Router App. This name will be displayed in the router's web interface. It is recommended to use only the characters 'a'-'z', 'A'-'Z', '0'-'9', and space (' ') for the name. If this file is absent, the RA's directory name (<RAname>) will be used instead.
My Custom Router Apprequires
This file specifies the minimum required version of the router's firmware compatible with this Router App. The version must follow the three-number format: MAJOR.MINOR.PATCH.
6.5.0summary
This file contains a brief one-sentence summary of the Router App. This description is not visible in the router GUI.
version
This file contains the version information for the Router App, which will be displayed in the web interface. The recommended format is semantic versioning (MAJOR.MINOR.PATCH) followed by a date in YYYY-MM-DD format, as shown below. If this file is missing, the version of the Router App will not be displayed in the router's web interface.
1.0.0 (2015-07-15)Configuration Files
defaults
This file must contain the default configuration parameters for the Router App. These parameters are used during the initial installation and when the router is reset to factory defaults (using the RST button).
The content of this file should be copied to the settings file by the init script during installation (specifically, when called with the defaults argument) to enable configuration backup functionality. If your Router App does not require configuration, this file is not needed.
Variables must be defined using the following format:MOD_<RAname>_<variable_name>=<value>
Here, MOD signifies Router App, making it distinguishable from the router's core configuration parameters. <RAname> is the name of the Router App (matching the directory and archive name), and <variable_name> is the desired parameter name. It is recommended to use uppercase letters for both <RAname> and variable_name.
MOD_MYMODULE_ENABLED=1
MOD_MYMODULE_PARAM1=0
MOD_MYMODULE_PARAM2=5
MOD_MYMODULE_PARAM3=20
settings
This file should not be included in the Router App's *.tgz archive. It should be created during the installation process by the init script (when called with the defaults parameter), see next paragraph. Typically, the init script copies the contents of the defaults file into the runtime settings file, enabling configuration backup.
When the router's configuration is backed up, the contents of the settings file are included in the resulting *.cfg file. This file also persists across Router App updates. When updating a Router App, the system backs up the existing settings file. The updated Router App will first attempt to use the restored settings file. It only refers back to the defaults file for parameters not found in the restored settings file (e.g., newly added parameters).
Control Scripts
All control scripts (such as init, install, uninstall, ip-up, etc., located in the etc/ directory of your Router App) must start with the shebang line #!/bin/sh. They should be written using POSIX-compliant shell syntax to ensure compatibility with the BusyBox ash shell environment typically found on Advantech routers.
Caution
Do not forget to set execute permissions for all your script files. This should be done in your development environment before packaging the Router App, or within the install script itself if appropriate for dynamically generated scripts. Use the command: chmod +x <script_filename>.
init
This is the initialization script for the Router App. It is invoked by the system with different parameters depending on the context (e.g., router startup, Router App installation, update, removal). It can also be called manually with a specific parameter. If an init script is not present, no actions will be performed for the Router App during these events. The script accepts the following parameters:
- start — Executed automatically at router startup and after the Router App is successfully installed. Use this to start daemons or perform necessary setup.
- stop — Executed automatically before updating or uninstalling the Router App. Use this to gracefully stop daemons and perform cleanup.
- restart — Not called automatically. Can be called manually to stop and then start the Router App.
- status — Not called automatically. Can be called manually to check if the Router App's services are running. Should exit with 0 if running, non-zero otherwise.
- defaults — Executed automatically after installation and when the router's RST button is pressed (factory reset). Its primary purpose is to copy the contents of the 'defaults' file into the runtime
settingsfile, usually located at/opt/$MODNAME/etc/settings.
Tips
An example init script is shown below. This example simply prints messages into Syslog indicating the action being performed. Set the MOD_NAME variable in this script to match your Router App Name. Note the cp command in the defaults case, which copies default settings to the runtime settings file, enabling configuration backup. This source code can be found in the example1 of the SDK documentation (reref to the section on SDK).
#!/bin/sh

MOD_NAME=example1
MOD_DEFAULTS=/opt/$MOD_NAME/etc/defaults
MOD_SETTINGS=/opt/$MOD_NAME/etc/settings
[ -L "$MOD_SETTINGS" ] && MOD_SETTINGS=`readlink $MOD_SETTINGS`

/usr/bin/logger -t $MOD_NAME "DEBUG: $0 $@"

case "$1" in
  start)
    echo "Starting module $MOD_NAME: done"
    exit 0
    ;;
  stop)
    echo "Stopping module $MOD_NAME: done"
    exit 0
    ;;
  restart)
    $0 stop
    $0 start
    ;;
  status)
    echo "Module $MOD_NAME is running"
    exit 0
    ;;
  defaults)
    cp $MOD_DEFAULTS $MOD_SETTINGS 2>/dev/null
    ;;
  *)
    echo "Usage: $0 {start|stop|restart|status|defaults}"
    exit 1
esac
install
This script is executed once, immediately after the Router App's files have been extracted and copied to the /opt/ directory during the installation process. Use this for initial setup tasks that only need to run once upon installation. See the section on Application Lifecycles for the sequence of script execution.
uninstall
This script is executed during the uninstallation process. It runs after the Router App has been stopped (via init stop) but just before its files are deleted from the /opt/ directory. Use this script to perform any necessary cleanup. See the section on Application Lifecycles for the script execution order.
ip-up
Executed when a WAN (IPv4) connection is established.
Parameters: <ip-address> <WAN-interface>.
Example: /opt/mymodule/etc/ip-up 10.40.28.64 ppp0
ip6-up
Executed when a WAN (IPv6) connection is established.
Parameters: <ip6-address> <WAN-interface>.
Example: /opt/mymodule/etc/ip6-up fc00::a40:37 ppp0
ip-down
Executed when a WAN (IPv4) connection is lost.
Parameters: <ip-address> <WAN-interface>.
Example: /opt/mymodule/etc/ip-down 10.40.28.64 ppp0
ip6-down
Executed when a WAN (IPv6) connection is lost.
Parameters: <ip6-address> <WAN-interface>.
Example: /opt/mymodule/etc/ip6-down fc00::a40:37 ppp0
report
This script is executed during the creation of the report file (from console or GUI). It has no parameters passed to the script.
Web Interface Files
Overview of Web Interface Integration
The /opt/<RAname>/www/ directory in your Router App package is key for web interface integration.
If a file named index.html or index.cgi (or similar standard index file) exists within this directory, a link to it will appear in the router's main web interface under the Customization -> Router Apps section. Clicking this link will access the Router App's web interface.
If the /www directory is absent, or if it does not contain a recognizable index file, no link will be shown in the main web interface. The contents of the /opt/<RAname>/www directory are mapped to the following URL:http(s)://<router ip address>/module/<RAname>
(where <RAname> is your Router App's name).
Adding Static and Dynamic Content
- Static Content: HTML, CSS, JavaScript files, and images can be placed directly into the
/wwwdirectory. - Dynamic Content: CGI scripts (written in shell, Python, C/C++ compiled to executable, etc.) can be placed in
/www. Ensure they are executable and produce valid HTTP headers and HTML content. The Python example in the section on developing scripted RAs with Python is one such case.
Web Interface Security
Regarding access control for the Router App's web interface, you have two options:
- Secured (Recommended): Protect the web interface using the router's existing user authentication system. To do this, create a file named
.htpasswdinside the/opt/<RAname>/www/directory. This file should be a symbolic link to the router's main password file, located at/etc/htpasswd. Use the following command within yourinstallscript or manually via SSH (execute inside/opt/<RAname>/www/):
ln -s /etc/htpasswd .htpasswdThis ensures that accessing the Router App's web interface requires the same username and password used to log into the main router interface.
- Unsecured: If no
.htpasswdfile (or a symbolic link named.htpasswd) exists in the/wwwdirectory, the web interface will be accessible to anyone who can reach the router's IP address, without requiring authentication. This option is strongly discouraged due to security risks.
Application Packaging
Router App Archive Format
To upload a Router App into an Advantech router, it must be packaged as a *.tgz archive file (a TAR archive compressed with Gzip). This archive must contain a single top-level directory, refer to Internal Archive Structure.
The name of this single top-level directory inside the archive must be identical to the base name of the *.tgz archive file itself (excluding the platform suffix and .tgz extension). This base name is restricted to a maximum of 24 characters and can only contain alphanumeric characters ('a'-'z', 'A'-'Z', '0'-'9') and the underscore ('_'). Using spaces or other special characters in the base name, or in any subdirectory or file names within the archive, is strongly discouraged.
Archiv name of a Router App has this syntax: <RAname>.<platform>.tgz, e.g. mymodule.v4.tgz.
Creating a Router App Archive
It is recommended to use our SDK to compile the source code and build the Router App archive. Refer to the section on Building First Compiled App.
If you want to create the Router App archive manually, you can proceed as follows. Assume that your Router App files are organized within a directory named mymodule and, for demonstration purposes, have a minimal structure containing only the init file with the content from the section on Control Scripts. The source file structure would then look like this:
mymodule/             (RA root directory)
`-- etc/              (/etc folder)
    `-- init          (file with init script)
To create the archive, you can use the script below (named pack.sh).
#!/bin/bash
set -e

[ -z "$1" ] && { echo "Error: App name is missing."; echo "Usage: $0  "; exit 1; }
[ -z "$2" ] && { echo "Error: Platform is missing."; echo "Usage: $0  "; exit 1; }
[ -d "$1" ] || { echo "Error: Directory '$1' not found."; exit 1; }

echo "Packing $1 for platform $2 → $1.$2.tgz"
tar -c --owner=0 --group=0 --mtime="2001-01-01 UTC" --exclude-vcs "$1" | gzip -n > "$1.$2.tgz"
echo "Done."
This script has following syntax: pack.sh <appname> <platform>. To pack mymodule Router App for platform v4, navigate to the parent directory of mymodule and execute these commands:
user@machine:~$ chmod +x pack.sh
user@machine:~$ ./pack.sh mymodule v4
Packing mymodule for platform v4 → mymodule.v4.tgz
Done.
It will create package with this content:
mymodule.v4.tgz
`-- mymodule.v4.tar
    `-- mymodule/
        `-- etc/
            `-- init
If you install this Router App in the router's GUI, you can see the following messages in the Syslog:
[notice] mymodule: DEBUG: /opt/mymodule/etc/init defaults
[notice] mymodule: DEBUG: /opt/mymodule/etc/init start
[notice] umupdate: Module mymodule added.
[notice] https: user 'root' added user module 'mymodule.v4.tgz'
Here, the two rows are just coming from the init file (script).
Application Lifecycles
Shell scripts executed during Router App management (install, uninstall, init) should be designed to complete reasonably quickly (ideally within a few seconds) to avoid delaying the overall system operation or causing timeouts in the web interface.
Router App Installation Sequence
Installation occurs when a new Router App *.tgz archive is uploaded via the web interface (Customization -> Router Apps). The process is as follows:
- User presses the Add or Update button and uploads the
*.tgzarchive. - The system extracts the archive and copies the contents to
/opt/mymoduledirectory. - The install script is executed:
/opt/mymodule/etc/install - The init script is called to set defaults:
/opt/mymodule/etc/init defaults(This should create thesettingsfile fromdefaults). - The init script is called to start the app:
/opt/mymodule/etc/init start
Router App Update Sequence
Updating is triggered by uploading a *.tgz archive with the same name as an already installed Router App.
- User presses the Add or Update button and uploads the new
*.tgzarchive. - The system identifies that an app with the same name exists.
- The
initscript of the currently installed (old) version is called to stop it:/opt/<RAname>/etc/init stop - The system automatically backs up the existing runtime configuration file:
/opt/<RAname>/etc/settings. - The system deletes all files and subdirectories of the old version from
/opt/<RAname>. - The system extracts the contents of the new
*.tgzarchive to/opt/<RAname>. - The
installscript of the new version is executed (if present):/opt/<RAname>/etc/install. - The
initscript of the new version is called to apply its defaults (if present):/opt/<RAname>/etc/init defaults. - The system automatically restores the backed-up
settingsfile from step 4, overwriting thesettingsfile created in step 8. This merge operation ensures that previously configured values are retained for existing parameters, and new parameters get their defaults. - The
initscript of the new version is called to start the app (if present):/opt/<RAname>/etc/init start.
Router App Uninstallation Sequence
Uninstallation is triggered by pressing the Delete button next to a Router App in the web interface.
- User presses the Delete button for the target Router App.
- The init script is called to stop the app:
/opt/mymodule/etc/init stop - The uninstall script is executed:
/opt/mymodule/etc/uninstall(Use this for any final cleanup). - The entire Router App directory (
/opt/mymodule) and its contents are removed from the router's filesystem.
Building Router Apps
This chapter outlines the essential tools and resources required for developing compiled Router Apps in C or C++ for Advantech routers. Proper setup of the development environment is crucial for successful cross-compilation and deployment.
Overview of Development Tools
In addition to general development tools (such as a text editor and basic command-line familiarity, as mentioned in the chapter on Getting Started with Router Apps), creating compiled C/C++ Router Apps specifically requires:
- A cross-compiler toolchain tailored to the target Advantech router's architecture (e.g., ARMv7, AArch64). This toolchain allows you to compile code on your development machine (typically x86-64 Linux) that will run on the router.
- Optionally, but highly recommended, an SDK (Software Development Kit) provided by Advantech. The SDK often simplifies development by providing pre-configured build systems, example applications, helper libraries (like the
ummodule for Python, or C equivalents), and documentation specific to Advantech platforms.
Cross-Compiler Toolchains
For compiling Router Apps written in C or C++, you must use a cross-compiler toolchain that matches the architecture of your target router platform (e.g., v2i, v3, v4, v4i). Advantech provides pre-built toolchains suitable for common development host environments.
The Advantech toolchains repository conveniently provides both Debian packages (.deb) for Debian-based Linux systems (such as Ubuntu) and RPM packages (.rpm) for RPM-based Linux distributions (such as Fedora or CentOS), allowing for straightforward installation on a wide range of development host systems.
| Toolchain For | Router Platforms | Download Link |
|---|---|---|
| C/C++ Applications | v2i, v3, v4, v4i | https://bitbucket.org/bbsmartworx/toolchains |
Advantech Cross-Compiler Toolchains
Always refer to the README file or documentation included within the downloaded toolchain archive for the most up-to-date installation and usage instructions specific to that toolchain version and your development host operating system.
Example: Installing Toolchains on a Debian-based Linux System
The following commands illustrate a typical process for cloning the repository and installing these packages:
# Clone the toolchains repository from Bitbucket
user@machine:~$ git clone https://bitbucket.org/bbsmartworx/toolchains.git
Cloning into 'toolchains'...
... (output from git clone) ...

# Navigate into the cloned directory
user@machine:~$ cd toolchains/

# Install all .deb packages found in the 'deb' subdirectory
# This command typically requires root privileges, hence 'sudo'.
user@machine:~/toolchains$ sudo dpkg -i deb/*.deb
... (output from dpkg -i, showing package installations) ...
After installing the toolchain packages, the cross-compilers (e.g., armv7-linux-gnueabi-gcc, armv7-linux-gnueabi-g++, aarch64-linux-gnu-gcc, aarch64-linux-gnu-g++, etc.) are typically installed under the /opt/toolchain/ directory, for instance, in subdirectories like /opt/toolchain/gcc-icr-v3-armv7-linux-gnueabi/bin/ or /opt/toolchain/gcc-icr-v4-aarch64-linux-gnu/bin/.
SDK (Software Development Kit)
Advantech provides an SDK (ModulesSDK on Bitbucket) designed to facilitate Router App development for both C/C++ and Python. Utilizing the SDK is highly recommended as it often includes:
- Example Router Apps demonstrating various functionalities and best practices.
- Helper libraries or modules (e.g., for interacting with router hardware like GPIOs, LEDs, or for web interface integration).
- Pre-configured Makefiles or build scripts that simplify the cross-compilation process for different router platforms.
Using the official SDK ensures better compatibility and access to platform-specific features.
| Supported Languages | Router Platforms | SDK Download Link |
|---|---|---|
| C/C++ and Python | v2i, v3, v4, v4i | https://bitbucket.org/bbsmartworx/modulessdk |
Advantech Router App SDK (ModulesSDK)
Consult the README file or other documentation included within the SDK for detailed instructions on its setup, structure, and usage.
Example: Cloning and Using the ModulesSDK
The following commands demonstrate cloning the ModulesSDK repository and typical steps for compiling libraries and example applications provided within it. Ensure that you have the appropriate cross-compiler toolchains (as described in the Cross-Compiler Toolchains section) installed and configured in your system's PATH before attempting to compile SDK examples.
# Clone the ModulesSDK repository, perhaps into a directory named 'ModulesSDK'
user@machine:~$ git clone https://bitbucket.org/bbsmartworx/modulessdk.git  ModulesSDK
Cloning into 'ModulesSDK'...
... (output from git clone) ...

# Navigate into the cloned SDK directory
user@machine:~$ cd ModulesSDK/

# Compile common libraries provided by the SDK
user@machine:~/ModulesSDK$ make
... (output from make, compiling libraries) ...

# Clean all build artifacts
user@machine:~/ModulesSDK$ make clean
The exact make targets and variables (like PLATFORM) will depend on the specific structure and Makefiles within the ModulesSDK. Always refer to the SDK's documentation for precise build instructions.
If compiled successfully, the Router App installation archives are created in the ModulesSDK/images folder.
Building Your First Compiled Application with the SDK
This section provides a step-by-step guide to creating a simple command-line utility, crc32sum, as a compiled Router App using C and the Advantech ModulesSDK. The crc32sum utility will calculate the CRC32 (Cyclic Redundancy Check) checksum of files stored on the router. CRC32 is an error-detecting code commonly used to verify data integrity. This utility can be used by administrators or other scripts on the router to:
- Verify if a configuration file, firmware component, log file, or any other data file has been corrupted or unintentionally modified.
- Confirm data transfer success by comparing its CRC32 checksum against the source file's checksum.
- Be incorporated into shell scripts for automated integrity checks of critical files.
We will use the Advantech ModulesSDK for this example, as it is the recommended approach. The SDK simplifies the cross-compilation process and helps in building Router App installation packages (*.tgz) for various target router platforms. Ensure you have the ModulesSDK cloned and the necessary cross-compiler toolchains installed (refer to this chapter on Building Router Apps).
Step 1: Writing the C Program
The C program, which we will name crc32sum.c, will take a filename as a command-line argument and print its CRC32 checksum.
Source code for crc32sum.c:
Place following code into ModulesSDK/modules/crc32sum/source/crc32sum.c file.
#include <stdio.h>
#include <stdlib.h>
#include <stdint.h> // For uint32_t

// Standard CRC32 polynomial
#define CRC32_POLYNOMIAL 0xEDB88320L

// Function to calculate CRC32 (PKZIP, Ethernet, PNG standard)
static uint32_t calculate_crc32(FILE *file) {
    // Static table to ensure it's initialized only once
    static uint32_t crc_table[256];
    static int table_initialized = 0; // Flag to check if table is initialized
    uint32_t current_crc_value;
    int i, j;
    unsigned char byte_read;

    // Initialize CRC table only once
    if (!table_initialized) {
        uint32_t crc_entry;
        for (i = 0; i < 256; i++) {
            crc_entry = i;
            for (j = 0; j < 8; j++) {
                // LSB-first processing for table generation
                crc_entry = (crc_entry & 1) ? (crc_entry >> 1) ^ CRC32_POLYNOMIAL : crc_entry >> 1;
            }
            crc_table[i] = crc_entry;
        }
        table_initialized = 1;
    }

    // Calculate CRC of the file content
    current_crc_value = 0xFFFFFFFFL; // Initial CRC value (standard for this CRC32 variant)
    while (fread(&byte_read, 1, 1, file) == 1) {
        // LSB-first processing of byte into CRC
        current_crc_value = crc_table[(current_crc_value ^ byte_read) & 0xFF] ^ (current_crc_value >> 8);
    }
    return current_crc_value ^ 0xFFFFFFFFL; // Final XOR (standard for this CRC32 variant)
}

int main(int argc, char *argv[]) {
    FILE *file_ptr;
    uint32_t calculated_crc_value;

    if (argc != 2) {
        fprintf(stderr, "Usage: %s <filename>\n", argv[0]);
        return 1; // Indicate error
    }

    file_ptr = fopen(argv[1], "rb"); // Open in binary read mode
    if (file_ptr == NULL) {
        perror("Error opening file"); // perror prints the system error string
        return 1; // Indicate error
    }

    calculated_crc_value = calculate_crc32(file_ptr);
    fclose(file_ptr);
    printf("%08X\t%s\n", calculated_crc_value, argv[1]); // Output in uppercase hex
    return 0; // Indicate success
}
Key features of crc32sum.c:
- It includes
<stdint.h>for fixed-width integer types likeuint32_t. - The
calculate_crc32function implements a standard table-driven CRC32 algorithm, consistent with common CRC32/PKZIP variants. - It reads the input file byte by byte in binary mode (
"rb"). - The
mainfunction handles command-line arguments (expecting a single filename) and file operations, including basic error checking. - Output is formatted to print the 8-digit uppercase hexadecimal CRC32 value followed by a tab character and the filename, similar to utilities like
md5sum.
Step 2: Creating the Router App Control Scripts and Metadata
This step involves preparing the necessary control scripts and metadata files within the etc/ directory of your Router App. For this crc32sum utility, which is a command-line tool and not a background daemon, an init script for starting/stopping a service is not required. Instead, install and uninstall scripts will manage a symbolic link to make the command globally accessible.
The install script:
This script creates a symbolic link in /usr/bin, allowing crc32sum to be run without specifying its full path after the Router App is installed.
#!/bin/sh
# Create a symbolic link for crc32sum in /usr/bin

ln -sf /opt/crc32sum/bin/crc32sum /usr/bin/crc32sum

exit 0
The uninstall script:
This script removes the symbolic link created during installation when the Router App is uninstalled.
#!/bin/sh
# Remove the symbolic link for crc32sum from /usr/bin

rm -f /usr/bin/crc32sum

exit 0
Important: After creating these install and uninstall scripts, ensure they are made executable using the chmod +x command (e.g., chmod +x install uninstall) on your development machine before building the app.
Optional metadata files in etc/ subdirectory:
name: A plain text file containing the human-readable name for display in the router's web interface. Example content:
CRC32 Sum Utilityversion: A plain text file specifying the version of your Router App. Example content:
1.0.0 (2025-05-21)Step 3: Preparing Makefiles for SDK Compilation
The Advantech ModulesSDK uses a Makefile-based build system. To integrate our crc32sum application:
- Create the module directory: If it doesn't exist, create a directory for your new module within the SDK, for example:
ModulesSDK/modules/crc32sum/. - Copy the main Makefile template: Copy the generic module
MakefilefromModulesSDK/modules/template/Makefileto your new module's directory:ModulesSDK/modules/crc32sum/Makefile. This Makefile handles the overall process of building the module for different platforms and packaging it. - Create the source Makefile: Create a new directory
ModulesSDK/modules/crc32sum/source/. Inside thissource/directory, create anotherMakefilewith the following content to define how your C code is compiled:
Content for ModulesSDK/modules/crc32sum/source/Makefile:
# Include common rules and definitions from the SDK's root
include ../../../Rules.mk

# Define the name of the executable to be built
MODULE_TARGET_EXE = crc32sum
# Define the C source file(s) for the executable
MODULE_TARGET_SRC = crc32sum.c

# Optional: Add linker libraries if needed (e.g., -lm for math, -lpthread for pthreads)
# For crc32sum.c, no extra libraries are needed beyond standard C.
# LDLIBS += -lm

# Use a standard SDK macro to define the build rule for the program
$(eval $(call build-program, $(MODULE_TARGET_EXE), $(MODULE_TARGET_SRC)))

# Define the 'install' target for this source Makefile.
# This target is called by the main module Makefile to copy the compiled
# binary into the staging directory before packaging.
install:
	# Create the 'bin' directory in the staging area (DESTDIR) if it doesn't exist
	@install -d $(DESTDIR)/bin
	# Copy the compiled executable to DESTDIR/bin/ and set execute permissions (755)
	@install -m 755 $(OBJDIR)/$(MODULE_TARGET_EXE) $(DESTDIR)/bin/$(MODULE_TARGET_EXE)
Resulting Directory Structure for the crc32sum Module within SDK
After these steps, the directory structure for your crc32sum module within the ModulesSDK should look like this:
ModulesSDK/
|-- Rules.mk                  (and other root SDK files)
|-- modules/
|   |-- crc32sum/
|   |   |-- merge/
|   |   |    `-- etc/
|   |   |      |-- install       (install script)
|   |   |      |-- name          (metadata file)
|   |   |      |-- uninstall     (uninstall script)
|   |   |      `-- version       (metadata file)
|   |   |-- source/
|   |   |   |-- crc32sum.c    (your C source code)
|   |   |   `-- Makefile      (Makefile for compiling crc32sum.c)
|   |   `-- Makefile          (main Makefile for the crc32sum module, copied from template)
|   |-- template/
|   |   `-- Makefile          (original template Makefile)
|   |-- example1/
|   |-- example2/
|   |-- ...                   (other example modules)
`-- ...                       (other SDK directories like images/, libs/)
Step 4: Building the Router App Package
Once the source code and Makefiles are in place within the ModulesSDK structure:
- Navigate to the SDK's root directory:
user@machine:~$ cd /path/to/your/ModulesSDK/- Build for all modules:
Often, simply running make from the root of the SDK might build all modules for all default platforms if the main SDK Makefile is structured that way.
user@machine:~/ModulesSDK$ makeThe SDK's build system will handle the cross-compilation using the appropriate toolchain and then package the application into a *.tgz archive. The resulting installation packages are typically placed in a directory like ModulesSDK/images/crc32sum/. For instance, you might find ModulesSDK/images/crc32sum/crc32sum.v4.tgz.
Step 5: Uploading and Testing
Upload the generated *.tgz archive file for the target platform (e.g., crc32sum.v4.tgz) to your Advantech router. This is typically done via the router's web interface, in the section Customization → Router Apps. After the Router App is installed by the system (which includes running your install script):
- The utility should be available as the
crc32sumcommand globally due to the symbolic link created in/usr/bin. - Test from the router's CLI:
- Create a test file:
echo "test data" > /tmp/testfile.txt - Run the utility:
crc32sum /tmp/testfile.txt - Verify the output. For a file containing the exact string "test data" followed by a newline character (which
echotypically adds), the CRC32 checksum should be176BDC9D. The output will appear as:176BDC9D /tmp/testfile.txt
- Create a test file:
This example provides a compact C utility whose core logic (CRC32 calculation) is a strong candidate for C implementation rather than shell scripting. Using the SDK streamlines the build and packaging process for different router platforms.
Core Programming for Compiled Applications
Libraries and Dependency Management for Compiled Apps
Caution
To ensure the continued proper functioning of your Router App after router firmware updates, adhere to the following recommendations regarding libraries and dependencies:
- Avoid dynamic linking to libraries provided by the router's firmware, with the exception of the standard C library (
glibc). Link other necessary libraries statically with your Router App whenever possible. - Do not rely on the presence or specific versions of other libraries in the router's filesystem (e.g., in
/usr/lib), except forglibc.
The reason for these recommendations is that libraries included in the router's firmware (other than glibc, which maintains strong backward compatibility guarantees) may change, be updated, or even be removed between different firmware versions or across router models. Making your Router App independent of these system libraries (except for relying on a baseline glibc) is crucial for ensuring it remains compatible across firmware updates and different router platforms.
If you are developing your Router App in C or C++, you can dynamically link against the glibc library provided by the router (typically located in /lib or /usr/lib via symlinks).
Interfacing with Router System Services and APIs
Compiled applications can interact with the router's system services and hardware through several mechanisms:
- Standard Linux System Calls: Direct invocation of system calls (e.g.,
open(),read(),write(),socket(),fork()) provides the most fundamental level of interaction with the Linux kernel and its services. - Shell Commands via
system()orpopen(): Executing shell commands using thesystem()C library function or managing command I/O viapopen(). This approach should be used with caution due to potential security risks (e.g., command injection if external input is used to construct commands without proper sanitization) and performance overhead compared to direct API calls or system calls. - Inter-Process Communication (IPC): If your application needs to communicate with other daemons or processes running on the router, standard Linux IPC mechanisms such as pipes, FIFOs (named pipes), POSIX message queues, shared memory, or Unix domain sockets can be used.
- Specific
ioctlCalls for Hardware Access: For direct hardware manipulation (e.g., GPIOs, LEDs, serial ports, or other custom hardware),ioctlsystem calls on specific device files (e.g.,/dev/gpiochip0,/dev/ttyS0) are often the method of choice. The specificioctlcommands, request codes, and data structures are hardware and driver-dependent. Detailed information on these low-level hardware APIs should be available in the Advantech SDK documentation or platform-specific hardware/driver guides. The SDK often provides wrapper functions or libraries to simplify these interactions. (Note: Theioctlcommand-line utility is not typically present in BusyBox by default, so interaction is via the C system call.)
The Advantech SDK, when available for your target platform and development language, typically provides helper functions, libraries, and example code to simplify access to router-specific functionalities and hardware, abstracting some of the lower-level details and promoting more portable code across Advantech platforms.
Debugging and Testing Compiled Applications
Effective debugging and testing are crucial for developing robust compiled applications on an embedded platform like an Advantech router:
- System Log Integration: Utilize the
loggercommand-line utility (if calling from shell scripts) or thesyslog()C library functions (afteropenlog()) from within your C application to send diagnostic messages, status updates, and error reports to the router's system log. This is often the primary method for on-device debugging and monitoring. (Your console output confirmsloggeris available). - Debug Builds and Symbols: When cross-compiling, create a debug version of your application by including debugging symbols (typically using the
-gcompiler flag with GCC). While on-router interactive debugging tools like GDB might be limited or not present in standard firmware, these symbols are invaluable if you can perform remote debugging (e.g., with GDB server if available) or analyze core dumps generated by application crashes. - Resource-Aware Testing: Test your application thoroughly on the actual target router platform(s). Pay close attention to resource consumption (CPU utilization, RAM footprint, flash storage usage) under various operational conditions to ensure your app is efficient and does not destabilize the router.
- SDK Examples and Documentation: If an SDK is provided by Advantech for your router model, review its example applications and documentation. These can serve as valuable references for best practices, API usage, build system configuration, and platform-specific considerations.
- Incremental Development and Unit Testing: Develop and test components or features incrementally. For complex applications, start with basic functionality and add features step-by-step, testing at each stage. Where possible, write unit tests for individual functions or modules that can be run in your cross-compilation environment or on the target.
- Robust Error Handling: Implement comprehensive error handling in your C code. Diligently check return values of all system calls and library functions. Log errors appropriately (e.g., to syslog) to aid in diagnostics.
- Cross-Platform Considerations: If your Router App is intended to run on multiple Advantech router models or different firmware versions, test for compatibility and be mindful of potential differences in available libraries, kernel features, or hardware interfaces.
Developing Scripted Router Applications (Python)
Advantech routers support the development of Router Apps using Python, offering a high-level, rapidly developed alternative to compiled languages like C/C++ for many tasks. Python 3 is typically available on supported platforms via dedicated Python Router Apps (see Python for general Python installation and usage on the router). This chapter focuses on leveraging Python specifically for creating Router App packages.
Python Environment within a Router App
When a Python script runs as part of an installed Router App, it operates within the Python environment provided by the active Python Router App (Full or Lite version) on the device. This environment includes the Python 3 interpreter and its standard library.
For router-specific functionalities, such as accessing GPIOs, reading system parameters, or generating HTML content for integration with the router's web interface, Advantech provides a special Python module named um. This module is included as part of an SDK. Always consult the SDK documentation for your target platform (refer to the SDK section) for details on the availability and usage of the um module.
Advantages and Limitations of Python for Router Apps
Using Python for developing Router Apps presents several benefits and some considerations:
Advantages
- Rapid Development: Python's concise syntax and high-level nature generally lead to faster development cycles compared to C/C++.
- Ease of Use: Python is known for its readability and simpler learning curve, making it accessible for a wider range of developers.
- Suitability for Specific Tasks: Excellent for web scripting (e.g., CGI scripts for custom web interface pages), automation tasks (e.g., scheduled jobs, event-driven actions), data processing (e.g., parsing logs, manipulating configuration), and network scripting.
- Rich Standard Library: Python's extensive standard library provides many built-in modules for common tasks, reducing the need for external dependencies.
- Third-Party Libraries (with Full Python RA): The Full Python Router App, with
pip, allows access to a vast ecosystem of third-party libraries via PyPI, greatly extending capabilities (see the section on usingpipto install third-party libraries).
Limitations
- Resource Consumption: Python applications, being interpreted, can have higher CPU and memory overhead compared to equivalent applications compiled from C/C++. This is an important consideration for resource-constrained embedded routers.
- Performance: For extremely time-critical operations or computationally intensive tasks (e.g., high-speed packet processing, complex cryptographic calculations), the performance of Python might be a bottleneck compared to C/C++.
- Dependency Management (Lite Python RA): If using the Python Lite RA (which lacks
pip), managing third-party dependencies requires manually bundling them with your Router App, which can be less convenient. - Startup Time: Python scripts might have a slightly longer startup time compared to compiled binaries.
Application Structure for Python Router Apps
Python applications packaged as Router Apps follow the same general directory structure and packaging conventions as compiled Router Apps, as described in the Router App Structure chapter. Key considerations for Python scripts include:
- Executable Scripts and Daemons: Python scripts intended to be run as main executables or background daemons (started by the
initscript of your Router App) should typically be placed in the/bindirectory within your Router App package (e.g.,/opt/<app_name>/bin/myscript.py). These scripts should have a shebang line (e.g.,#!/usr/bin/python3) and be made executable (chmod +x). - Custom Python Modules: If your application consists of multiple Python files or custom library modules, you can place them in the root directory of your Router App package (e.g.,
/opt/<app_name>/mymodule.py) or in a dedicated subdirectory (e.g.,/opt/<app_name>/lib/). These modules can then be imported into your main scripts using standard Python import mechanisms (e.g.,import mymoduleorfrom lib import my_utility). Ensure the Python interpreter can find these modules (Python typically adds the script's own directory tosys.path). - CGI Scripts for Web Interface Integration: Python scripts designed as CGI (Common Gateway Interface) applications to extend the router's web GUI must be placed in the
/wwwsubdirectory of your Router App package (e.g.,/opt/<app_name>/www/index.cgi).- These CGI scripts must have execute permissions.
- They must start with a shebang line pointing to the Python interpreter (e.g.,
#!/usr/bin/python3). - The first line of output from a CGI script must be a valid HTTP header, typically
Content-Type: text/html, followed by a blank line, before any HTML content is printed. Theummodule, if used, often handles this.
- Control Scripts (
init,install,uninstall): These scripts, located in/etc, are standard shell scripts (#!/bin/sh) and are used to manage the lifecycle of your Python Router App (e.g., starting/stopping a Python daemon). They are not Python scripts themselves.
Example: Python CGI for System Status Display
The following is an example (available in SDK as example7) of a Python CGI script, index.cgi, intended to be part of a Router App. It demonstrates how to use the (hypothetical or SDK-provided) um module to retrieve and display various system status information (like GPIO states, supply voltage, and internal temperature) on a custom web page within the router's web interface. This script would typically reside in /opt/<app_name>/www/index.cgi within your Router App package.
#!/usr/bin/python3
# **************************************************************************
#
# CGI script of User Module
#
# Copyright (C) 2016-2024 Advantech Czech s.r.o.
#
# This Source Code Form is subject to the terms of the Mozilla Public
# License, v. 2.0. If a copy of the MPL was not distributed with this
# file, You can obtain one at http://mozilla.org/MPL/2.0/.
#
# **************************************************************************
import um
MODULE_TITLE = b"Example 7"
um.html_page_begin(MODULE_TITLE)
um.html_form_begin(MODULE_TITLE, b"System Status", None, 0, None, None)
um.html_pre_head(b"Binary Input")
msg = b"Binary input BIN0 is "
msg += b"OFF" if um.gpio_get_bin0() else b"ON"
msg += b"."
um.html_pre_text(msg)
um.html_pre_head(b"Binary Output")
msg = b"Binary output OUT0 is "
msg += b"ON" if um.gpio_get_out0() else b"OFF"
msg += b"."
um.html_pre_text(msg)
um.html_pre_head(b"Supply Voltage")
voltage = (um.gpio_get_voltage() + 50) / 100
msg = "Supply voltage is "
msg += str(voltage / 10.0) + " V" if voltage > 0 else "N/A"
msg += "."
um.html_pre_text(msg.encode('utf-8'))
um.html_pre_head(b"Temperature")
temperature = um.gpio_get_temperature()
msg = "Internal temperature is "
msg += str(temperature - 273) + " °C" if temperature > 0 else "N/A"
msg += "."
um.html_pre_text(msg.encode('utf-8'))
um.html_form_end(None)
um.html_page_end()This example script is illustrative and demonstrates:
- Importing the router-specific
ummodule (if available). - Using functions from the
ummodule (e.g.,um.html_page_begin(),um.gpio_get_bin0()) to generate HTML content for display in the router's web interface and to retrieve hardware status information. - The interpretation of values returned by hardware-access functions (e.g., whether 0 means ON or OFF for a binary input) is dependent on the specific implementation of the
ummodule and the underlying hardware of the router model. This should be clearly documented by the SDK or module provider. - Basic error handling using
try...exceptblocks for robustness, especially when dealing with hardware interactions or external modules. - The necessity of encoding Python strings to bytes (e.g., using
msg.encode('utf-8')) if theummodule's HTML functions expect byte strings.
The um module plays a crucial role in abstracting the low-level hardware and web interface details, making it simpler to access these features from Python scripts within a Router App.
Managing Dependencies for Python Router Apps
When your Python Router App relies on libraries:
- Standard Libraries: If your app uses only Python standard libraries, ensure they are part of the Python environment provided by the installed Python RA (Full or Lite) on the router. Most common standard libraries are usually included.
- Third-Party Libraries (Not Pre-installed):
- Full Python RA with
pip3: If the Full Python RA is installed, you can potentially usepip3to install required third-party libraries from PyPI directly onto the router as a post-installation step (e.g., triggered from your Router App'sinstallorinitscript, or manually by an administrator). This requires internet access and careful consideration of storage space and compilation needs. - Bundling Libraries: For both Full and Lite RAs (especially mandatory for Lite), if libraries are not installable via
pipor if you want a self-contained app, you must bundle the necessary pure-Python third-party libraries directly within your Router App package.- Place the library's source code (e.g., the package directory) into a subdirectory within your Router App (e.g.,
/opt/<app_name>/vendor/). - In your Python scripts, you may need to adjust
sys.pathat runtime to include this vendor directory so Python can find the bundled modules:
- Place the library's source code (e.g., the package directory) into a subdirectory within your Router App (e.g.,
- Full Python RA with
# In your main Python script:
import sys
import os
# Assuming your script is in /opt/<app_name>/bin/
# and vendor directory is /opt/<app_name>/vendor/
app_root = os.path.dirname(os.path.dirname(os.path.abspath(__file__)))
vendor_dir = os.path.join(app_root, "vendor")
if vendor_dir not in sys.path:
    sys.path.insert(0, vendor_dir)

# Now you can import your bundled library
# import my_bundled_library- Alternatively, if your app structure allows, relative imports might be usable.
- C Extensions: Libraries with C extensions that require compilation are challenging to bundle directly without pre-compiling them for the target router architecture.
- Virtual Environments (
venv): Whilevenvis excellent for development, its direct usage and deployment within a Router App package on the router itself are generally less common due to increased storage footprint and complexity in managing activation for automated scripts. If used, the path to the virtual environment's interpreter must be explicitly invoked.
Deployment of Python Router Apps
Deployment of a Python-based Router App follows the same procedure as for any other Router App:
- Package Contents: Package all necessary Python scripts (
.py), custom modules, bundled third-party libraries (if any), CGI scripts, and any other required files (e.g., configuration templates, data files) into the*.tgzarchive. - Directory Structure: Adhere to the standard Router App directory structure (e.g.,
bin/for executables,www/for CGI,etc/for control scripts, custom module directories). - Permissions: Ensure all scripts that need to be executed (main scripts in
bin/, CGI scripts inwww/) have execute permissions set (chmod +x) before packaging. The control scripts inetc/(init,install,uninstall) must also be executable shell scripts. - Installation: Upload the
*.tgzpackage to the router via the web interface (Customization → Router Apps or similar menu). The router's system will then handle the extraction and setup, including running yourinstallscript.
Refer to Application Packaging and Application Lifecycles for general Router App packaging and lifecycle details.
Summary and Best Practices
Key Development Constraints Recap
- Storage space in the
/optdirectory, where Router Apps are installed, is limited. Refer to the table for partition sizes specific to each platform. Plan your application size accordingly. - On platforms with a 128 KiB MRAM partition for
/var/data(e.g., standard v3), limit your Router App's usage of this space to approximately 64 KiB to ensure sufficient space for the operating system. See the section on non-volatile storage for details. - Note that the
/optdirectory persists across router firmware updates, preserving installed Router Apps. Data stored in/var/dataalso generally persists. - Router Apps run within a BusyBox environment, which provides a subset of standard Linux commands and shell features. Ensure your scripts use POSIX-compliant shell syntax (
#!/bin/sh) and rely only on commands available on the target router. - Be mindful of RAM and CPU limitations detailed in the chapter on optimizing resources.
- Adhere to library linking guidelines for C/C++ apps to maintain firmware compatibility.
- Follow security best practices for web interfaces.
Best Practices Recap
- Use the official SDKs and toolchains when available.
- Structure your application package correctly (
*.tgzwith a single top-level directory). - Implement robust
init,install, anduninstallscripts. - Manage application configuration using
defaultsandsettingsfiles. - Keep scripts and applications lightweight and efficient.
- Test thoroughly on target hardware and across different firmware versions if aiming for broad compatibility.
- Use logging for easier debugging.
- Secure web interfaces appropriately.
Firewall Rules for Router Apps
If your Router App runs a server accepting connections on a specific TCP or UDP port, you must configure the router's firewall (iptables) to allow this traffic, especially if the router's "Default Server" NAT option is enabled.
Tips
The Send all remaining incoming packets to default server option in the NAT configuration can redirect incoming traffic to a specified internal IP address if no other NAT or firewall rule explicitly handles it. This can prevent connections from reaching your Router App.
To ensure traffic reaches your application, the Router App should manage its own firewall rules, typically within its init script (/opt/<RAname>/etc/init), adding rules on start and removing them on stop.

Integration with Router Firewall Chains:
Advantech router firmware often provides predefined chains designed for Router App firewall rules to integrate cleanly with the system's overall firewall structure. Use these chains:
in_modchain (filtertable): This chain is typically jumped to from the mainINPUTchain (which filters traffic destined for the router itself). Rules placed here (or in a custom chain jumped to from here) can explicitlyACCEPTtraffic destined for the port your application is listening on.pre_modchain (nattable): This chain is typically jumped to early in thePREROUTINGchain (which handles incoming packets before the routing decision, primarily for DNAT). By adding a rule here (or in a custom chain jumped to from here) thatACCEPTs traffic destined for your application's port, you prevent that traffic from being processed by later DNAT rules in thePREROUTINGchain, specifically bypassing the "Default Server" rule.
The example init script snippet below shows functions add_chain() and del_chain() for managing these rules using a unique chain for the application. The add_chain() function is called during init start with parameters like mod_mymodule tcp 1000, where mod_mymodule is a unique identifier (custom chain name) for the app's rules, tcp is the protocol, and 1000 is the port number (which should ideally be read from the app's settings file). The del_chain() function, called during init stop, removes the custom chain and the jumps to it, cleaning up the firewall rules. The del_chain function in the example includes checks to prevent errors if rules or chains don't exist before attempting deletion.
Example Functions for init Script:
MODNAME=mymodule
MODEXEC=mymoduled
add_chain() {
   /sbin/iptables -N $1 || return
   /sbin/iptables -A $1 -p $2 --dport $3 -j ACCEPT
   /sbin/iptables -A in_mod -j $1
   /sbin/iptables -t nat -N $1
   /sbin/iptables -t nat -A $1 -p $2 --dport $3 -j ACCEPT
   /sbin/iptables -t nat -A pre_mod -j $1
   if [ -f /sbin/ip6tables ]; then
   /sbin/ip6tables -N $1 || return
   /sbin/ip6tables -A $1 -p $2 --dport $3 -j ACCEPT
   /sbin/ip6tables -A in_mod -j $1
   /sbin/ip6tables -t nat -N $1
   /sbin/ip6tables -t nat -A $1 -p $2 --dport $3 -j ACCEPT
   /sbin/ip6tables -t nat -A pre_mod -j $1
   fi
}
del_chain() {
   # Check if chain exists before attempting to delete
   /sbin/iptables -L $1 >/dev/null 2>&1
   if [ $? -eq 0 ]; then
      /sbin/iptables -D in_mod -j $1 2>/dev/null
      /sbin/iptables -F $1
      /sbin/iptables -X $1
   fi
   # Check if nat chain exists
   /sbin/iptables -t nat -L $1 >/dev/null 2>&1
   if [ $? -eq 0 ]; then
      /sbin/iptables -t nat -D pre_mod -j $1 2>/dev/null
      /sbin/iptables -t nat -F $1
      /sbin/iptables -t nat -X $1
   fi
   # Handle IPv6 rules if ip6tables exists
   if [ -f /sbin/ip6tables ]; then
      /sbin/ip6tables -L $1 >/dev/null 2>&1
      if [ $? -eq 0 ]; then
         /sbin/ip6tables -D in_mod -j $1 2>/dev/null
         /sbin/ip6tables -F $1
         /sbin/ip6tables -X $1
      fi
      /sbin/ip6tables -t nat -L $1 >/dev/null 2>&1
      if [ $? -eq 0 ]; then
         /sbin/ip6tables -t nat -D pre_mod -j $1 2>/dev/null
         /sbin/ip6tables -t nat -F $1
         /sbin/ip6tables -t nat -X $1
      fi
   fi
}
Example case Statement in init Script:
case "$1" in
    start)
        echo -n "Starting module $MODNAME: "
        . /opt/$MODNAME/etc/settings
        [ "$MOD_EXAMPLE5_ENABLED" != "1" ] && echo "skipped" && exit 0
        add_chain mod_$MODNAME tcp $MOD_MYMODULE_PORT 2> /dev/null
        /opt/$MODNAME/bin/$MODEXEC &
        RETVAL=$?
        [ $RETVAL = 0 ] && echo "done" || echo "failed"
        exit $RETVAL
        ;;
    stop)
        echo -n "Stopping module $MODNAME: "
        killall $MODEXEC 2> /dev/null
        del_chain mod_$MODNAME 2> /dev/null
        RETVAL=$?
        [ $RETVAL = 0 ] && echo "done" || echo "failed"
        exit $RETVAL
        ;;
    *)
        echo "Usage: $0 {start|stop|restart|status|defaults}"
        exit 1
esac
Simplified iptables Structure Overview:
The following illustrates where the custom module chains (mod_..., created by add_chain) typically fit into the router's packet processing flow.
natTable (Connection Tracking, Address/Port Translation)- PREROUTING Chain (Incoming packets, before routing decision)
- ... (Standard rules)
- JUMP to
prechain (Typically for WAN interfaces). This chain usually jumps topre_mod, which contains specific modification rules such as:- JUMP to
mod_app1chain (App 1's rules) - JUMP to
mod_app2chain (App 2's rules) - ... (Further rules added by
add_chain)
- JUMP to
- ... (Standard DNAT rules, potentially Default Server DNAT rule)
- POSTROUTING Chain (Outgoing packets, after routing decision)
- ...
- ... (Standard SNAT/MASQUERADE rules)
- PREROUTING Chain (Incoming packets, before routing decision)
By adding an ACCEPT rule in a custom chain jumped to from pre_mod (nat table), the Router App prevents its traffic from being redirected by later DNAT or Default Server rules. The corresponding ACCEPT rule jumped to from in_mod (filter table) explicitly allows the traffic to reach the application process running on the router.