Bluetooth
Warning
- This Router App is not installed on Advantech routers by default. See the manual of your router, section Customization Pages → Router Apps, for instructions on how to upload a Router App.
- Note that on v3 and v4i platforms, the Bluetooth interface is unavailable when a Wi-Fi interface (either AP or STA mode) is active.
Tips
The Router App is supported by the following router models:
- ICR-32xxW
- ICR-44xxW3
- ICR-41xxW and ICR-42xxW
Bluetooth is a wireless technology standard used for exchanging data between fixed and mobile devices over short distances. It utilizes UHF radio waves in the industrial, scientific, and medical (ISM) radio bands, ranging from 2.402 GHz to 2.480 GHz. It was originally conceived as a wireless alternative to RS-232 data cables.
There are two main variants of Bluetooth: Classic Bluetooth and Bluetooth Low Energy (BLE). Although they exist within the same standard, they are considerably different.
Classic Bluetooth has been part of the standard since its inception and is sometimes referred to as Bluetooth BR/EDR. This variant is designed for higher data throughput applications, such as file transfers and audio streaming. It requires a connection handshake between devices and typically creates continuous data streams.
Bluetooth Low Energy (BLE), previously known as Wibree, was introduced in Bluetooth v4.0. It features an entirely new protocol stack designed for sending short packets, which is ideal for IoT applications. Compared to the protocols in Bluetooth v1.0 through v3.0, BLE is aimed at very low-power applications that can run for several years on a coin cell battery. BLE represents a significant progression in extending the battery life of mobile devices. While the range was relatively short in version 4.x, it was significantly improved in version 5.0 and newer.
The Bluetooth implementation in Advantech routers consists of three parts:
- Kernel Bluetooth support and drivers (available from firmware version 6.2.6).
- The Bluetooth Router App, which includes BlueZ (the Linux Bluetooth stack).
- Applications, currently focusing on the Node-RED Bluetooth node and C scripts.
The current implementation targets Bluetooth Low Energy sensors and Personal Area Networking (PAN).
Web Interface
Once the Router App is installed, its web interface can be accessed by clicking the Router App name on the Router Apps page of the router's web interface.
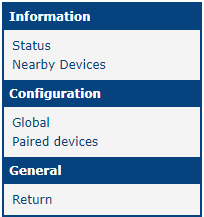
The left panel of the web interface contains a menu divided into three sections: Information (containing Status and Nearby Devices), Configuration, and General (containing Licenses and the Return item). The Return item switches the view back to the router's main web configuration pages. The main menu of the Router App's web interface is shown in the figure below.
Information
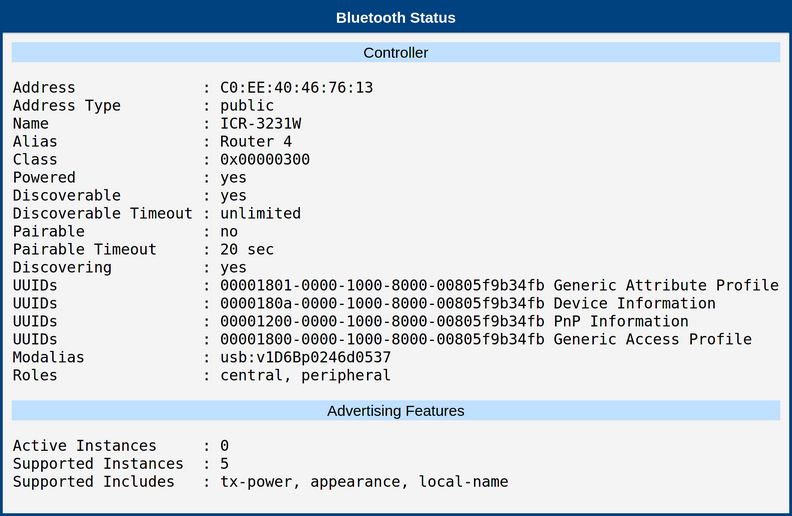
Status
When Bluetooth is active, the current settings of the Bluetooth adapter are displayed here. This includes the device address, the data presented by the device, discovery status, pairability, and the services provided.
Nearby Devices
This page lists discoverable Bluetooth devices in the vicinity. The list is dynamic; a device is removed if it is not detected for more than 30 seconds. Note that the list does not refresh automatically; a manual refresh of the page is required to update the results.
Pairing or unpairing of nearby devices is initiated from this list. Detailed information about a specific device can be viewed by expanding its entry. For more information, see the Pairing section.

Configuration
Global
Global settings for the Bluetooth Router App can be configured on the Global page.
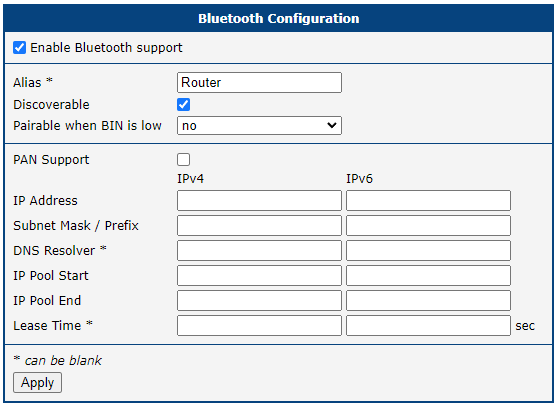
| Item | Description |
|---|---|
| Enable Bluetooth support | Enables or disables Bluetooth functionality. |
| Discoverable | Makes the router visible to other Bluetooth devices. |
| Alias | Sets the name of the router as seen by other devices during a search. |
| Pairable when BIN is low | Enables pairing mode when a specific digital input is triggered. This is useful when web interface access is unavailable. |
| PAN Support | Enables Personal Area Networking (PAN) via Bluetooth. |
| IP Address | Sets the IP address for the PAN server. |
| Subnet Mask / Prefix | Sets the subnet mask or prefix for the PAN network. |
| DNS Resolver | Specifies the IP address of the DNS resolver for PAN clients. |
| IP Pool Start | Defines the start of the IP address range for PAN clients. |
| IP Pool End | Defines the end of the IP address range for PAN clients. |
| Lease Time | Specifies the duration (in seconds) for which an IP address is leased to a client. |
Global configuration items
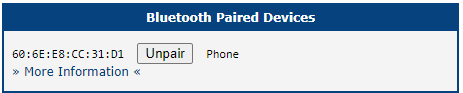
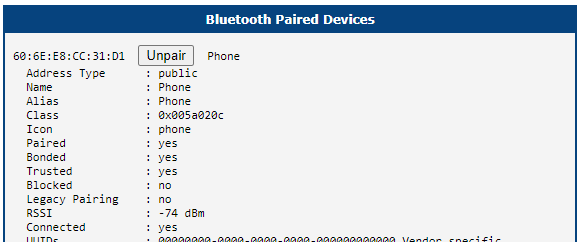
Paired Devices
This page displays a list of devices currently paired with the router. Detailed information for each device can be viewed even if the device is not currently within range. For more details on the pairing process, see the Pairing section.
General
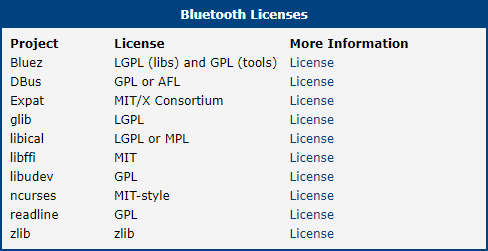
Licenses
This section lists the Open-Source Software (OSS) licenses used by the Bluetooth Router App.
Bluetooth Usage
Classic Bluetooth operates using the concept of profiles. For instance, if PAN Support is enabled, the Status page displays a UUID entry such as:
UUIDs: 00001116-0000-1000-8000-00805f9b34fb NAPThis indicates that the router is acting as a Network Access Point (NAP) for PAN.
To use specific profile services, devices must be paired and authorized. You can authorize profiles individually upon each use or mark a device as Trusted to allow global access to all profiles without repeated authorization.
For BLE, pairing is often optional, though it provides enhanced security when used. To establish a connection, ensure both devices have Bluetooth enabled and are in pairing mode. Once connected, data such as files or sensor readings can be transferred seamlessly.
Pairing
Pairing is the process where Bluetooth devices exchange security keys to enable encrypted communication. It is mandatory for Classic Bluetooth and optional for BLE.
The process involves an initiator and a responder. For a responder to accept a request, it must be in Pairable mode. It is also recommended to be in Discoverable mode so the initiator can find the device; otherwise, the initiator must know the responder's hardware address.
During pairing, you typically confirm you are connecting to the correct device via various authentication methods. If a device lacks a UI (e.g., no display or keyboard), authentication may be skipped or simplified.
Advantech routers support two primary pairing methods:
- Manual Pairing: Initiated from the Nearby Devices page (Authenticated).
- Automatic Pairing: Controlled via a digital input (BIN) (Non-authenticated).
Manual Pairing via Nearby Devices
In this scenario, the router acts as the initiator.
Pressing the Pair button next to a visible device initiates the process. If both devices support it, a 6-digit passkey is displayed on both the router's web interface and the target device for comparison. If the target device does not support manual authentication, pairing proceeds immediately.
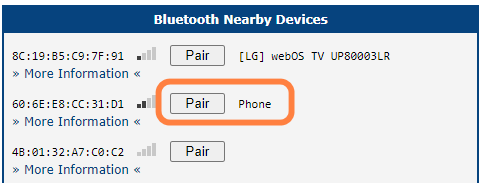
If authentication is required, the confirmation code appears on both the router's page and the device.
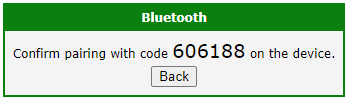
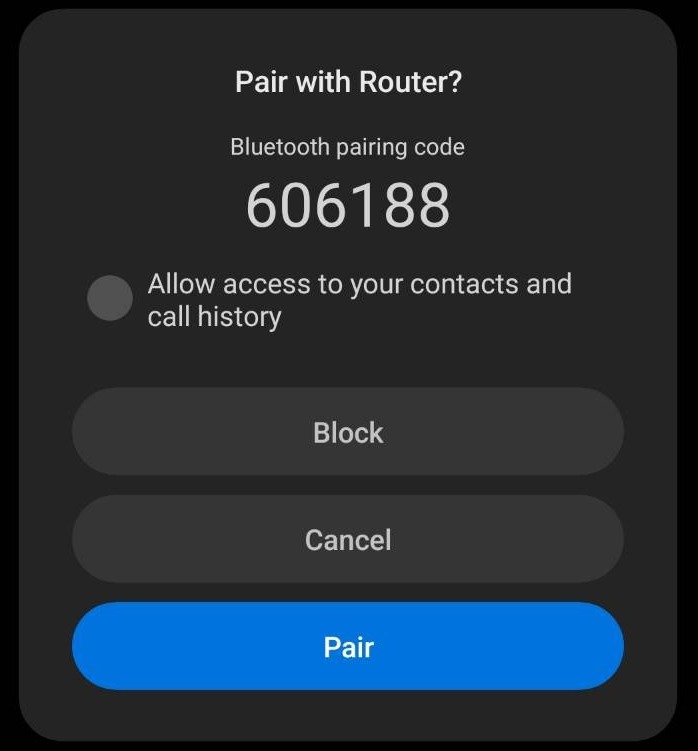
Upon confirmation, the device is successfully paired and appears in the Paired Devices list.
Automatic Pairing Controlled via BIN
In this scenario, the router acts as the responder.
If access to the router's web interface is restricted, pairing can be controlled via a physical digital input. When the digital input is triggered (e.g., by a button press), the router enters Pairable mode and automatically approves incoming pairing requests.
The specific digital input is defined in the Global configuration using the Pairable when BIN is low option. It is recommended to also enable the Discoverable option to make the router visible during this time.
Warning
Because this method does not use manual authentication, ensure there are no unauthorized devices nearby attempting to pair during this window.
Unpairing and Management
When pairing is successful, the device is automatically set to Trusted and Bonded, meaning keys are stored for long-term use. These keys are stored on the router in the /var/data/bluetooth directory; if this directory is cleared, all pairing information will be lost.
To unpair a device, click the Unpair button on the Paired Devices page. This can be done even if the device is not currently in range.

Tips
If an active device is unpaired, it may take a few moments to reappear in the Nearby Devices list.
For automation via scripts, the bluetoothctl tool can be used with the pair and remove commands.
Networking (PAN)
A Personal Area Network (PAN) is a type of network similar to a Local Area Network (LAN) but operates on a smaller scale. Devices connected via PAN can communicate with each other just as they would on a standard Ethernet network.
The router supports the Network Access Point (NAP) profile, allowing it to act as a PAN server. In this configuration, the router assigns IP addresses to connected devices and provides routing capabilities, enabling PAN clients to access other networks connected to the router.
To use PAN functionality, the router typically acts as a Network Access Point (NAP). Conversely, the connected device must display the PAN User (PANU) profile:
UUIDs: 00001115-0000-1000-8000-00805f9b34fb PANUTips
There is also a GN profile for creating a mesh-type network. However, this is not currently supported on Advantech routers. Likewise, the reverse direction, where the router connects to an access point, is not supported.
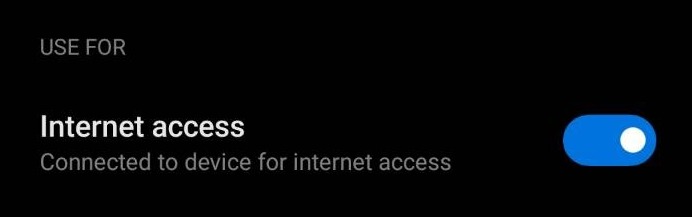
On the mobile device, you must enable Internet Access for the paired router in the Bluetooth configuration. For the router to mediate internet connectivity (WAN), the Masquerade outgoing packets option must be enabled in the NAT menu. Without this, the router allows connected devices to communicate only within the local network.
If the device is not set to Trusted on the router, an authorization request will be triggered when enabling the profile on the mobile device, which may fail if the router is not prepared to accept it.
Tips
When PAN is enabled, the pan0 interface appears in the system. For each connected device, there is a corresponding bnepX interface.
BLE (Sensors)
While Classic Bluetooth is typically used for transferring continuous data streams, BLE provides alternative methods for data transmission. Very short data payloads are often sent as manufacturer data items within advertising packets. For more complex scenarios, services and characteristics are used, as defined by the Bluetooth standard. In either case, specific software is required to parse and process the incoming data. Refer to the Examples chapter for examples of how to create your own BLE applications.
Command Line Tools
In addition to the web-based graphical user interface, the router provides a set of command-line tools for advanced configuration, management, and troubleshooting of Bluetooth connections. These utilities, primarily derived from the BlueZ Linux Bluetooth stack, allow you to interact directly with the Bluetooth daemon and low-level protocols.
Below is a list of the most commonly used utilities available in the router's command-line interface (CLI):
bluetoothctl— A powerful command-line utility for discovery, connection, disconnection, scanning, pairing, etc. You can find more details on how to use this tool in shell scripts to work with BLE sensors in Examples 1 and 2.bneptest— Development and debugging utilities for the Bluetooth protocol stack.btmon— Bluetooth monitor.dbus-monitor— This command is used to monitor messages passing through a D-Bus message bus.dbus-monitorhas two different output modes: the 'classic'-style monitoring mode and the profiling mode. The profiling format is compact, with a single line per message and microsecond-resolution timing information. The--profileand--monitoroptions select the profiling and monitoring output formats, respectively. If neither is specified, it defaults to the monitoring format. Whiledbus-monitoris not strictly part of Bluetooth, it is closely connected with BlueZ, which relies primarily on D-Bus for communicating with applications.dbus-send— Used to send a message to a D-Bus message bus. This tool is very useful for testing and debugging. Similar to the monitor, it is closely tied to BlueZ IPC.l2ping— Sends an L2CAP echo request to the Bluetooth MAC address (bd_addr) given in dotted hex notation. This tool is useful for testing connectivity.l2test— Tool for testing Bluetooth communication at a lower level. Example: On the router, runl2test -r. On a PC with Bluetooth, runl2test -s BT_ROUTER_ADDRESS. You should then see the Bluetooth data being received on the router.
Examples
The following examples demonstrate how to use Bluetooth capabilities in customer projects. They cover different Bluetooth communication types as well as various programming languages and environments. We hope that a combination of all these examples covers most of your project requirements.
You can also find additional Bluetooth examples in the Node-RED application note (Examples 4 and 5).
Reading From a BLE Sensor Using a Shell Script
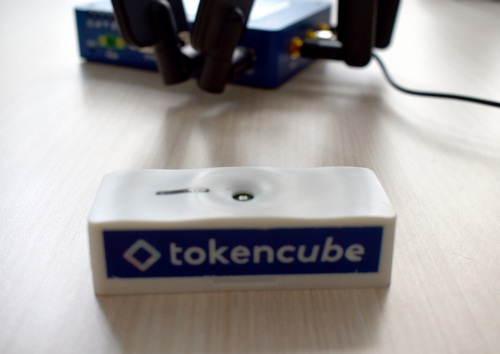
In this example, we read the temperature from a TokenCube BLE tag upon receiving an SMS request.
The sensor mentioned above advertises data via the manufacturer data item. We must know the exact data structure to process it. Advantech does not provide this information; you must consult the sensor vendor. Brief information for this particular example follows:
| Byte Nr. | Description | Value |
|---|---|---|
| 0..1 | Manufacturer ID | 0xFFEE |
| 2 | Hardware ID | 0x04 — Token version 4 |
| 3 | Firmware version | 0x01 |
| 4 | Page number — first nibble is total number of pages, second nibble is page number | 0x21 or 0x22 — two pages, first or second page |
| 5 | Sensor identifier | 0x01..0x0A — normal mode, 0x81..0x8A — alarm mode; see next table for normal mode |
| 6..x1 | Sensor value | --- |
| (x1+1) | Next sensor identifier | --- |
| (x1+2)..x2 | Next sensor value | --- |
Data structure
| ID | Sensor Type | Values | Interpretation | Value |
|---|---|---|---|---|
| 0x01 | Temperature | °C | int16, BE | 0x14 0x03 = 5123 = 51.23 °C |
| 0x04 | Humidity | % RH | int16, BE | 0x10 0x87 = 4231 = 42.31 % |
| Other sensor IDs ... | ||||
Data interpretation
Due to the limited size of the manufacturer data payload, the tag advertises data alternately in two different records. An example of that data, with the temperature bytes representing 22.3 °C highlighted, is shown below:

We use the standard BlueZ tool, bluetoothctl, to retrieve the data:
We then process the output using the awk tool. The script tries to read the data several times to ensure it captures the specific page containing the temperature data.
Tips
Many sensors have a much simpler data structure than this tag (e.g., a single data block where values are defined by fixed positions in the data stream instead of prefixes). Although the temperature data should strictly be searched by the ID 0x01, our tested tags consistently returned temperature as the first value. Therefore, we read it as the first value in our example to keep the code clear and simple.
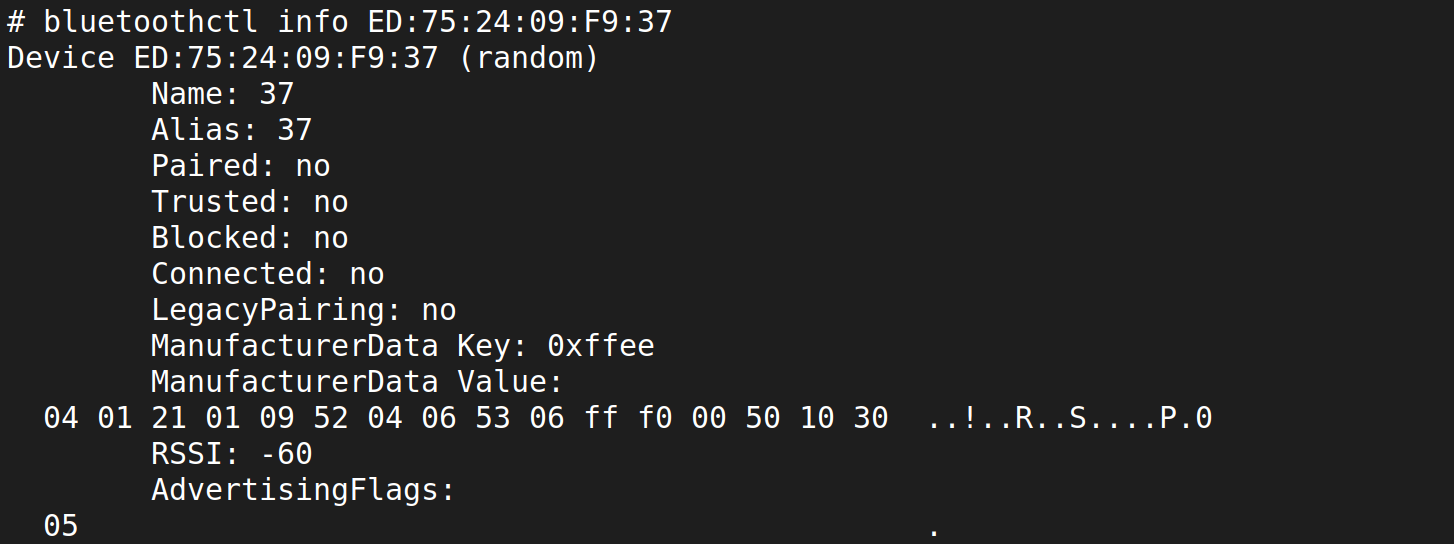
Place the resulting script in /var/scripts/sms. Do not forget to replace the MAC address ED:75:24:09:F9:37 with your tag's actual address, and ensure the script is marked as executable.
#/bin/sh

if [ "$3" == "TEMPERATURE" ]; then
  ATTEMPT=200
  while [ $ATTEMPT -gt 0 -a "$TEMPERATURE" == "" ]; do
    TEMPERATURE=`bluetoothctl info ED:75:24:09:F9:37 | \
    awk '/ManufacturerData Value:/ {next} /^\s+04 01 21/ \
        {print (("0x"$5)*256 + ("0x"$6))/100;exit;}'`
    ATTEMPT=$(($ATTEMPT - 1))
  done

  if [ "$TEMPERATURE" != "" ]; then
    gsmsms $2 "Temperature is $TEMPERATURE degree Celsius"
  else
    gsmsms $2 "Temperature value is not available"
  fi
fi
Now, when you send an SMS containing the text "temperature" (case-insensitive) to your router's SIM phone number, the mwan daemon passes it as argument $3 to your script. You will then receive the temperature value back on the originating phone number (argument $2). Note that the mwan service must be running for SMS reception to work. In a real-world application, it is advisable to restrict accepted phone numbers (consult the router's manual).
Additionally, be aware that the /var/scripts folder is cleared upon reboot. You must ensure the script is restored after every boot, for example, by copying it via the system Startup Script or via an init script in your own custom Router App.
Writing to a BLE Device Using a Shell Script
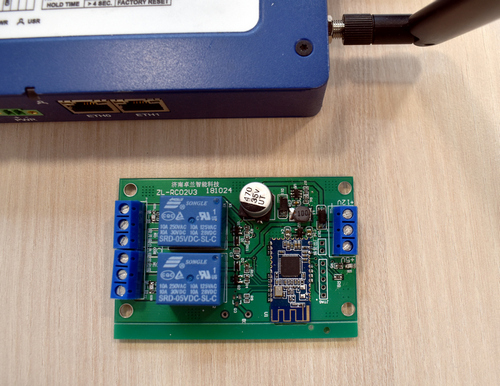
In this example, connected devices are switched on and off via a Jollan IoT ZL-RC02V3 BLE relay module at specified times.
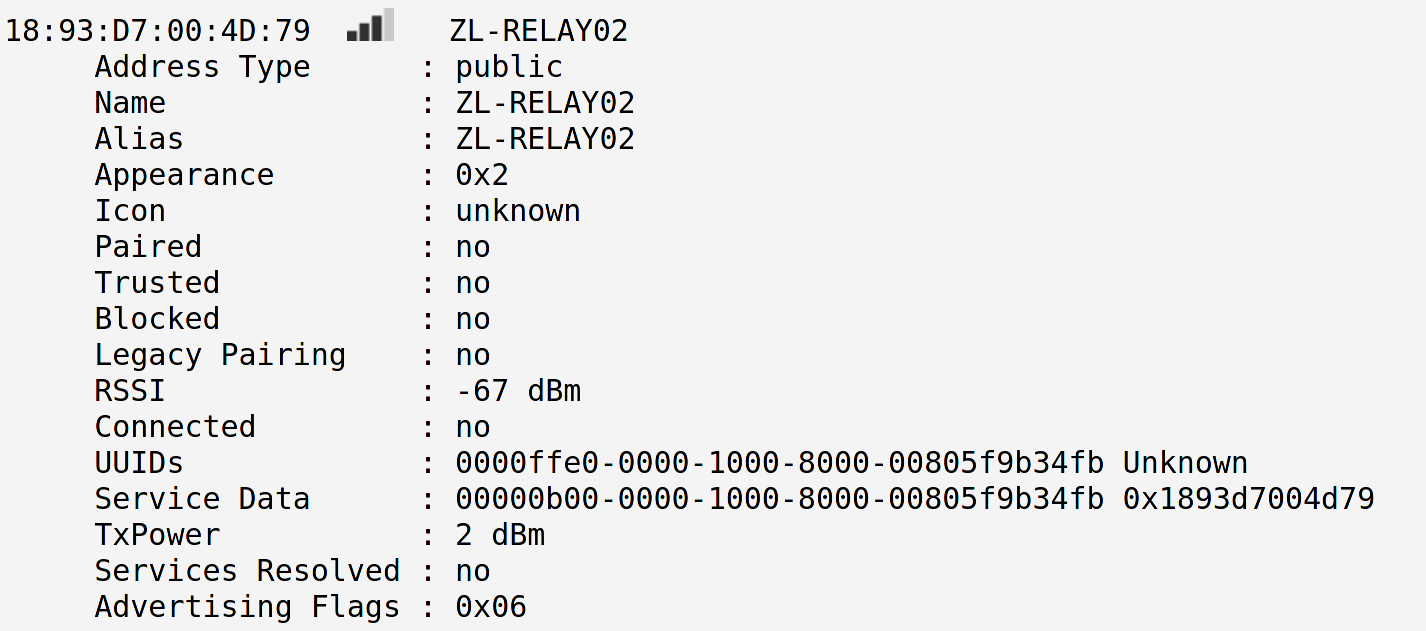
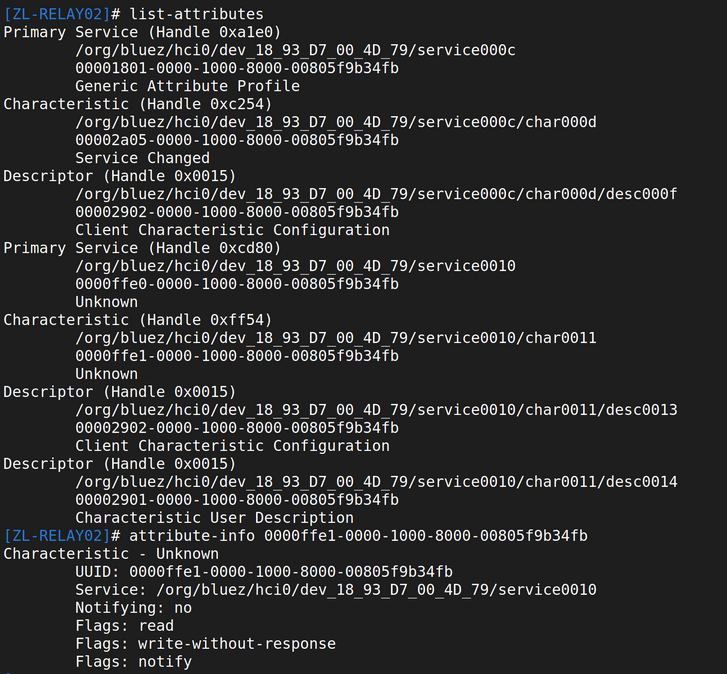
The ZL-RC02V3 module uses BLE services and characteristics to control its relays. You can explore these BLE characteristics using the bluetoothctl tool. Start the tool, connect to the relay module with the connect command (e.g., connect 18:93:D7:00:4D:79), and enter the GATT submenu by typing menu gatt. From there, you can use the list-attributes and attribute-info commands. We are specifically interested in the 0000ffe1-0000-1000-8000-00805f9b34fb characteristic.
Based on the relay module's documentation, we find the following control commands:
| Command | Byte sequence |
|---|---|
| Close the first relay | C5 04 XX XX XX XX XX XX XX XX AA |
| Open the first relay | C5 07 XX XX XX XX XX XX XX XX AA |
| Close the second relay | C5 05 XX XX XX XX XX XX XX XX AA |
| Open the second relay | C5 06 XX XX XX XX XX XX XX XX AA |
| Where the 8 XX bytes represent a password. The default password is "12345678" (in ASCII). | |
Relay control commands
Tips
You must contact the relay module vendor to obtain full documentation. Advantech does not provide it.
We use bluetoothctl again to control the relays via a script. Save the following script as /var/scripts/relays:
#/bin/sh

case "$1" in
  ON)
    R1=0x04
    ;;
  OFF)
    R1=0x06
    ;;
  *)
    echo "The first relay state is invalid"
    exit 1
    ;;
esac

case "$2" in
  ON)
    R2=0x05
    ;;
  OFF)
    R2=0x07
    ;;
  *)
    echo "The second relay state is invalid"
    exit 1
    ;;
esac

bluetoothctl connect 18:93:D7:00:4D:79
if [ $? -ne 0 ]; then
  logger -t relays "Failed to connect to relays"
fi

echo -e \
"menu gatt\n" \
"select-attribute 0000ffe1-0000-1000-8000-00805f9b34fb\n" \
"write \"0xC5 $R1 0x31 0x32 0x33 0x34 0x35 0x36 0x37 0x38 0xAA\"\n" \
"write \"0xC5 $R2 0x31 0x32 0x33 0x34 0x35 0x36 0x37 0x38 0xAA\"\n" \
| bluetoothctl

bluetoothctl disconnect 18:93:D7:00:4D:79
Next, create the following configuration in /var/scripts/crontab:
00 02 * * * root /var/scripts/relays ON OFF
10 02 * * * root /var/scripts/relays ON ON
00 03 * * * root /var/scripts/relays OFF OFF
Finally, start the cron daemon by executing: /etc/init.d/cron start
The script will now switch on the first relay at 2:00 AM, the second relay 10 minutes later, and switch off both relays at 3:00 AM every day.
The /var/scripts folder is cleared upon reboot, so you must restore the scripts after every boot (e.g., using the Startup Script or a custom Router App init script).
Reading a BLE Sensor in C
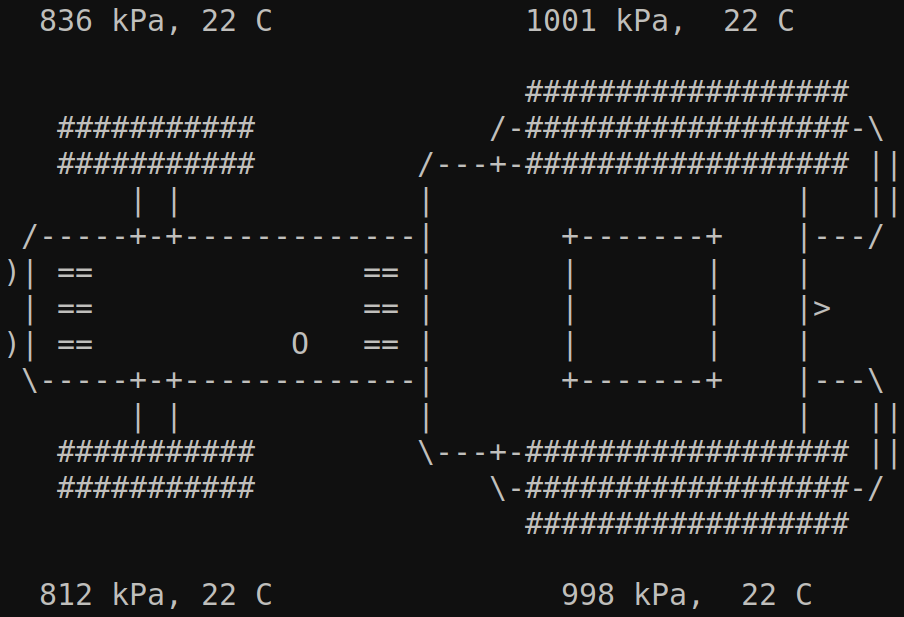
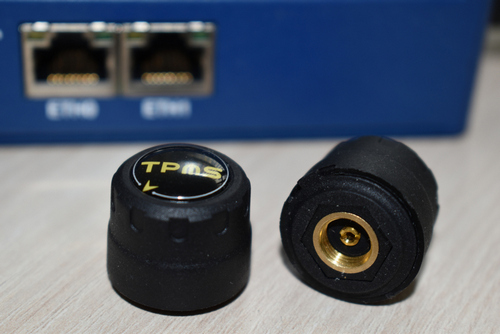
This example demonstrates how to read data from a BLE Tyre Pressure Monitoring Sensor (TPMS) using the C programming language.
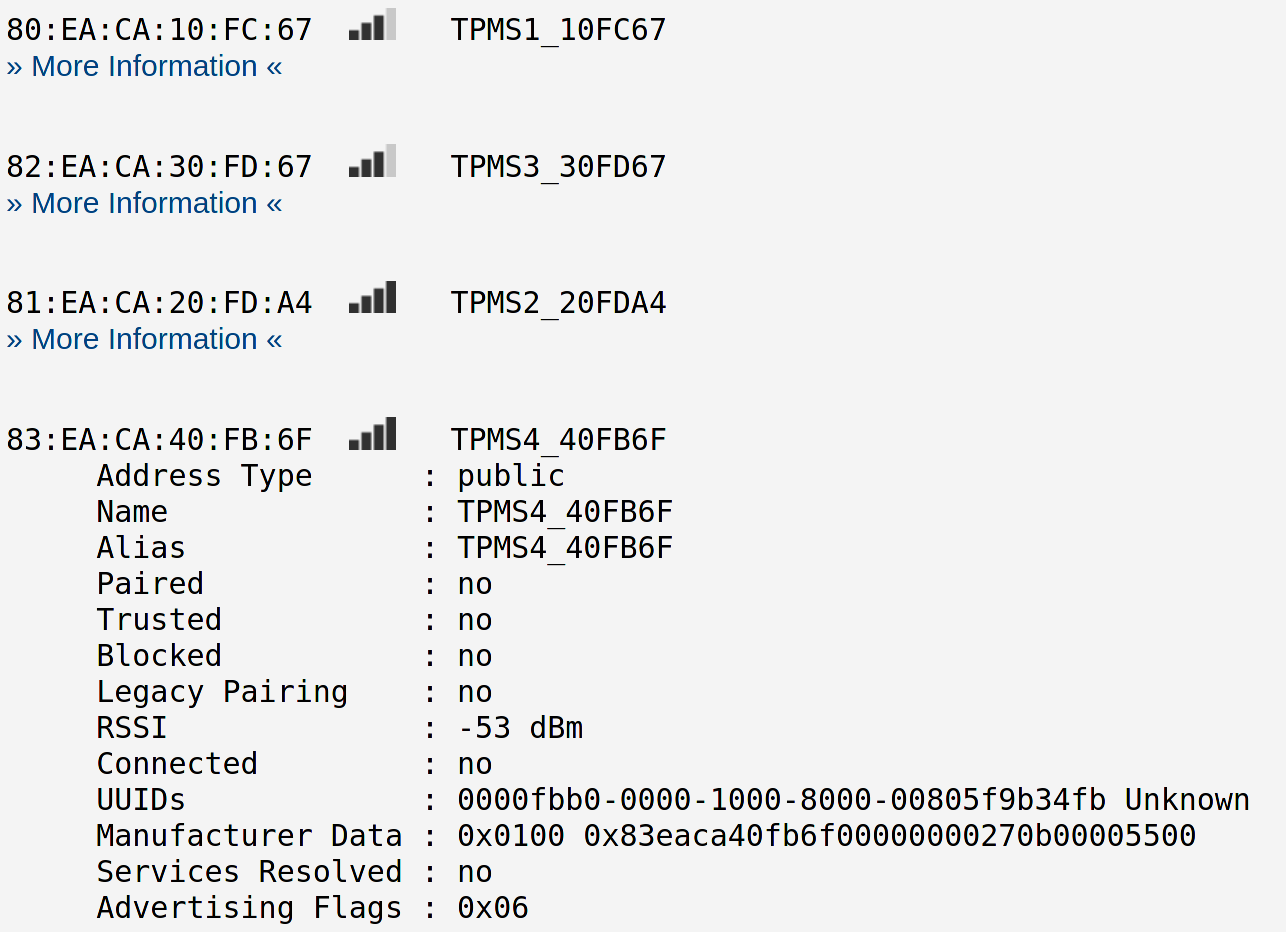
The sensors used in this example propagate data via manufacturer data advertising items. Note that to save battery, these sensors broadcast at very long intervals and immediately upon detecting a pressure change. Therefore, a real-world application requires a permanently running daemon. This example is written to run in the foreground and output results for demonstration purposes. You can mount or dismount the sensor from the tyre to force it to transmit data.
We have two options when using BlueZ: HCI and D-Bus. We use the HCI API in this example. Because HCI can be complex for advanced applications, the BlueZ authors generally recommend using the newer D-Bus API. (See the next example for a D-Bus approach.)
Tips
You need a Linux environment for the following steps. Ubuntu is suggested.
This example is a bit complex as it requires a cross-compiler and several dependencies. We resolve the compiler prerequisite using our Router App SDK. Clone the following repositories from the public Git:
git clone git@bitbucket.org:bbsmartworx/modulessdk.git
git clone git@bitbucket.org:bbsmartworx/toolchains.git
Rename the first repository to ModulesSDK. Install the deb or rpm packages from the second repository. You can find more details about building a Router App in the Extending Router Functionality page.
The Makefile resolves dependencies by downloading their source codes from the internet and building them automatically. Note that it attempts to build only the necessary components.
Next, navigate to ModulesSDK/modules and copy the template to create a new project called tyres. You can optionally change the contents of tyres/merge/etc/name and tyres/merge/etc/version.
Then, remove all contents of the tyres/source folder and place the following two files in it:
Makefile— Download theexample3-makefile.txtfile from the Bluetooth Router App page and rename it toMakefile.tyres.c— Download theexample3.cfile from the Bluetooth Router App page and rename it totyres.c.
The Makefile is not commented as it falls outside the scope of this documentation. All logical steps in the C source code are commented, and a brief overview of the process follows.
The common steps for working with BLE sensors via HCI are:
- Initialize: Open the device, set the filter, configure parameters, and enable scanning.
- Wait and read data: Use
read(), optionally combined withselect(). - Process: Parse the read data by navigating through the event structures (see below).
- Stop: Disable scanning and close the device.
Although you can interface directly with HCI via sockets alone, we recommend using the BlueZ API with its HCI structure definitions and higher-level functions. We use the following structures when parsing a received HCI event during scanning:

Unfortunately, the API lacks strict definitions for parsing beacon data payloads, as the structure is not fully standardized and multiple proprietary formats exist (e.g., AltBeacon, iBeacon, URIBeacon). The sensors in this example broadcast using the iBeacon format.
We must understand the manufacturer's data structure to extract the exact pressure and temperature values. The necessary offsets for this example are documented in the code comments. Advantech does not provide documentation for third-party sensors; you must consult the sensor vendor for their specific data specifications.
Once everything is prepared, run make PLATFORM=v3 (adjusting the platform flag if needed). The resulting tyres binary will be located in the obj.v3 subfolder. Copy this binary to your router (e.g., via SFTP) and execute it from the terminal.
Alternatively, you can install the fully built Router App package tyres.v3.tgz, and you will find the binary pre-installed at /opt/tyres/bin/tyres. After execution, you should see an output similar to the following: