Node-RED
Caution
- This Router App has been tested on a router with firmware version 6.3.10. After updating the router firmware to a higher version, check whether a newer version of the Router App has also been released and update it accordingly for compatibility.
- The Node-RED Router App requires Node.js to be installed first — see the Node-RED Dependency and Extensions section.
- This Router App is only compatible with v3 and v4 platform routers.
Node-RED Router App Description
Node-RED is a flow-based programming tool for wiring together hardware devices, APIs, and online services in new and interesting ways.
The Node-RED Router App for Advantech routers allows Node-RED to run in v3 and v4 routers as a software router app. This enables the use of the router as a Node-RED device.
Node-RED provides a browser-based editor that makes it easy to wire together flows using the wide range of nodes in the palette that can be deployed to its runtime in a single click. The lightweight runtime is built on Node.js, taking full advantage of its event-driven, non-blocking model. This makes it ideal for running at the edge of the network (in a router) as well as in a cloud. JavaScript functions can be created within the editor using a rich text editor. A built-in library allows you to save useful functions, templates or flows for reuse. The flows created in Node-RED are stored using JSON which can be easily imported and exported for sharing with others or other devices.
Tips
For more information and full documentation see: http://nodered.org/
Caution
Flow definitions are part of the router report automatically, so if you want to send the report to Support, it is unnecessary to attach flow definitions separately. The report does not contain data declared by the node as confidential (credentials).
Node-RED Dependency and Extensions
Tips
It is necessary to install the Node.js router app prior to Node-RED. Node.js is required for Node-RED to work — it is a separate router app, and it can also be used as a standalone JavaScript server for other purposes.
You can also install other Node-RED Router Apps. These add more nodes to Node-RED. List of available extension Router Apps:
- AWS
- Azure
- BACnet
- Bluetooth
- Dashboard
- dnp3
- Filesystem
- FTP
- GPSd
- gzip
- KNX
- LwM2M
- Modbus
- OPC UA
- PLC - EtherNet/IP
- PLC - Melsec
- Splunk event collector
Each of these additional node packages is a separate Router App with its own page, listed under Node-RED in the sidebar.
Tips
The Node-RED module MQTT Broker was removed. If you want MQTT Broker functionality in Advantech routers, use the separate MQTT Broker router app, which is more powerful and has more functions.
Caution
Please always use a combination of the latest versions of published Node-RED modules. Correct functionality cannot be guaranteed for a mix of versions.
Node-RED Router App
When uploaded to the router, the Router App is accessible in the Customization section in the Router Apps item of the router's web interface. Click on the title of the Router App to see the Router App menu as shown below:
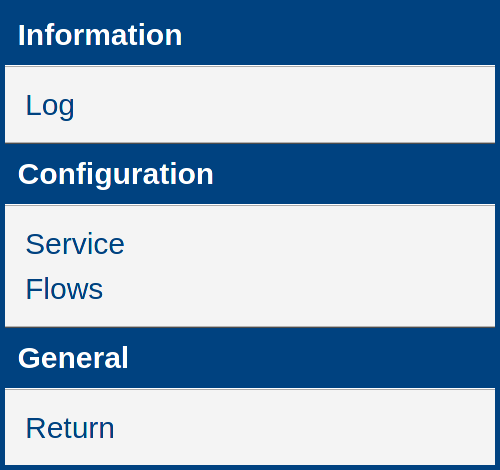
The Information section provides the Log page with the Node-RED logging messages. You can auto start/stop Node-RED on any port in the Configuration section or access the flow editor. The Return item in the General section returns to the higher menu of the router.
Node-RED Configuration
| Item | Description |
|---|---|
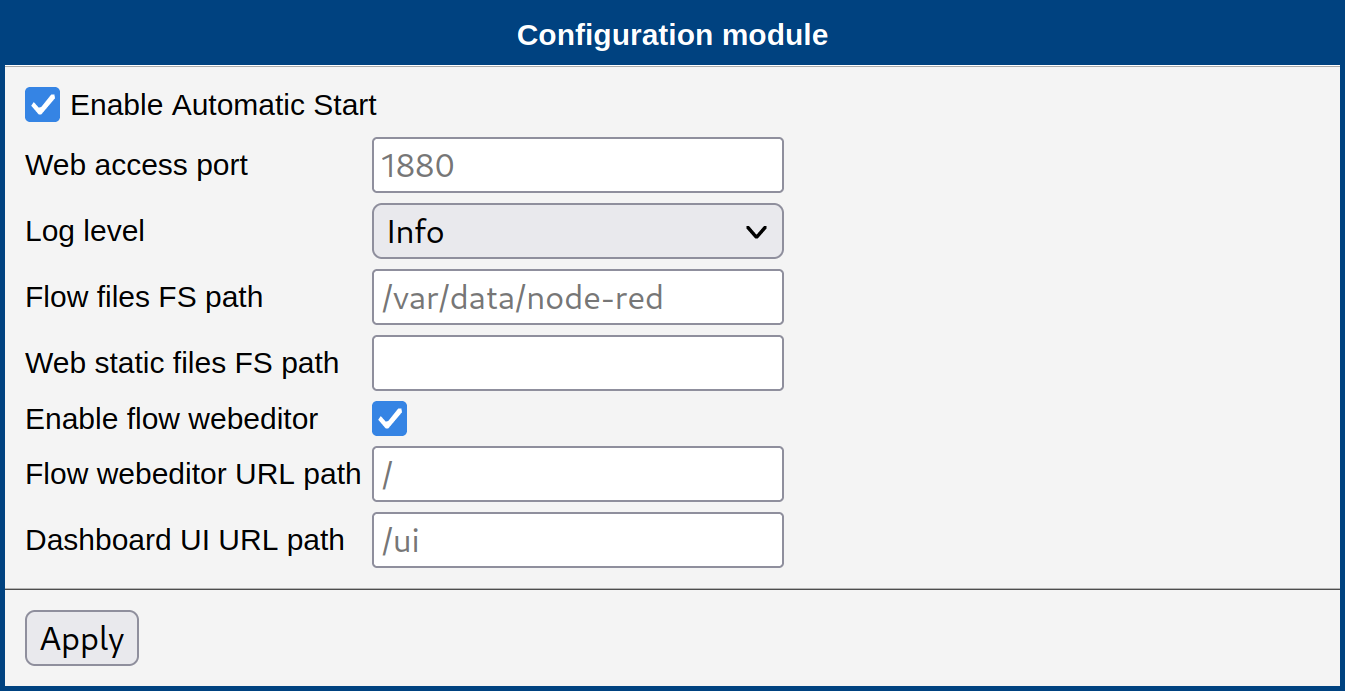
| Enable Automatic Start | Enables Node-RED functionality. |
| Web access port | Enter the port where you want to run the Node-RED HTTP server. The flow editor and all other web-accessible parts (e.g., HTTP in node or Dashboard nodes) communicate on this port. The default port is 1880. |
| Log level | Choose the severity of the information you want to see in the log. See the Node-RED Status (Log) section for details. |
| Flow files FS path | Specify the path where the flow definitions will be stored. See the Flow Files Path section for details. The default value is /var/data/node-red. |
| Web static files FS path | Specify the path from which the Node-RED web server serves files. See the Web Static Files FS Path section for details. |
| Enables flow webeditor | Uncheck this option on production routers to prevent end users from accessing the flow editor. See the Flow Webeditor section for details. |
| Flow webeditor URL path | The path part of the URL through which a user can access the flow editor. See the Flow Webeditor section for details. |
| Dashboard UI URL path | The path part of the URL through which a user can access the Dashboard web GUI. See the Flow Webeditor section for details. |
Configuration items
Run and Access the Node-RED Engine
When the router app is uploaded to the router, follow these steps to run Node-RED in the router:
In the router app menu, go to Configuration → Node-RED and check Enable Automatic Start. Press the Apply button. Node-RED will start and run continuously whenever the router is running (including after reboots, until deactivated again by unchecking the checkbox and pressing Apply). You can see its status information on the Log page — the "Started flows" row indicates a fully started Node-RED engine. You can also enable or disable the flow editor to restrict end-user access.
Click on the menu item Flows to access the flow editor, or manually enter the address
https://<router_ip>:<port_number>/<webadmin_path>. HTTPS is mandatory as the communication is encrypted.Tips
Warning: It may take 30 seconds or longer to boot the Node-RED UI (depends on the router model, the number of installed nodes, and the flow size). Please wait if the login page does not load immediately.

Node-RED login in the router Log in using the same credentials used for the router administration (e.g., user
root). PAM authentication is used, so it is possible to log in with any defined user's credentials. Users can be managed in Administration → Users in the router's web interface.
Admin and User profiles have the same settings when authenticating into Node-RED and therefore have the same rights. For a different authentication process, refer to the documentation: https://nodered.org/docs/security
Flow Files Path
You can specify the path where the flow definitions will be stored. This is the GUI equivalent to the flowFile option in the settings.js file without the file name. The default path is /var/data/node-red. Setting this path to /opt/myapp/flows offers the benefit of being able to archive a flow as a classic Router App and install it afterward. See the How to Distribute Your Own Flows to the Routers section for more details.
Web Static Files FS Path
There is a Web static files FS path field on the Node-RED configuration page. This is the GUI equivalent to the httpStatic option in settings.js. It is the path from which the Node-RED web server serves files. It is useful for static web files (e.g., images) or for downloading collected data as a file. See Example 3: Ping Statistics for both use cases.
Caution
It is necessary to distinguish between the URI for local files (writing, storing data) and the URI for web access (reading for user access, downloading data).
Flow Webeditor
It is possible to customize access to the Node-RED GUI. You can prohibit user access to the Node-RED flow editor on production routers by unchecking Enables flow webeditor. When there is a Dashboard GUI for a running flow, the admin can set a custom URL path for access. Setting Dashboard UI URL path to / makes the GUI available at e.g. https://192.168.1.1:1880/. For convenient development in this case, a developer can set Flow webeditor URL path to e.g. /admin to avoid a conflict between the Dashboard and webeditor paths — the webeditor would then be accessible at https://192.168.1.1:1880/admin.
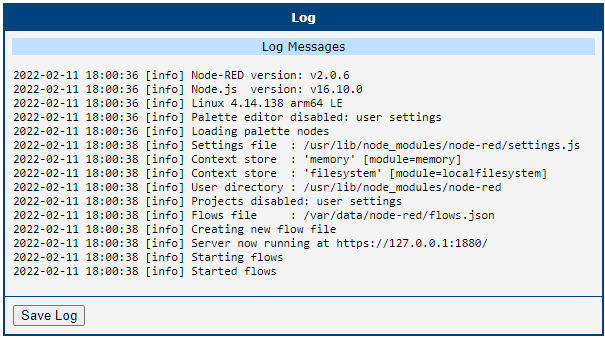
Node-RED Status (Log)
You can choose various log levels on the Node-RED configuration page. The following options are available: None, Fatal, Error, Warning, Info (the default), Debug, Trace.
The log messages are visible on the Log page in the Status section of the router app interface. Here you will find various information, such as software parts and versions used (Node-RED version, Node.js version, etc.), the settings file, the user directory, the flow JSON file, and more. These can be accessed or edited via SSH. Information about the start/stop of flows and error details is also shown. You can download the messages and save them as a text file by clicking the Save Log button. The version of all other individual nodes can be found in the Node.js Router App details on the Licenses page.
Available Nodes and Version
Node-RED Version
For more information about the software versions, see the Log page in the Node-RED Router App or the Licenses page in the Node.js Router App. The current Router Apps contain Node-RED version 3.0.2 and Node.js version 18.15.0.
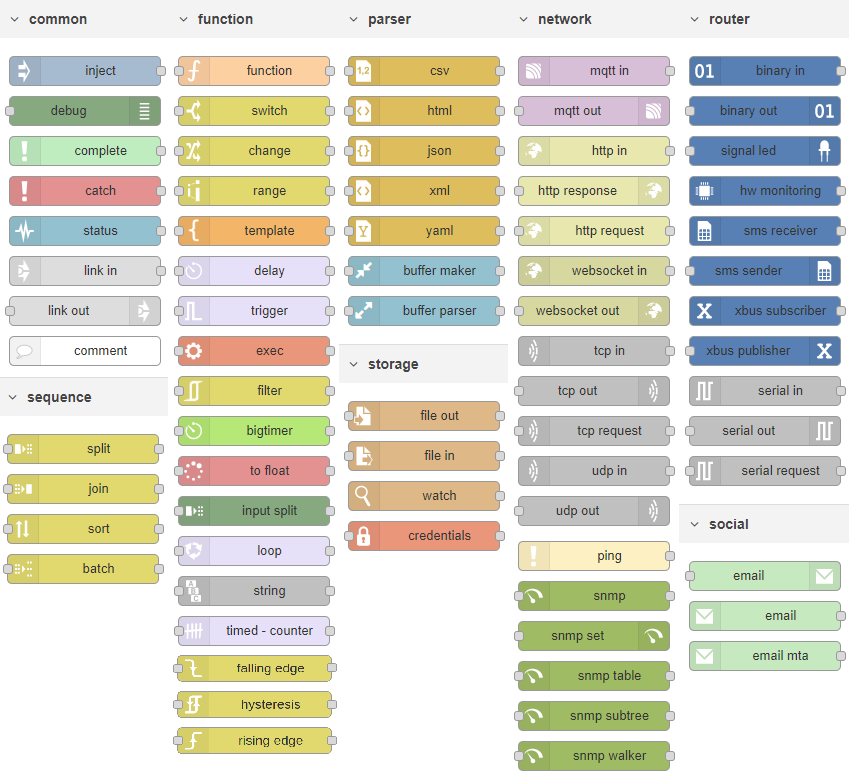
Available Nodes
Advantech ships Node-RED and all related nodes in Router App packages and other router additional software. The main Router App Node-RED contains Node-RED itself and these commonly usable nodes:
- Node packages required by Node-RED
- Router nodes — a special set designed for Advantech routers — see the Router Nodes section
- Big Time — https://flows.nodered.org/node/node-red-contrib-bigtimer
- Buffer Parser — https://flows.nodered.org/node/node-red-contrib-buffer-parser
- Credentials — https://flows.nodered.org/node/node-red-contrib-credentials
- Edge Trigger — https://flows.nodered.org/node/node-red-contrib-edge-trigger
- Float — https://flows.nodered.org/node/node-red-contrib-tofloat
- Input Split — https://flows.nodered.org/node/node-red-contrib-input-split
- Loop — https://flows.nodered.org/node/node-red-contrib-loop
- Ping — https://flows.nodered.org/node/node-red-node-ping
- Snmp — https://flows.nodered.org/node/node-red-node-snmp
- String — https://flows.nodered.org/node/node-red-contrib-string
- Timed Counter — https://flows.nodered.org/node/node-red-contrib-timed-counter
Other nodes are available in separate Router Apps, each documented on its own page listed under Node-RED in the sidebar. The figure below lists a complete graphical overview of the nodes available in the Node-RED UI.
Caution
The router's firmware version 6.2.1 or above is required for the watch node to work correctly.
For any other node that Advantech does not provide as a part of the Router Apps, you can try to prepare it for the router yourself (see the Building the Custom Nodes for Node.js/Node-RED section) or send a request to cellular.info@advantech.com.
Router Nodes
Advantech provides custom router nodes to access router-specific features. The list of available router-related nodes is in the table below. When clicking on the nodes, more detailed documentation is available in the Node-RED UI.
| Node | Description |
|---|---|
 | Gets a router configuration (both Firmware and all Router App configurations). |
 | Sets a router configuration (both Firmware and all Router App configurations). |
 | Digital input node for the router. Sends a message with payload 0 or 1 to the node output when the pin changes state. |
 | Digital binary output node for the router. |
 | Directly controls the signal LED on the router. |
 | Monitors the hardware parameters. You can select between the temperature in Celsius degrees and the power supply in Volts. |
 | Receives an SMS to the router. |
 | Sends an SMS from the router. |
 | Subscribes messages from XBus. |
 | Publishes messages to XBus. |
Router nodes
Advanced Topics
File Locations
Files related to Node-RED are organized in the router as follows:
/usr/lib/node_modules — Node.js looks for node modules in this folder and its subfolders. One of the subfolders is node-red with the Node-RED installation.
/usr/lib/node_modules/node-red/settings.js — File with Node-RED configuration and authentication configuration.
/usr/lib/node_modules/node-red/nodes — Node-RED looks for nodes in this folder. You can put 3rd party nodes directly into this folder.
/var/log/module-nodered — Logs from Node-RED are written in this file. The log is rotating (maximum size is 1 MB; the history length depends on the log level set).
/var/data/node-red/flows.json — File contains definition of your flows. The path part is configurable — see the Flow Files Path section.
/var/data/node-red/flows_cred.json — File contains credentials (confidential data) of your flows. The file is encrypted. The path part is configurable — see the Flow Files Path section.
/var/data/node-red/context — Node-RED stores persistent flow and global variables here.
How to Distribute Your Own Flows to the Routers
There are several options for distributing flows you created to multiple other routers.
You can use the export/import functions in the flow editor and perform the deployment. This way is useful especially during development. However, it is too tedious for distributing to production routers and cannot be automated.
For example, you could directly copy the files with flow definitions over SFTP. The path to those files can be set in the Configuration (Flow files path item). The default path is /var/data/node-red. The main file is called flows.json. After the file is uploaded, Node-RED needs to be restarted.
If your flows contain confidential data (for example, a password in an FTP node), you will also need to add the file flows_cred.json. This file is encrypted. For the router to be able to decrypt this file, the secret from the router where the flows were created is needed. The secret is generated during the first launch of Node-RED, or you could choose your own. This option is not accessible via the GUI. The secret can be found in the /opt/nodered/etc/setting file under the MOD_NODERED_CREDSECRET item. If you are running a bulk router installation, you are probably loading a prepared configuration. The needed secret for Node-RED will be easily distributed if the configuration is prepared on the router where the flows are developed.
The best way to distribute flows to multiple devices is to create your own Router App. This way you can install and update your Node-RED application exactly like other Router Apps. One simple trick is needed — set the storage folder for flows (Flow files path item in Configuration) to a path under /opt (for example /opt/myapp/flows).
After that, prepare the myapp folder with subdirectories flows and etc. Place the flow definitions in flows (see above). The etc folder should contain text files name and version with the name and version of your application. Compress everything using the tar command:
tar -czf myapp.v3.tgz myappMore information about creating Router Apps/User Modules can be found in the Extending Router Functionality application guide.
Your own Router App can also be used for distributing your own nodes (see the Building the Custom Nodes for Node.js/Node-RED section for details on how to prepare your own node). The finished node can then be compressed with the other files to a .tgz. The user needs to create a symbolic link to the node on the router, for example /usr/lib/node_modules/node-red/nodes/mynode → /opt/myapp/nodes/mynode. Use the script /opt/myapp/etc/install for creating the symbolic link and /opt/myapp/etc/uninstall for deleting it. Make sure these scripts are executable.
Example of the install script:
#!/bin/sh

if [ ! -L /usr/lib/node_modules/node-red/nodes/mynode -a -L \
/usr/lib/node_modules/node-red ]; then
    ln -s /opt/myapp/nodes/mynode /usr/lib/node_modules/node-red/nodes/mynode
fi

# If it isn't firmware update and it isn't called from Node-RED install script
if [ -e /etc/settings -a "$1" != "norestart" ]; then
    /opt/nodered/etc/init restart
fi
And the uninstall script:
#!/bin/sh

rm -f /usr/lib/node_modules/node-red/nodes/mynode

/opt/nodered/etc/init restart
There are other ways to get your flows to Node-RED, for example the Node-RED REST API, but this topic exceeds the focus of this application note.
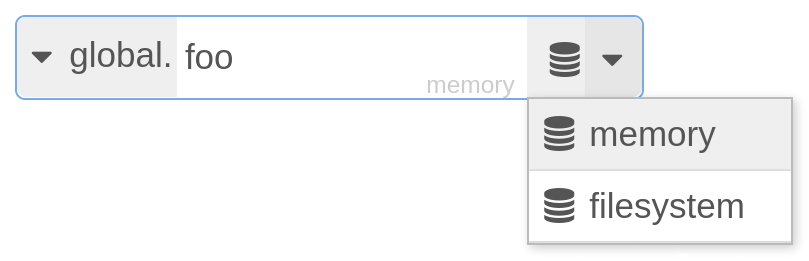
Persistent Variable Storage
The persistent storage for variables is defined in the Node-RED configuration. When you add an item of the flow or global type, you can choose whether it should be stored in memory or in the filesystem. In the case of the filesystem, the variable survives even a router reboot. Items are physically stored in /var/data/node-red/context.
Node "router"
The router node is added to the global context. See the Node.js Application Note for more information about this node. You can use this node to obtain router data, such as a serial number. The example below shows how to get the serial number into the message payload.
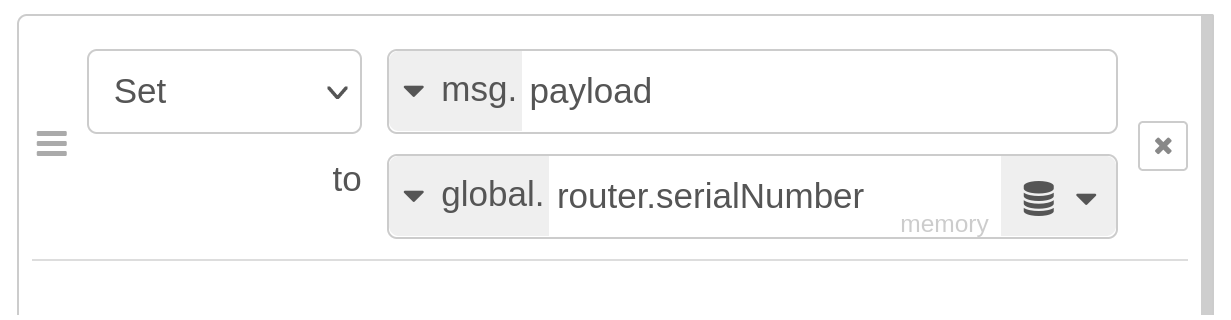
Alternatively, the router node can be used in the function node, like this:
let router = global.get('router')
msg.payload = router.productName
Building the Custom Nodes for Node.js/Node-RED
Caution
Advantech is not responsible for the consequences caused by customer-built nodes, and it provides no support for the instructions in this section.
An official way to build and install a node is using the npm command. However, the router is an embedded device with limited resources, and some nodes require a complex build environment and high performance because of languages other than JavaScript. Advantech provides the npm tool as a standalone Router App. You can install it on the router, but its usage is limited.
Another way is to prepare a node on a PC with Linux and then copy it to the router. The process is straightforward, but in some cases, you need to have a PC with the same major version of Node.js as is on the router.
Tips
During installation, you can encounter two kinds of nodes: those written in JavaScript only and those written in JavaScript and other language(s). Some node authors provide prebuilt binaries so you can install the latter type just as easily as pure JavaScript nodes. But when you see a message:
WARN install No prebuilt binaries foundin npm output, you need to compile the binaries, and the following section is one option for you.
Preparing JavaScript Only Nodes on PC
These nodes need only an NPM package manager. Install NPM via your distribution repository. For example, for deb-based distributions:
apt-get install npmFor rpm-based distributions:
dnf install npm(or yum install npm)
Now you can prepare the desired node:
npm --global-style install NODEwhere NODE is a node name as found on www.npmjs.org or flows.nodered.org.
Once finished, you can see a node_modules folder with the desired node folder inside. Copy the node folder to the router at /usr/lib/node_modules/node-red/nodes (e.g., via FTP/SFTP), restart Node-RED and the node(s) should appear in the palette. A better approach is to place it in /opt and create a link from the mentioned folder to avoid overriding during firmware upgrades. Packing the result node to a .tgz file as a common Router App is also possible.
Preparing Nodes Using Other Languages on PC
Some nodes have parts written in languages other than JavaScript. These nodes require the GYP meta-build system and a build environment relevant to the language.
GYP package is NPM-dependent on most distributions, so you do not need to install it separately.
For the most common languages, C/C++, you can use the same toolchains used for building the router's router apps. See the Environment Setup chapter in the Developing Router Apps Guideline to learn how to install it.
When you have installed all prerequisites, invoke the following commands for the V3 platform:
export CC="/opt/toolchain/gcc-conel-armv7-linux-gnueabi/bin/armv7-linux-gnueabi-gcc"
export CXX="/opt/toolchain/gcc-conel-armv7-linux-gnueabi/bin/armv7-linux-gnueabi-g++"
npm --arch=arm --global-style install NODE
Or for the V4 platform:
export CC="/opt/toolchain/gcc-conel-aarch64-linux-gnueabi/bin/aarch64-linux-gnueabi-gcc"
export CXX="/opt/toolchain/gcc-conel-aarch64-linux-gnueabi/bin/aarch64-linux-gnueabi-g++"
npm --arch=arm --global-style install NODE
where NODE is again the real node name. Continue with copying as described above.
Caution
Bindings to other languages can use a version-dependent API, so while building, it is strongly recommended to have the same Node.js major version as is in the router.
Installing Nodes Directly on Router
The npm tool installs nodes physically to /usr/lib/node_modules on the system partition.
Tips
Applications installed in the system partition will be deleted upon updating the router firmware.
Caution
Be aware that if the /usr/lib folder fills the entire storage, it may render the router non-functional, and a factory reset might not resolve the issue. Ensure not to install too many applications in this folder.
You can manage nodes with the installed npm Router App on the router. A common command is:
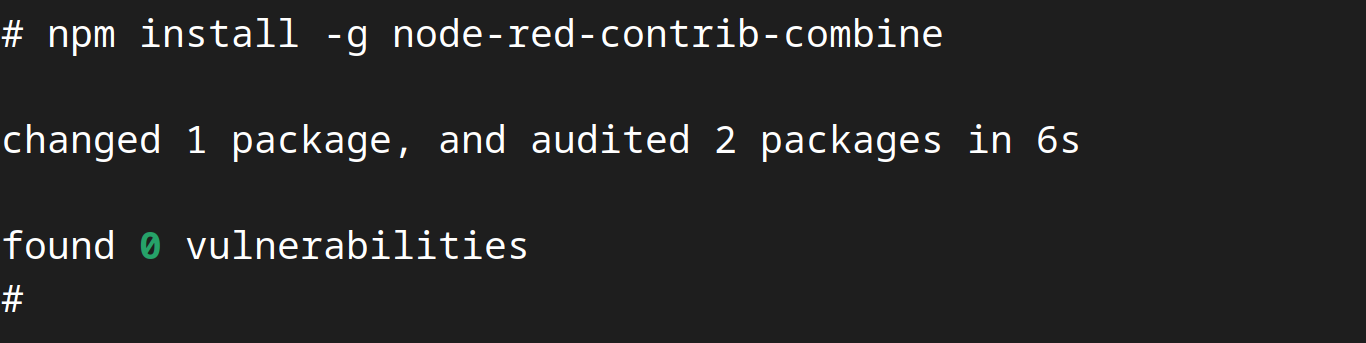
npm install -g <node_name>For example:
npm install -g node-red-contrib-combineThis installs the node to the main node modules folder /usr/lib/node_modules. Node-RED can find palette nodes in this location. It is possible to install with npm to a different location, but note that other folders are symlinks to /opt and they are overwritten on updates.
Note that the npm tool requires an internet connection.
Caution
Only nodes provided by Advantech as Router Apps are supported. There will be no support for Node.js/Node-RED nodes installed by the npm tool.
Flow Examples
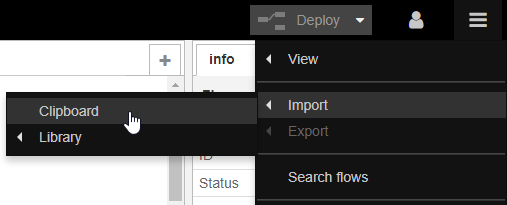
The following examples are importable to Node-RED via JSON code. To import an example to the Node-RED UI, copy the JSON code provided in the example. Import the code via the top right menu in the Node-RED UI by choosing Import → Clipboard.
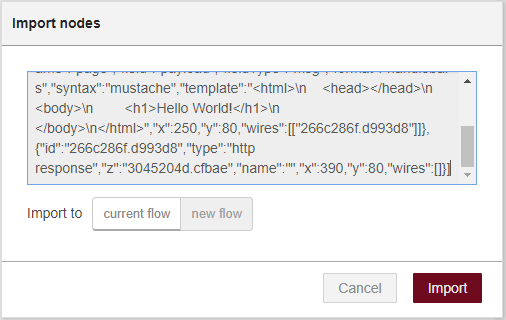
Paste the JSON code into the input field, as shown in the figure below.
After import, the JSON code turns into the desired nodes flow.
Example 1: User LED Turn On and Off
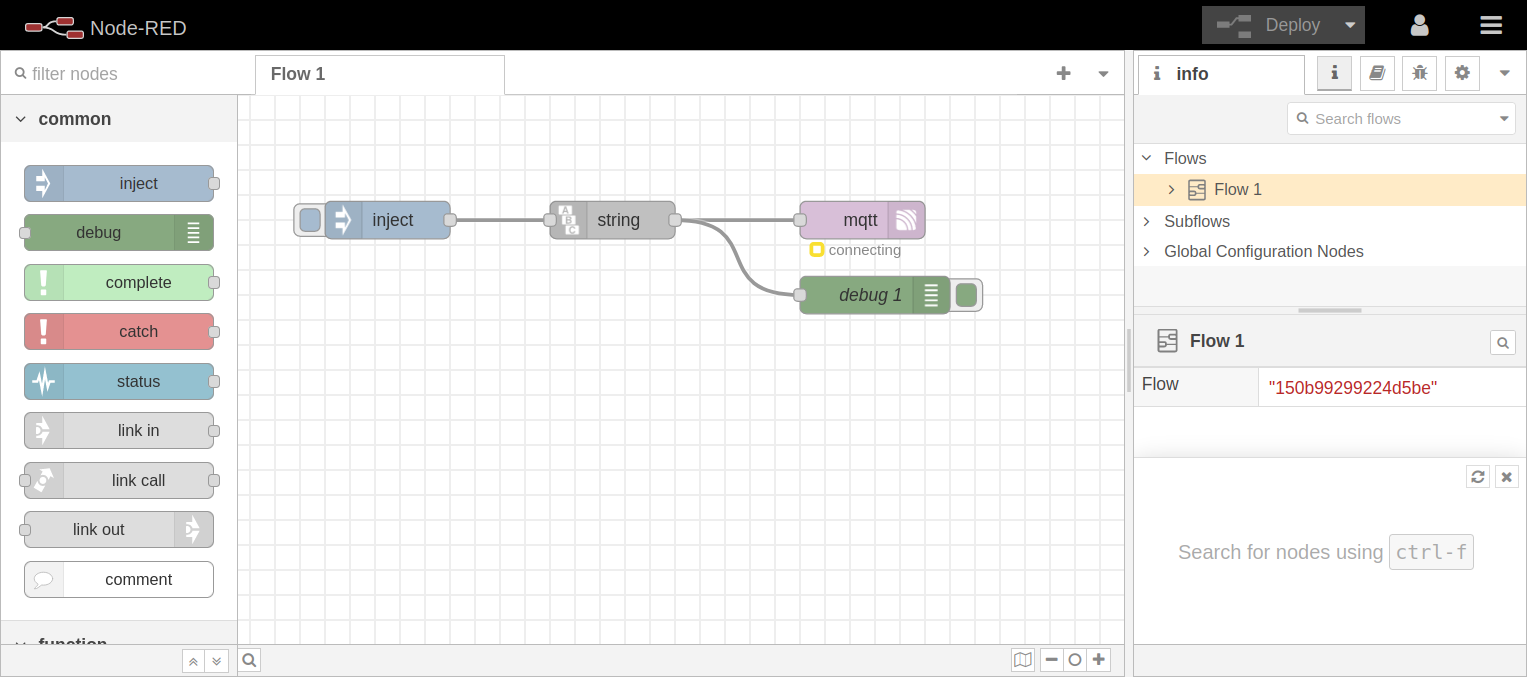
A simple example of the first Node-RED flow to try with Router nodes. Import the following JSON code to get the flow:
[{"id":"332fed03.319632","type":"inject","z":"2fdae8a2.1f1e","name":"ON",
"topic":"","payload":"true","payloadType":"bool","repeat":"","crontab":"",
"once":false,"x":176.5,"y":33.01666259765625,"wires":[["6b35babe.53a5c4"]]
},{"id":"544bcbf6.9236cc","type":"inject","z":"2fdae8a2.1f1e","name":"OFF",
"topic":"","payload":"false","payloadType":"bool","repeat":"","crontab":"",
"once":false,"x":175.5,"y":118.01666259765625,"wires":[["6b35babe.53a5c4"]
]},{"id":"6b35babe.53a5c4","type":"signal_led","z":"2fdae8a2.1f1e","led":
"USR","inverting":false,"defaultState":"0","name":"USRLED","x":324.5,"y":
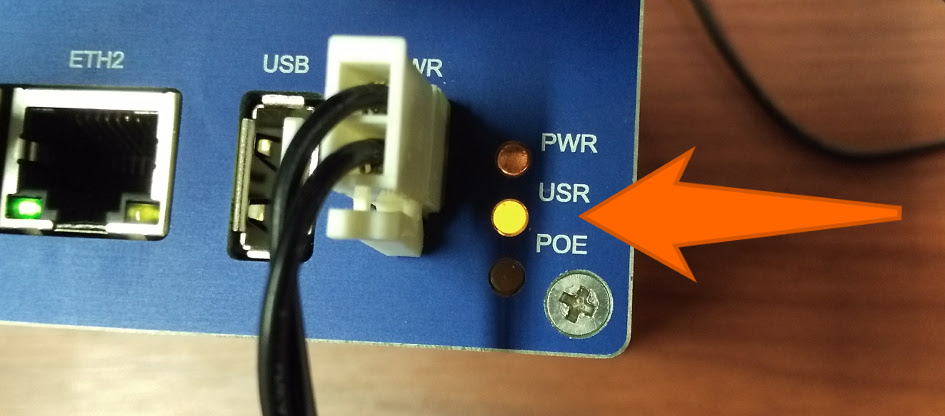
75.63333129882812,"wires":[]}]Two inject nodes from the input nodes list are used, and one signal led node from the Router nodes list. Double-click on a node to see or edit its parameters.
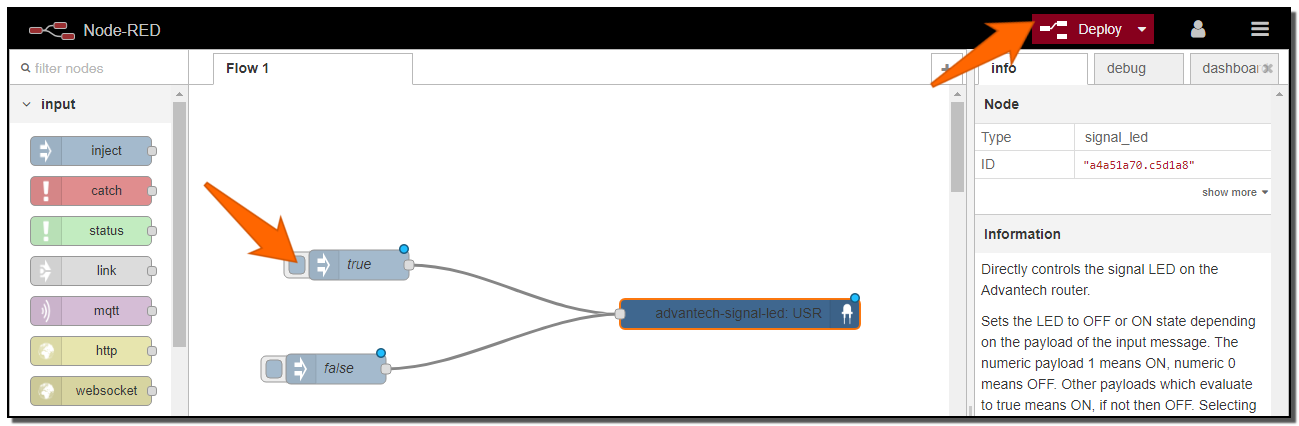
Click the red Deploy button in the upper right corner. Now the flow is running. Click on the small rounded button in front of the true node (indicated by the orange arrow in the figure). The USR LED on the router will start to shine, as in the figure below. You can turn it off by clicking on the false node (sends boolean false to the signal-led node).
Example 2: HTTP Endpoint
This example is taken from the Node-RED documentation examples:
https://cookbook.nodered.org/http/create-an-http-endpoint
Import the JSON code from the link above. It turns into the nodes as seen in the following figure — an HTTP endpoint that responds to GET requests with some static content (such as an HTML page) is created.
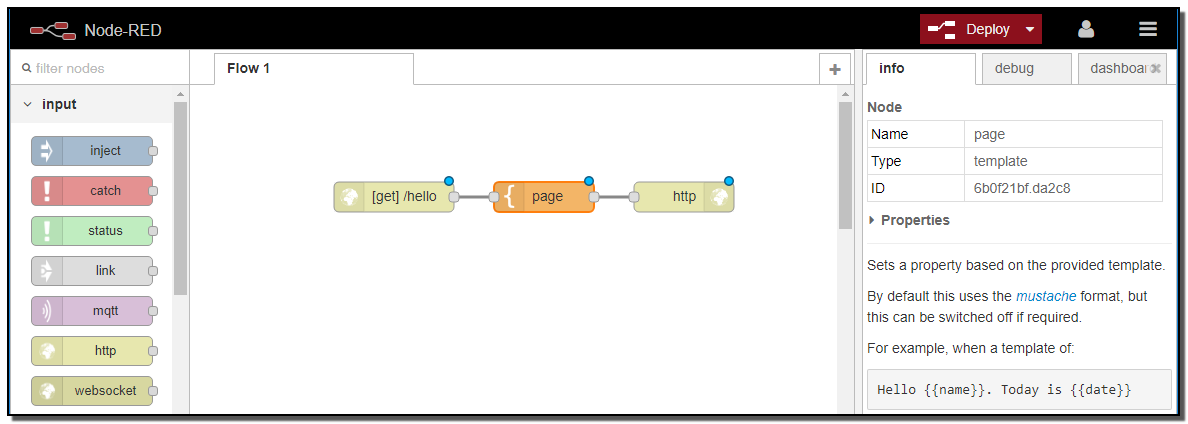
The nodes "HTTP in" (where URL can be defined), "template" (where HTML page can be defined), and "HTTP response" are used. Next, click the red Deploy button in the upper right corner. This will make the flow live and running.
When you enter a defined URL (from "HTTP in" node) into the web browser (in this case, https://<ip-address-of-the-router>:<configured-port>/hello), you will see the defined HTML page as the response:

Example 3: Ping Statistics
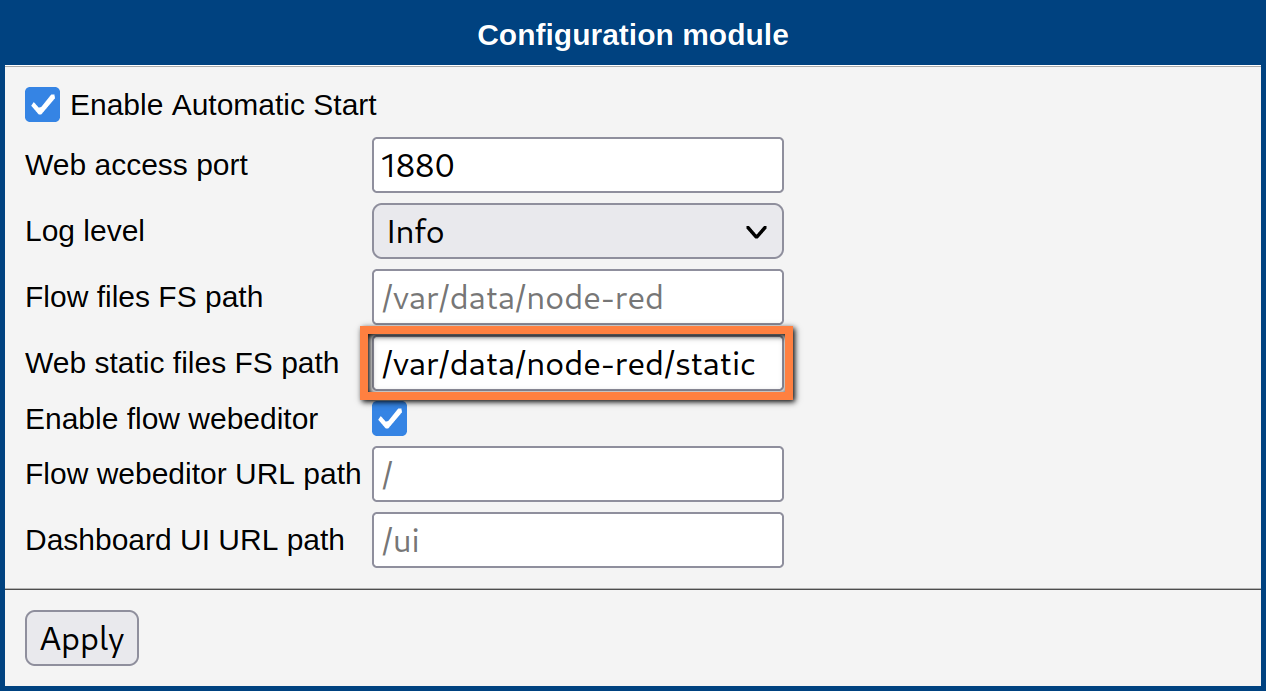
This example demonstrates how to use the Web static files FS path option in Node-RED configuration. It pings the www.advantech.com domain, stores the results in a file, shows them in a chart, and enables download of the collected data file.
First, add the path /var/data/node-red/static to the Node-RED configuration as seen in the figure:
Next, create the folder structure so the given path exists. Log in to the router (via SSH) and run this command:
mkdir /var/data/node-red/staticOr connect to the router via FTP and create folder /var/data/node-red/static. Then download the button image from https://upload.wikimedia.org/wikipedia/commons/8/8d/Download_alt_font_awesome.svg and upload it to the router as /var/data/node-red/static/download.svg. Or download it directly in the router, e.g. with the command:
curl https://upload.wikimedia.org/wikipedia/commons/8/8d/Download_alt_font_awesome.svg \
  -o /var/data/node-red/static/download.svg
Copy this JSON code and import it as the Node-RED flow:
[{"id":"6a06b9c496562116","type":"tab","label":"Flow 1","disabled":false,"info":"","env":[]},
{"id":"2c84ad78.fa6f92","type":"ui_chart","z":"6a06b9c496562116","name":"Chart","group":
"ae1455d7.c2f2c8","order":1,"width":0,"height":0,"label":"Pings","chartType":"line","legend":"false",
"xformat":"HH:mm","interpolate":"linear","nodata":"","dot":false,"ymin":"0","ymax":"100",
"removeOlder":"10","removeOlderPoints":"","removeOlderUnit":"60","cutout":0,"useOneColor":false,
"useUTC":true,"colors":["#ff7f0e","#aec7e8","#1f77b4","#2ca02c","#98df8a","#d62728","#ff9896","#9467bd","#c5b0d5"],
"outputs":1,"useDifferentColor":false,"className":"","x":690,"y":220,"wires":[[]]},
{"id":"d9e078ec.f791b","type":"file","z":"6a06b9c496562116","name":"",
"filename":"/var/data/node-red/static/pings.dat","filenameType":"str","appendNewline":true,
"createDir":true,"overwriteFile":"false","x":500,"y":160,"wires":[[]]},
{"id":"21f9f5c8.52674a","type":"ping","z":"6a06b9c496562116","mode":null,"name":"",
"host":"www.advantech.com","timer":"10","inputs":0,"x":230,"y":160,"wires":[["d9e078ec.f791b"]]},
{"id":"20279b4717c1ddd3","type":"ui_template","z":"6a06b9c496562116","group":"ae1455d7.c2f2c8",
"name":"Download button","order":1,"width":"2","height":"1",
"format":"<a href=\"/pings.dat\"><md-button> <img src=\"/download.svg\" width=\"20\" height=\"20\"/>\n</md-button>\n</a>",
"storeOutMessages":true,"fwdInMessages":true,"resendOnRefresh":false,"templateScope":"local",
"className":"","x":650,"y":280,"wires":[[]]},
{"id":"a81ff01f8dd4f3f5","type":"watch","z":"6a06b9c496562116","name":"Watch File",
"files":"/var/data/node-red/static/pings.dat","recursive":"","x":200,"y":220,"wires":[["7d8a9b63f5b77eea"]]},
{"id":"7d8a9b63f5b77eea","type":"file in","z":"6a06b9c496562116","name":"Read File",
"filename":"filename","filenameType":"msg","format":"utf8","chunk":false,"sendError":false,
"encoding":"none","allProps":false,"x":360,"y":220,"wires":[["56294e2ca54d88b8"]]},
{"id":"56294e2ca54d88b8","type":"change","z":"6a06b9c496562116","name":"Get Last Line",
"rules":[{"t":"set","p":"payload","pt":"msg","to":"$split(msg.payload,\"\\n\")[-2]","tot":"jsonata"}],
"action":"","property":"","from":"","to":"","reg":false,"x":530,"y":220,"wires":[["2c84ad78.fa6f92"]]},
{"id":"ae1455d7.c2f2c8","type":"ui_group","name":"Networking monitor","tab":"8912138.b569e7",
"order":1,"disp":true,"width":"8"},
{"id":"8912138.b569e7","type":"ui_tab","name":"Advantech demo","icon":"dashboard"}]
Caution
This example requires the Node-RED Dashboard module to be installed.
The following flow of nodes will appear:
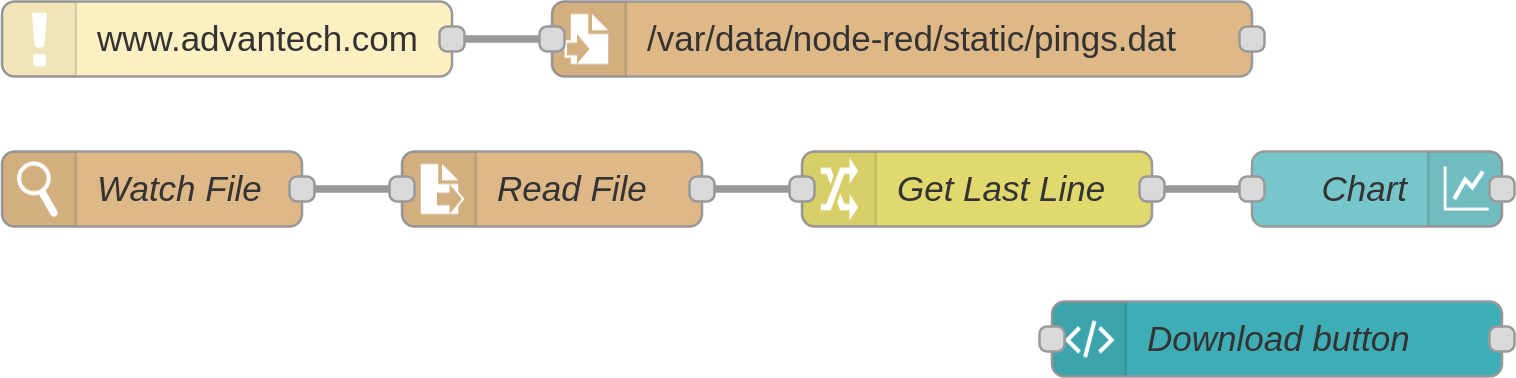
Deploy the flow with the red button in the upper right corner. Now you can access the ping statistics at:https://<router_ip>:<port_number>/<dashboard_path>
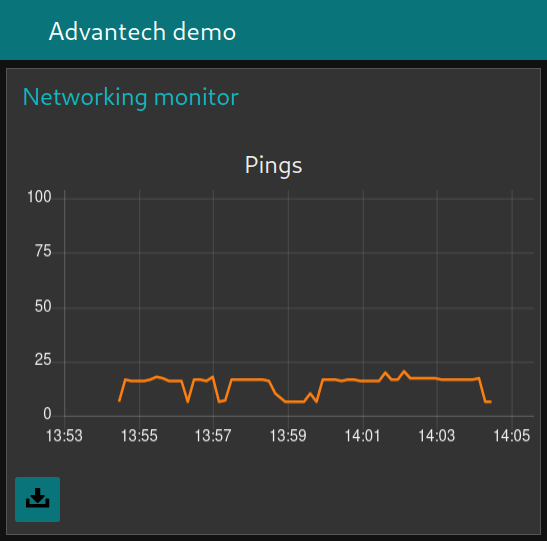
There is a chart with ping statistics (in milliseconds, the router must be connected to the Internet) and a button for downloading the /var/data/node-red/static/pings.dat file. Web static files FS path is used when writing (saving ping results to the data file), reading (viewing the statistics page with the button image), and downloading the data file.
Node-RED Bluetooth Examples
Example 4: Reading from Supported BLE Sensor in Node-RED
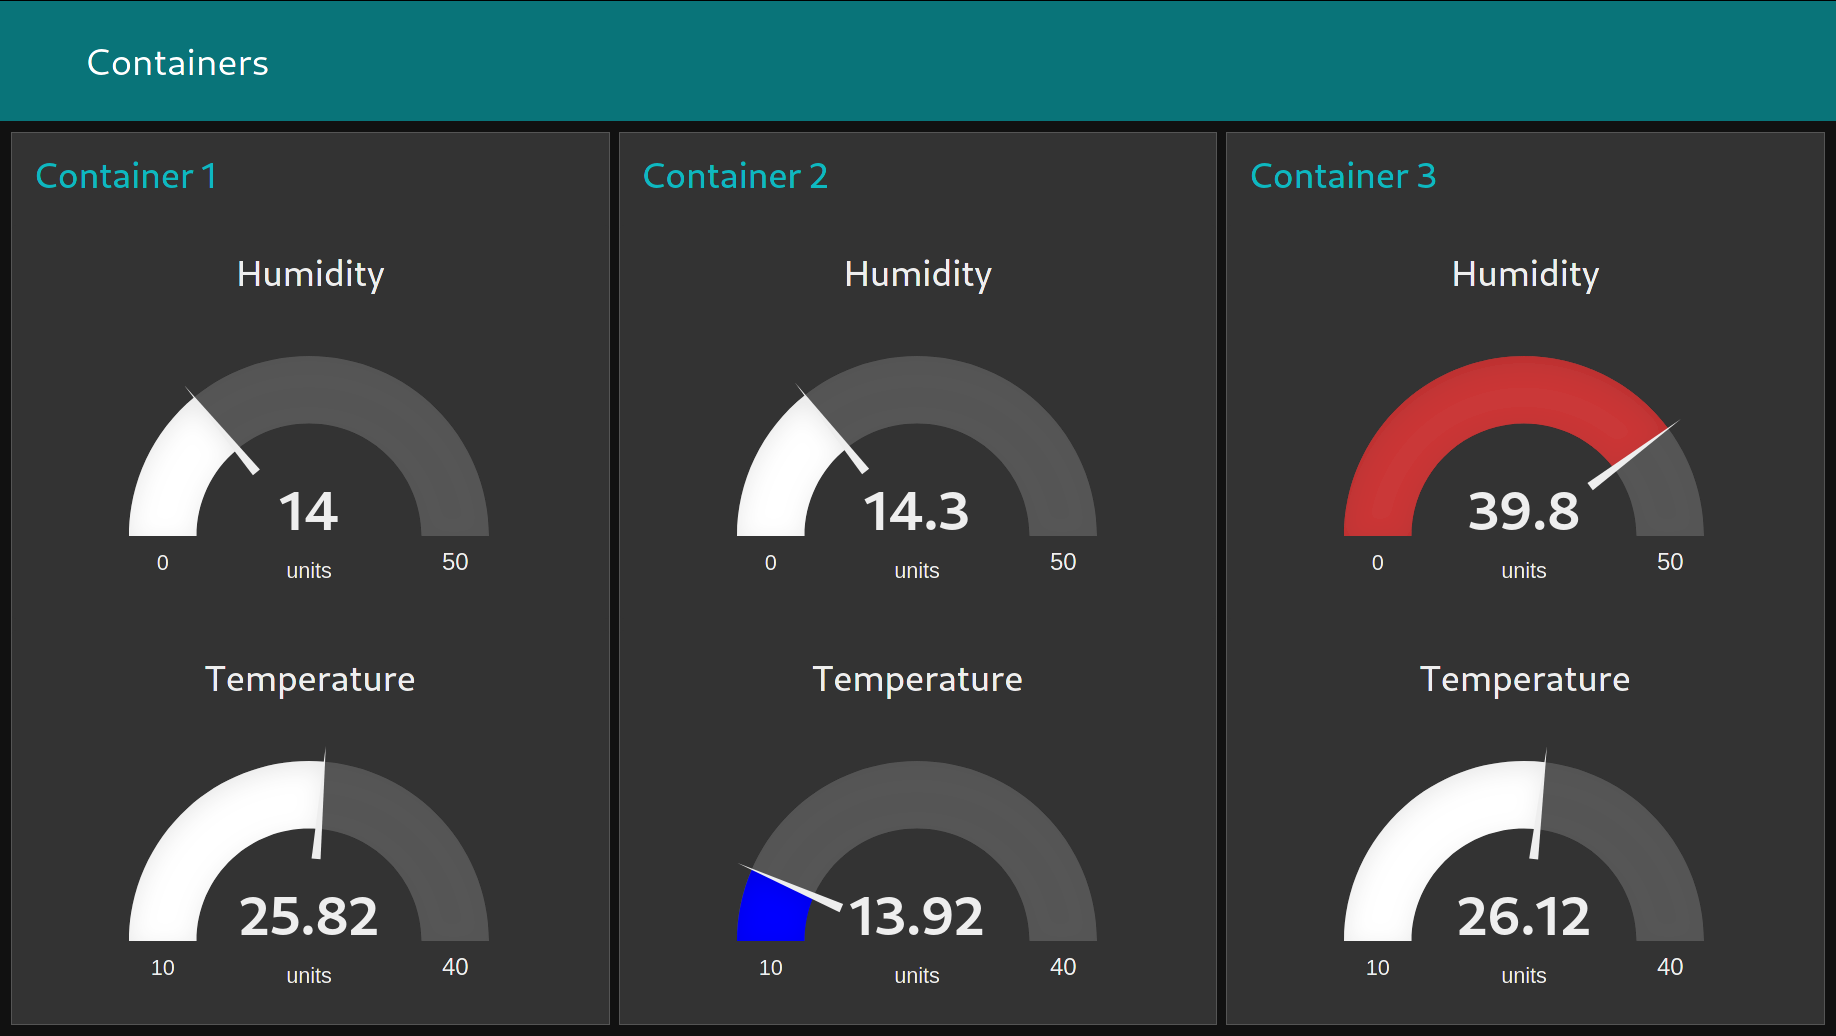
This example demonstrates the usage of three Ruuvi Tags for temperature and humidity monitoring.
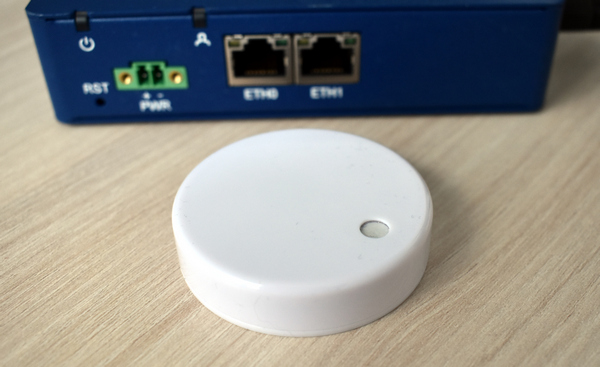

Advantech offers a specialized node for Ruuvi Tag sensors that handles data decoding. You can connect a RuuviTag to the BLE scanner node to get the measured values. The sensors propagate data via the manufacturer data advertising item.
Copy this JSON code and import it as the Node-RED flow:
[{"id":"2945eb57.8f6a34","type":"tab","label":"Flow 2","disabled":false,"info":""},
{"id":"be2fd8f3.23c9e8","type":"BLE scanner","z":"2945eb57.8f6a34","name":"","services":"",
"servicesType":"str","autostart":true,"continuous":true,"duplicates":true,"timeout":"","x":250,
"y":160,"wires":[["22af1566.e8bde2"]]},
{"id":"22af1566.e8bde2","type":"ruuvitag","z":"2945eb57.8f6a34","name":"","x":420,"y":160,
"wires":[["3693f0e2.1ef39"]]},
{"id":"3693f0e2.1ef39","type":"switch","z":"2945eb57.8f6a34","name":"","property":"peripheral",
"propertyType":"msg","rules":[{"t":"eq","v":"e92232c53f2b","vt":"str"},{"t":"eq","v":"e92232c54a78","vt":"str"},
{"t":"eq","v":"e92232c5412c","vt":"str"}],"checkall":"true","repair":false,"outputs":3,"x":560,"y":160,
"wires":[["358dabb5.a5d1ac","8464c887.e37e4"],["6619f6f5.3502c","5bf803f2.6134a4"],["7df2dec6.c0c068","2ca03fd5.6eb208"]]},
{"id":"358dabb5.a5d1ac","type":"ui_gauge","z":"2945eb57.8f6a34","name":"","group":"14d04008.aa63f",
"order":0,"width":0,"height":0,"gtype":"gage","title":"Temperature","label":"units",
"format":"{{msg.payload.temperature}}","min":"10","max":"40","colors":["#0000ff","#ffffff","#ff0000"],
"seg1":"15","seg2":"35","x":750,"y":60,"wires":[]},
{"id":"8464c887.e37e4","type":"ui_gauge","z":"2945eb57.8f6a34","name":"","group":"14d04008.aa63f",
"order":1,"width":0,"height":0,"gtype":"gage","title":"Humidity","label":"units",
"format":"{{msg.payload.humidity}}","min":0,"max":"50","colors":["#ffffff","#e6e600","#ca3838"],
"seg1":"25","seg2":"35","x":740,"y":100,"wires":[]},
{"id":"6619f6f5.3502c","type":"ui_gauge","z":"2945eb57.8f6a34","name":"","group":"b5f6ead5.983858",
"order":0,"width":0,"height":0,"gtype":"gage","title":"Temperature","label":"units",
"format":"{{msg.payload.temperature}}","min":"10","max":"40","colors":["#0000ff","#ffffff","#ff0000"],
"seg1":"15","seg2":"35","x":750,"y":140,"wires":[]},
{"id":"5bf803f2.6134a4","type":"ui_gauge","z":"2945eb57.8f6a34","name":"","group":"b5f6ead5.983858",
"order":1,"width":0,"height":0,"gtype":"gage","title":"Humidity","label":"units",
"format":"{{msg.payload.humidity}}","min":0,"max":"50","colors":["#ffffff","#e6e600","#ca3838"],
"seg1":"25","seg2":"35","x":740,"y":180,"wires":[]},
{"id":"7df2dec6.c0c068","type":"ui_gauge","z":"2945eb57.8f6a34","name":"","group":"87b4700b.33d698",
"order":0,"width":0,"height":0,"gtype":"gage","title":"Temperature","label":"units",
"format":"{{msg.payload.temperature}}","min":"10","max":"40","colors":["#0000ff","#ffffff","#ff0000"],
"seg1":"15","seg2":"35","x":750,"y":220,"wires":[]},
{"id":"2ca03fd5.6eb208","type":"ui_gauge","z":"2945eb57.8f6a34","name":"","group":"87b4700b.33d698",
"order":1,"width":0,"height":0,"gtype":"gage","title":"Humidity","label":"units",
"format":"{{msg.payload.humidity}}","min":0,"max":"50","colors":["#ffffff","#e6e600","#ca3838"],
"seg1":"25","seg2":"35","x":740,"y":260,"wires":[]},
{"id":"14d04008.aa63f","type":"ui_group","z":"","name":"Container 1","tab":"9c703a4f.c1f94","disp":true,"width":"6","collapse":false},
{"id":"b5f6ead5.983858","type":"ui_group","z":"","name":"Container 2","tab":"9c703a4f.c1f94","disp":true,"width":"6","collapse":false},
{"id":"87b4700b.33d698","type":"ui_group","z":"","name":"Container 3","tab":"9c703a4f.c1f94","disp":true,"width":"6","collapse":false},
{"id":"9c703a4f.c1f94","type":"ui_tab","z":"","name":"Containers","icon":"dashboard","disabled":false,"hidden":false}]
Caution
This example requires the extra installed Bluetooth, Node-RED Bluetooth, and Node-RED Dashboard Router Apps.
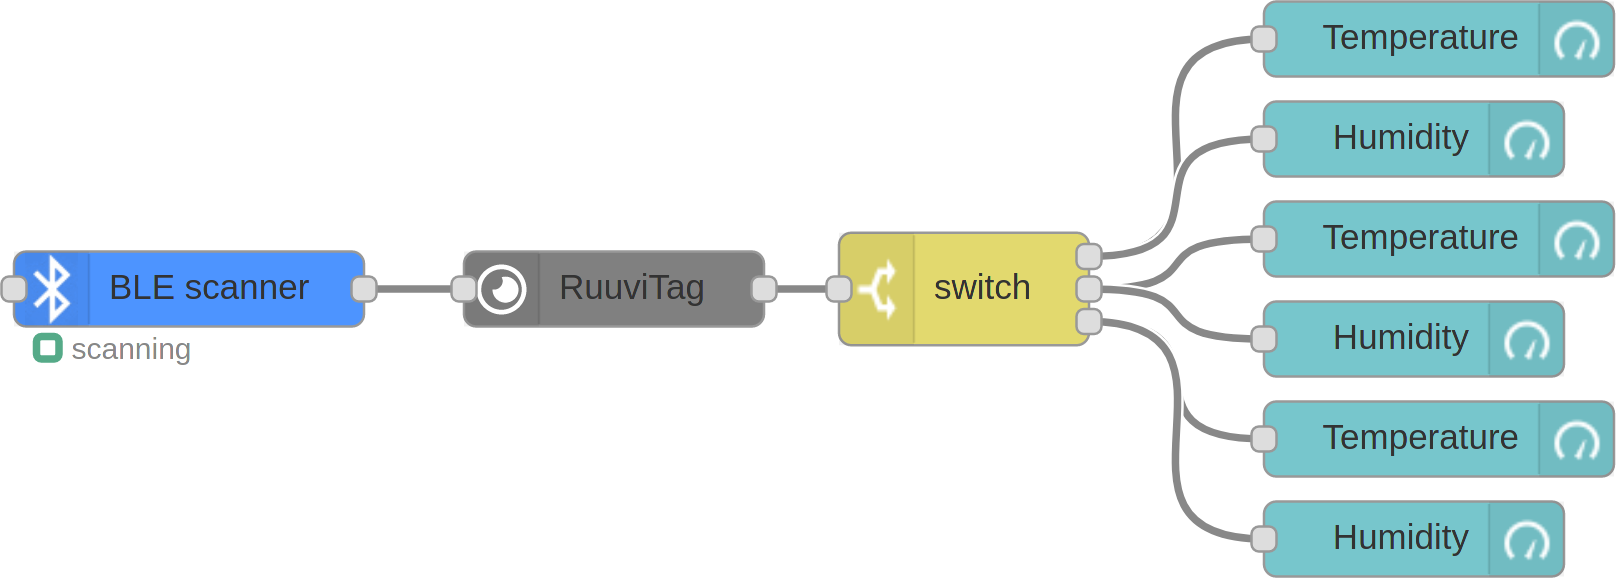
The data are collected continuously. The Switch node splits the data from three different sensors by their addresses into three Dashboard sections. You can see the result at https://<ip-address-of-the-router>:<configured-port>/ui.
You can find more Bluetooth examples in the Bluetooth Router App documentation. Those examples are not for Node-RED, but they can clarify some other aspects of using Bluetooth with Advantech routers.
Example 5: Reading from and Writing to Unsupported BLE Sensor in Node-RED
This example is about using a sensor when you do not have a specialized decoding node. It uses Xiaomi Flower Care to control the greenhouse environment.
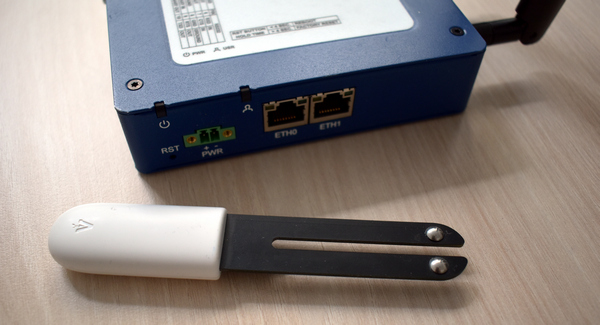
The sensor propagates data via the service characteristics.
Copy this JSON code and import it as the Node-RED flow:
[{"id":"30182cd3.1eaddc","type":"tab","label":"Flow 1","disabled":false,"info":""},
{"id":"acf17368.dd75d","type":"inject","z":"30182cd3.1eaddc","name":"","topic":"start","payload":"",
"payloadType":"str","repeat":"300","crontab":"","once":false,"onceDelay":0.1,"x":124,"y":40,
"wires":[["f13061ea.0121c8"]]},
{"id":"6e237e59.5aa808","type":"BLE device","z":"30182cd3.1eaddc","name":"","x":144,"y":160,
"wires":[["b773f45.1638d88","f4e53939.3e3978","d9bd6fcb.738508"]]},
{"id":"b773f45.1638d88","type":"BLE in","z":"30182cd3.1eaddc","topic":"read",
"characteristic":"00001a0200001000800000805f9b34fb","name":"","x":370,"y":40,"wires":[["4e7939bd.3e098"]]},
{"id":"ded8cf21.e47b18","type":"BLE in","z":"30182cd3.1eaddc","topic":"read",
"characteristic":"00001a0100001000800000805f9b34fb","name":"","x":490,"y":160,"wires":[["1fe8af43.36f789"]]},
{"id":"eed2cad7.3cb43","type":"BLE out","z":"30182cd3.1eaddc",
"characteristic":"00001a0000001000800000805f9b34fb","name":"","x":600,"y":100,"wires":[]},
{"id":"f4e53939.3e3978","type":"change","z":"30182cd3.1eaddc","name":"Set Realtime mode",
"rules":[{"t":"set","p":"payload","pt":"msg","to":"[160,31]","tot":"bin"}],"action":"","property":"",
"from":"","to":"","reg":false,"x":410,"y":100,"wires":[["eed2cad7.3cb43"]]},
{"id":"1fe8af43.36f789","type":"function","z":"30182cd3.1eaddc","name":"Realtime data",
"func":"msg.payload = {\n 'temperature': msg.payload.readUInt16LE(0)/10, \n 'brightness': msg.payload.readUInt32LE(3), \n 'moisture': msg.payload.readInt8(7), \n 'conductivity':msg.payload.readUInt16LE(8)\n}\nreturn msg;",
"outputs":1,"noerr":0,"x":640,"y":160,"wires":[["f53466e8.833b18"]]},
{"id":"f13061ea.0121c8","type":"BLE scanner","z":"30182cd3.1eaddc","name":"","services":"fe95",
"servicesType":"str","autostart":false,"continuous":false,"duplicates":false,"x":144,"y":100,
"wires":[["6e237e59.5aa808"]]},
{"id":"4e7939bd.3e098","type":"change","z":"30182cd3.1eaddc","name":"On/Off",
"rules":[{"t":"set","p":"payload","pt":"msg","to":"msg.payload.readInt8(0) < 40","tot":"str"}],
"action":"","property":"","from":"","to":"","reg":false,"x":510,"y":40,"wires":[["6d316b11.624f7c"]]},
{"id":"6d316b11.624f7c","type":"signal_led","z":"30182cd3.1eaddc","led":"USR","inverting":false,
"initial":"0","name":"","x":650,"y":40,"wires":[]},
{"id":"f53466e8.833b18","type":"Input Split","z":"30182cd3.1eaddc","name":"",
"inputProps":["payload.temperature","payload.brightness","payload.moisture","payload.conductivity"],
"outputs":4,"x":800,"y":160,"wires":[["7e659451.293304"],["d1f9663f.e9571"],["3e469c6.3c0f564"],["4e0f5d97.82b4c4"]]},
{"id":"7e659451.293304","type":"link out","z":"30182cd3.1eaddc","name":"Temperature","links":["7f5b8722.d6b24"],"x":915,"y":100,"wires":[]},
{"id":"d1f9663f.e9571","type":"link out","z":"30182cd3.1eaddc","name":"Brightness","links":["4399313a.3126f8"],"x":915,"y":140,"wires":[]},
{"id":"3e469c6.3c0f564","type":"link out","z":"30182cd3.1eaddc","name":"Moisture","links":["a025af7f.9297a8"],"x":915,"y":180,"wires":[]},
{"id":"4e0f5d97.82b4c4","type":"link out","z":"30182cd3.1eaddc","name":"Conductivity","links":["ad8db049.e1d3b8"],"x":915,"y":220,"wires":[]},
{"id":"a025af7f.9297a8","type":"link in","z":"30182cd3.1eaddc","name":"Valve","links":["3e469c6.3c0f564"],"x":55,"y":360,"wires":[["7afc3aa4.731944"]]},
{"id":"4399313a.3126f8","type":"link in","z":"30182cd3.1eaddc","name":"Slats","links":["d1f9663f.e9571"],"x":55,"y":300,"wires":[["90162d6b.f87d9"]]},
{"id":"ad8db049.e1d3b8","type":"link in","z":"30182cd3.1eaddc","name":"Batcher","links":["4e0f5d97.82b4c4"],"x":55,"y":420,"wires":[["1a4f3520.7f10c3"]]},
{"id":"7f5b8722.d6b24","type":"link in","z":"30182cd3.1eaddc","name":"Heater","links":["7e659451.293304"],"x":55,"y":240,"wires":[["ce4ccd99.f44678"]]},
{"id":"ceafabe4.1d6b4","type":"modbusSerial out","z":"30182cd3.1eaddc","port":"88e680e2.274bf",
"slave":"30","start":"2","dtype":"input","topic":"","name":"","x":350,"y":360,"wires":[]},
{"id":"7afc3aa4.731944","type":"change","z":"30182cd3.1eaddc","name":"Valve",
"rules":[{"t":"set","p":"payload","pt":"msg","to":"msg.payload < 50? 1 : 2","tot":"jsonata"}],
"action":"","property":"","from":"","to":"","reg":false,"x":150,"y":360,"wires":[["ceafabe4.1d6b4"]]},
{"id":"88d99715.18d348","type":"modbusSerial out","z":"30182cd3.1eaddc","port":"88e680e2.274bf",
"slave":"20","start":"1","dtype":"coil","topic":"","name":"","x":350,"y":300,"wires":[]},
{"id":"fee97542.aa4","type":"modbusSerial out","z":"30182cd3.1eaddc","port":"88e680e2.274bf",
"slave":"10","start":"1","dtype":"coil","topic":"","name":"","x":350,"y":240,"wires":[]},
{"id":"8b30e2c7.b5783","type":"modbusSerial out","z":"30182cd3.1eaddc","port":"88e680e2.274bf",
"slave":"40","start":"1215","dtype":"coil","topic":"","name":"","x":350,"y":420,"wires":[]},
{"id":"1a4f3520.7f10c3","type":"change","z":"30182cd3.1eaddc","name":"Batcher",
"rules":[{"t":"set","p":"payload","pt":"msg","to":"msg.payload < 80 ? msg.payload*10 : 0","tot":"str"}],
"action":"","property":"","from":"","to":"","reg":false,"x":160,"y":420,"wires":[["8b30e2c7.b5783"]]},
{"id":"ce4ccd99.f44678","type":"change","z":"30182cd3.1eaddc","name":"Heater",
"rules":[{"t":"set","p":"payload","pt":"msg","to":"msg.payload < 25 ? 1 : 0 ","tot":"str"}],
"action":"","property":"","from":"","to":"","reg":false,"x":150,"y":240,"wires":[["fee97542.aa4"]]},
{"id":"90162d6b.f87d9","type":"change","z":"30182cd3.1eaddc","name":"Slats",
"rules":[{"t":"set","p":"payload","pt":"msg","to":"msg.payload > 130 ? 1 : msg.payload < 90 ? 3 : 2","tot":"str"}],
"action":"","property":"","from":"","to":"","reg":false,"x":150,"y":300,"wires":[["88d99715.18d348"]]},
{"id":"d9bd6fcb.738508","type":"delay","z":"30182cd3.1eaddc","name":"","pauseType":"delay",
"timeout":"10","timeoutUnits":"milliseconds","rate":"1","nbRateUnits":"1","rateUnits":"second",
"randomFirst":"1","randomLast":"5","randomUnits":"seconds","drop":false,"x":350,"y":160,
"wires":[["ded8cf21.e47b18"]]},
{"id":"88e680e2.274bf","type":"modbusSerialConfig","z":"","port":"/dev/ttyS1","baud":"9600",
"data":"8","parity":"none","stop":"1","name":""}]
This example requires the extra installed Bluetooth and Node-RED Bluetooth Router Apps.
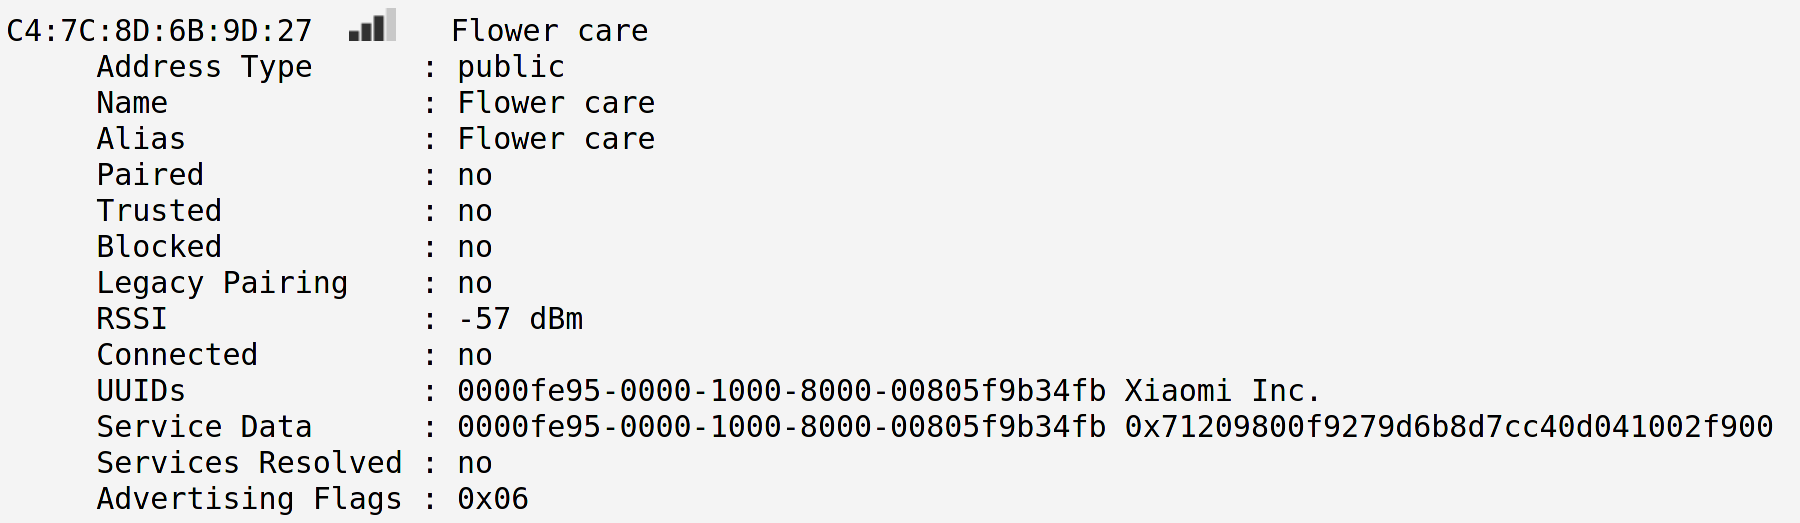
The data are checked every 5 minutes. Because there is no specialized node for this sensor, data is processed with general nodes. You need to know the GATT services and characteristics for this — consult the sensor vendor for this information. Only the necessary selected information for this example follows:
| Service UUID | Service short UUID | Usage |
|---|---|---|
| 0000fe95-0000-1000-8000-00805f9b34fb | fe95 | device discovery |
| 00001204-0000-1000-8000-00805f9b34fb | 1204 | data |
Characteristics for the 1204 service:
| Characteristic UUID | Read/Write | Usage |
|---|---|---|
| 00001a00-0000-1000-8000-00805f9b34fb | write | mode control |
Write 2-byte sequence 0xa01f to read realtime data from the next characteristic. | ||
| 00001a01-0000-1000-8000-00805f9b34fb | read | realtime data |
| The data are Little Endian encoded. Bytes 00–01 contain the temperature in 0.1°C as uint16, bytes 03–06 brightness in luxes as uint32, byte 07 moisture in % as uint8, and bytes 08–09 conductivity in µS/cm as uint16. | ||
| 00001a02-0000-1000-8000-00805f9b34fb | read | battery and FW |
| The first byte contains the battery level as a percentage. | ||
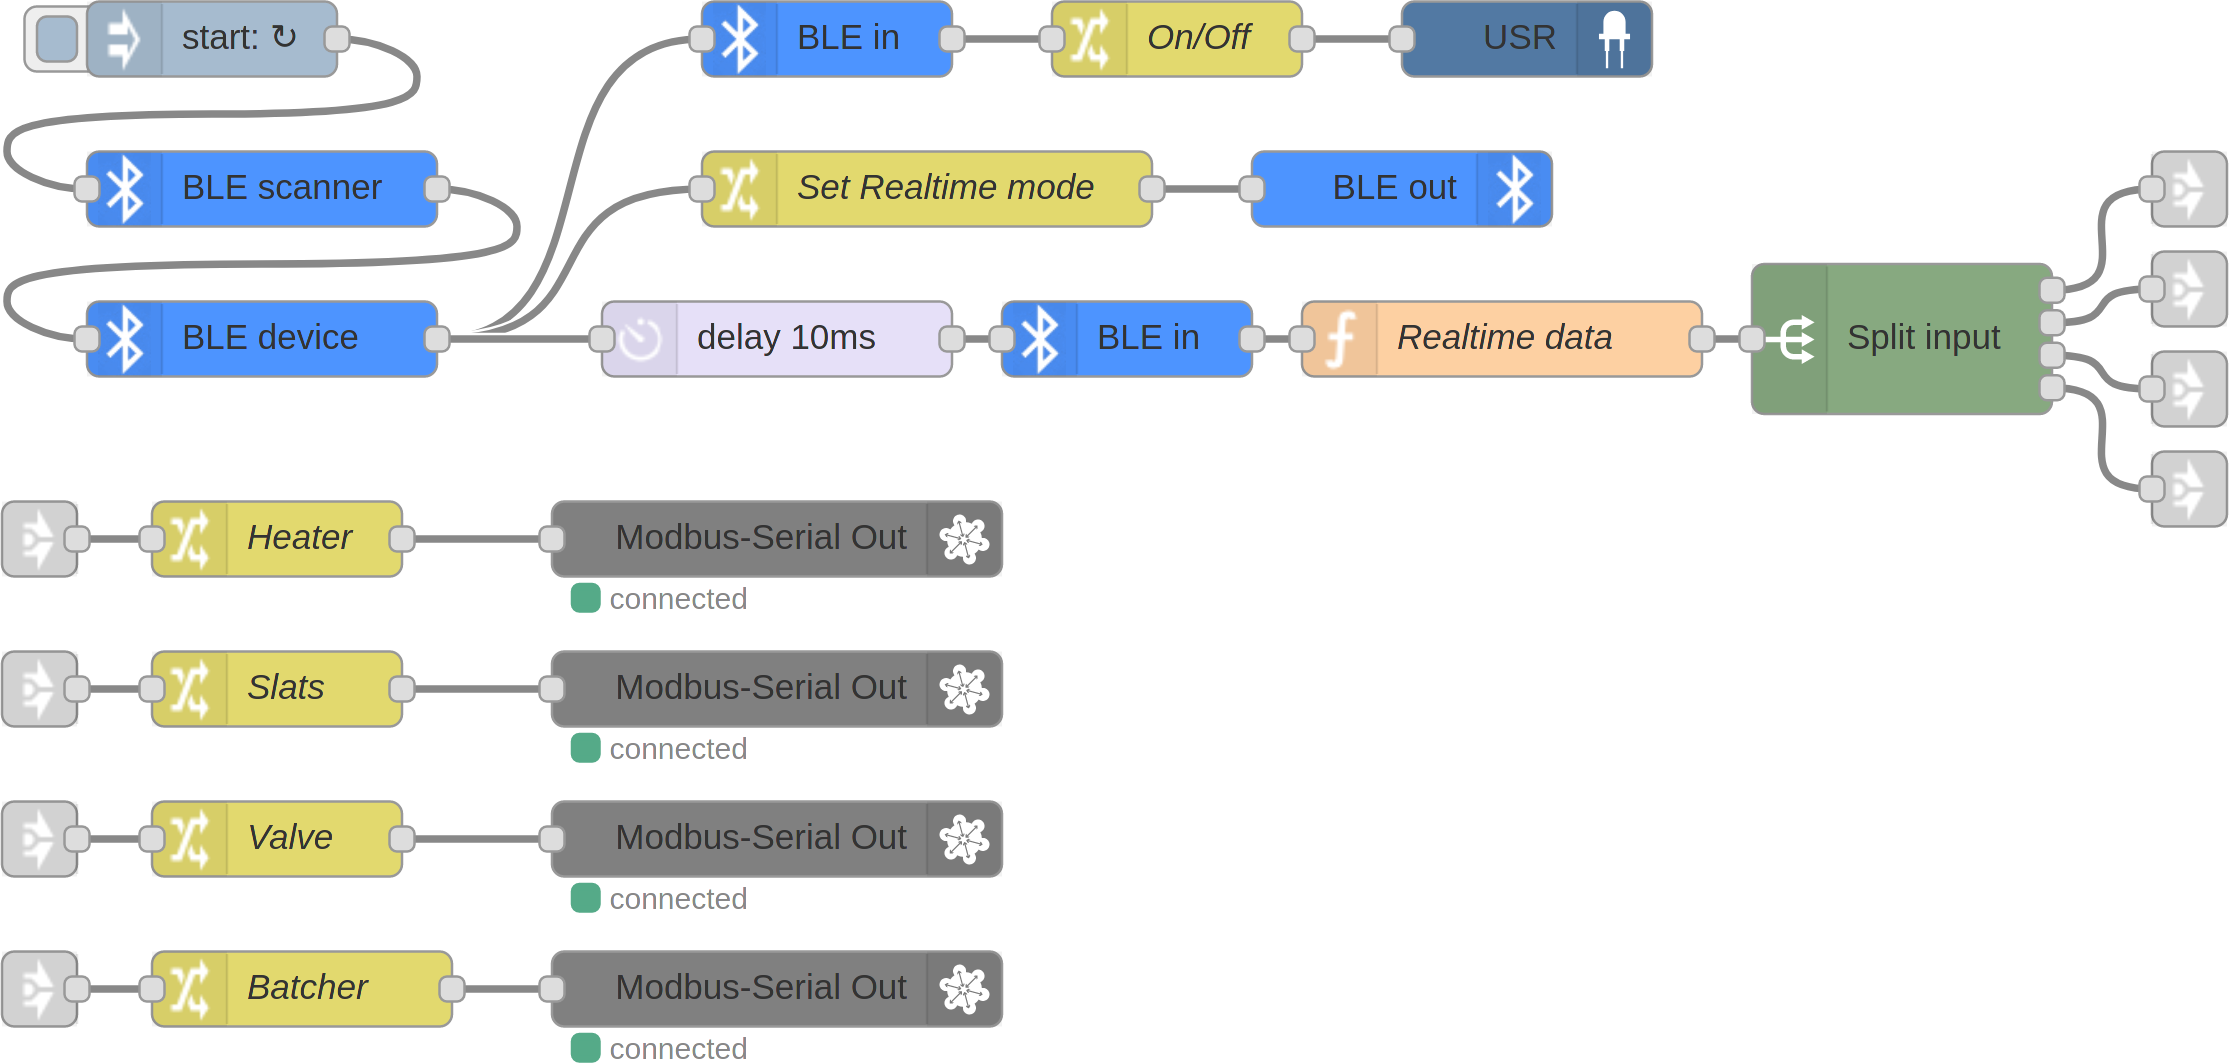
The BLE scanner scans until it finds a sensor with the specific service. This example only counts on one sensor, so there are no address checks and duplicates are allowed. Real-time data are read with a slight delay so that the sensor can change the mode. Next, they are decoded with the general function node.
The flow controls the greenhouse environment via Modbus devices (e.g., watering with a Modbus-controlled water valve or fertilizing with a Modbus-controlled dispenser) according to measured values. It also turns the user LED on the router on/off according to the sensor battery level.
You can find more Bluetooth examples in the Bluetooth Router App documentation. Those examples are not for Node-RED, but they can clarify some other aspects of using Bluetooth with Advantech routers.
Node-RED Modbus Examples
Caution
The Node-RED Modbus Node Module is required for these examples.
The Modbus Server is only a helper part of the examples below. It is possible to install its node on another router or use a different Modbus server (e.g., a simulator on a PC). It is only necessary to match the communication configuration on both the client in the example and the server.
The required configuration before attempting Examples 6–9: Add the Modbus Server node to the flow and configure the Modbus Client, which the Modbus nodes will use to connect.
Copy this JSON code and import it as the Node-RED flow:
[{"id":"4f11d120e1c43f22","type":"modbus-flex-server","z":"5e1b0393890554df","name":"",
"logEnabled":false,"serverAddress":"127.0.0.1","serverPort":11502,"responseDelay":100,"unitId":1,
"delayUnit":"ms","coilsBufferSize":20000,"registersBufferSize":20000,"minAddress":0,"splitAddress":10000,
"funcGetCoil":"function getFlexCoil(addr, unitID) {\n\tif (unitID === node.unitId &&\n\t\taddr >= node.minAddress &&\n\t\taddr <= node.splitAddress) {\n\n\t\treturn node.coils.readUInt8(addr * node.bufferFactor)\n\t}\n}",
"funcGetDiscreteInput":"function getFlexDiscreteInput(addr, unitID) {\n\taddr += node.splitAddress\n\tif (unitID === node.unitId &&\n\t\taddr >= node.splitAddress &&\n\t\taddr <= node.splitAddress * 2) {\n\n\t\treturn node.coils.readUInt8(addr * node.bufferFactor)\n\t}\n}",
"funcGetInputRegister":"function getFlexInputRegister(addr, unitID) {\n\tif (unitID === node.unitId &&\n\t\taddr >= node.minAddress &&\n\t\taddr <= node.splitAddress) {\n\n\t\treturn node.registers.readUInt16BE(addr * node.bufferFactor)\n\t}\n}",
"funcGetHoldingRegister":"function getFlexHoldingRegsiter(addr, unitID) {\n\taddr += node.splitAddress\n\tif (unitID === node.unitId &&\n\t\taddr >= node.splitAddress &&\n\t\taddr <= node.splitAddress * 2) {\n\n\t\treturn node.registers.readUInt16BE(addr * node.bufferFactor)\n\t}\n}",
"funcSetCoil":"function setFlexCoil(addr, value, unitID) {\n\tif (unitID === node.unitId &&\n\t\taddr >= node.minAddress &&\n\t\taddr <= node.splitAddress) {\n\n\t\tnode.coils.writeUInt8(value, addr * node.bufferFactor)\n\t}\n}",
"funcSetRegister":"function setFlexRegister(addr, value, unitID) {\n\taddr += node.splitAddress\n\tif (unitID === node.unitId &&\n\t\taddr >= node.splitAddress &&\n\t\taddr <= node.splitAddress * 2) {\n\n\t\tnode.registers.writeUInt16BE(value, addr * node.bufferFactor)\n\t}\n}",
"showErrors":false,"x":400,"y":80,"wires":[[],[],[],[],[]]},
{"id":"6e4a5e2fc9f3826f","type":"modbus-client","name":"Modbus TCP Server","clienttype":"tcp",
"bufferCommands":false,"stateLogEnabled":false,"queueLogEnabled":false,"tcpHost":"127.0.0.1",
"tcpPort":"11502","tcpType":"DEFAULT","serialPort":"/dev/ttyUSB","serialType":"RTU-BUFFERD",
"serialBaudrate":"9600","serialDatabits":"8","serialStopbits":"1","serialParity":"none",
"serialConnectionDelay":"100","serialAsciiResponseStartDelimiter":"0x3A","unit_id":"1",
"commandDelay":"1","clientTimeout":"1000","reconnectOnTimeout":true,"reconnectTimeout":"2000",
"parallelUnitIdsAllowed":true}]
The following node will appear:

Example 6: Writing to the User-Defined Modbus Server
An example of a flow to write to the TCP Modbus Server. This example writes to the holding registers.
Copy this JSON code and import it as the Node-RED flow:
[{"id":"15e99f6dc3820308","type":"hw_monitor","z":"5e1b0393890554df","param":"voltage","when":"0",
"low":"","high":"","name":"","x":670,"y":60,"wires":[["fe35a226cfc35727"]]},
{"id":"fe35a226cfc35727","type":"change","z":"5e1b0393890554df","name":"voltage * 1000",
"rules":[{"t":"set","p":"payload","pt":"msg","to":"$number(payload)*1000","tot":"jsonata"}],
"action":"","property":"","from":"","to":"","reg":false,"x":840,"y":60,"wires":[["5c6e5d717d6c4e1d"]]},
{"id":"5c6e5d717d6c4e1d","type":"modbus-write","z":"5e1b0393890554df","name":"Write voltage",
"showStatusActivities":false,"showErrors":false,"unitid":"1","dataType":"HoldingRegister",
"adr":"0","quantity":"1","server":"6e4a5e2fc9f3826f","emptyMsgOnFail":false,"keepMsgProperties":false,
"x":1030,"y":60,"wires":[[],[]]}]
The following flow of nodes will appear:

Writing is triggered every time the voltage changes in the device's power supply. Since the registers can store numbers between 0 and 65535 and the voltages on the device can range from +9 to +36 V DC with three-digit precision, the number is multiplied by 1000 before storing.
Voltage is written to address 0 using the Modbus-write node. The node configuration uses Modbus function code 6, which writes a single value to a specified address in the holding registers. After the voltage changes again, the old value in the register is overwritten.
Example 7: Reading from the User-Defined Modbus Server
An example of a flow to read from the TCP Modbus Server. This example reads the value written in Example 6.
Copy this JSON code and import it as the Node-RED flow:
[{"id":"fa93b02f75982874","type":"inject","z":"5e1b0393890554df","name":"Read last value",
"props":[{"p":"payload"}],"repeat":"","crontab":"","once":false,"onceDelay":0.1,"topic":"",
"payload":"","payloadType":"str","x":720,"y":120,"wires":[["13a16208e9af985c"]]},
{"id":"13a16208e9af985c","type":"modbus-getter","z":"5e1b0393890554df","name":"Read voltage",
"showStatusActivities":false,"showErrors":false,"logIOActivities":false,"unitid":"1",
"dataType":"HoldingRegister","adr":"0","quantity":"1","server":"6e4a5e2fc9f3826f",
"useIOFile":false,"ioFile":"","useIOForPayload":false,"emptyMsgOnFail":false,"keepMsgProperties":false,
"x":890,"y":120,"wires":[["dbe2d57441cccbf1"],[]]},
{"id":"dbe2d57441cccbf1","type":"change","z":"5e1b0393890554df","name":"voltage / 1000",
"rules":[{"t":"set","p":"payload","pt":"msg","to":"payload[0]/1000","tot":"jsonata"}],
"action":"","property":"","from":"","to":"","reg":false,"x":1080,"y":120,"wires":[["17ea3fce6db98c28"]]},
{"id":"17ea3fce6db98c28","type":"debug","z":"5e1b0393890554df","name":"Output","active":true,
"tosidebar":true,"console":false,"tostatus":false,"complete":"payload","targetType":"msg",
"statusVal":"","statusType":"auto","x":1230,"y":120,"wires":[]}]
The following flow of nodes will appear:

Press the button to read the value from the Modbus holding registers. The node configuration uses Modbus function code 3, which reads a specified number of holding registers from the starting address. In this case, the configuration reads one register from address 0. Since the stored value in the register was multiplied by 1000, it is divided before displaying to restore three-digit precision.
Example 8: Writing a Sequence to the User-Defined Modbus Server
An example of a flow to write a sequence of values. This example demonstrates how to modify Example 6 to write values to the registers in a different way.
Copy this JSON code and import it as the Node-RED flow:
[{"id":"b8a5f7c30afe0013","type":"hw_monitor","z":"5e1b0393890554df","param":"voltage","when":"0",
"low":"","high":"","name":"","x":350,"y":280,"wires":[["ff3d51e58d027413"]]},
{"id":"a15b41cd4d503053","type":"modbus-write","z":"5e1b0393890554df","name":"Write voltage",
"showStatusActivities":false,"showErrors":false,"unitid":"1","dataType":"MHoldingRegisters",
"adr":"1","quantity":"2","server":"6e4a5e2fc9f3826f","emptyMsgOnFail":false,"keepMsgProperties":false,
"x":730,"y":280,"wires":[["2e4d4cc32fdeca64"],[]]},
{"id":"ff3d51e58d027413","type":"function","z":"5e1b0393890554df","name":"float to dec array",
"func":"// example:\n// input: 12.095\n// output: [16705, 34079]\n\nvar float = msg.payload;\nvar buffer = new ArrayBuffer(4);\nvar floatView = new Float32Array(buffer);\nvar uint16View = new Uint16Array(buffer);\nfloatView[0] = float;\nmsg.payload = [uint16View[1], uint16View[0]];\nreturn msg;",
"outputs":1,"noerr":0,"initialize":"","finalize":"","libs":[],"x":530,"y":280,"wires":[["a15b41cd4d503053"]]}]
The following flow of nodes will appear:

This example focuses on the transformation of measured values. Instead of multiplying the calculated value, it stores the value in Single-precision floating-point format, which allows negative values to be preserved. Another way to accurately store negative numbers is to define an offset, add it before storing, and subtract it before displaying. The best practice is to hold the offset in another register and read it when computing.
How does the "float to dec array" function node work? For example, if the float value 12.078 flows in, this node transforms it into an array of length 2 with decimal values ranging from 0 to 65535. This way, the registers use 32 bits of storage.
Values are written to addresses 0 and 1 using the Modbus-write node. The node configuration uses Modbus function code 16, which presets multiple registers from a specified address in the holding registers.
Example 9: Reading a Sequence from the User-Defined Modbus Server
Caution
The Node-RED Dashboard module is required for this example.
An example of a flow to read a sequence of values. This example reads the values written to the registers in Example 8.
Copy this JSON code and import it as the Node-RED flow:
[{"id":"001d41f9baabeb9c","type":"inject","z":"5e1b0393890554df","name":"Read last float value",
"props":[{"p":"payload"}],"repeat":"1","crontab":"","once":true,"onceDelay":"1","topic":"",
"payload":"","payloadType":"str","x":440,"y":480,"wires":[["753cc8d5c5bec8a1"]]},
{"id":"73c3804fc367a0b8","type":"toFloat","z":"5e1b0393890554df","name":"","toFixed":"3",
"x":810,"y":560,"wires":[["775095c1191539c3"]]},
{"id":"2136931f8d721d92","type":"ui_chart","z":"5e1b0393890554df","name":"","group":"9efd6e054f0a3a18",
"order":0,"width":0,"height":0,"label":"Voltage","chartType":"line","legend":"false","xformat":"HH:mm:ss",
"interpolate":"linear","nodata":"","dot":true,"ymin":"","ymax":"","removeOlder":"2","removeOlderPoints":"",
"removeOlderUnit":"60","cutout":0,"useOneColor":false,"useUTC":true,
"colors":["#1f77b4","#aec7e8","#ff7f0e","#2ca02c","#98df8a","#d62728","#ff9896","#9467bd","#c5b0d5"],
"outputs":1,"useDifferentColor":false,"className":"","x":1080,"y":560,"wires":[[]]},
{"id":"753cc8d5c5bec8a1","type":"modbus-getter","z":"5e1b0393890554df","name":"Read voltage float",
"showStatusActivities":false,"showErrors":false,"logIOActivities":false,"unitid":"1",
"dataType":"HoldingRegister","adr":"1","quantity":"2","server":"6e4a5e2fc9f3826f",
"useIOFile":false,"ioFile":"","useIOForPayload":false,"emptyMsgOnFail":false,"keepMsgProperties":false,
"x":670,"y":480,"wires":[["4c6c0d9df75eada1"],[]]},
{"id":"81a3ee19a532262d","type":"change","z":"5e1b0393890554df","name":"dec to bin",
"rules":[{"t":"set","p":"payload","pt":"msg","to":"$pad($formatBase($number(payload), 2), -16,'0')\t","tot":"jsonata"}],
"action":"","property":"","from":"","to":"","reg":false,"x":540,"y":560,"wires":[["bed734d91af051d9"]]},
{"id":"4c6c0d9df75eada1","type":"split","z":"5e1b0393890554df","name":"split array","splt":"\\n",
"spltType":"str","arraySplt":1,"arraySpltType":"len","stream":false,"addname":"","x":400,"y":560,
"wires":[["81a3ee19a532262d"]]},
{"id":"bed734d91af051d9","type":"join","z":"5e1b0393890554df","name":"join bits","mode":"custom",
"build":"string","property":"payload","propertyType":"msg","key":"topic","joiner":"","joinerType":"str",
"accumulate":false,"timeout":"","count":"2","reduceRight":false,"x":680,"y":560,"wires":[["73c3804fc367a0b8"]]},
{"id":"775095c1191539c3","type":"switch","z":"5e1b0393890554df","name":"> 0","property":"payload",
"propertyType":"msg","rules":[{"t":"gt","v":"0","vt":"num"}],"checkall":"true","repair":false,
"outputs":1,"x":930,"y":560,"wires":[["2136931f8d721d92"]]},
{"id":"eae94d7a961ee00d","type":"inject","z":"5e1b0393890554df","name":"reset chart",
"props":[{"p":"payload"}],"repeat":"","crontab":"","once":false,"onceDelay":0.1,"topic":"",
"payload":"[]","payloadType":"json","x":920,"y":520,"wires":[["2136931f8d721d92"]]},
{"id":"9efd6e054f0a3a18","type":"ui_group","name":"Voltage monitor","tab":"48418b79.0f5834",
"order":1,"disp":true,"width":"6","collapse":false,"className":""}]
The following flow of nodes will appear:

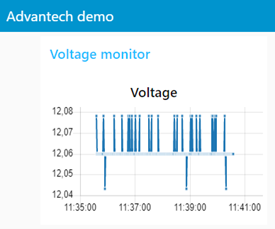
This example focuses on decoding the Single-precision floating-point format sequence from the Modbus Server, written in Example 8. The Modbus-read node uses function code 3 to read two holding registers from address 0. The node returns an array of two values that are split, converted from decimal to binary, and joined. The "to float" node then converts the result from binary to float.
Although this example could end with a debug node, it is expanded to include an actual use case by adding a chart that displays the voltage over the last 2 minutes. The "inject" node is configured to inject the flow every second. Invalid values are filtered out using the "switch" node.
The chart can be accessed at: https://<ip-address-of-the-router>:<configured-port>/ui
The chart should look like this:
Example 10: Reading Coil Status from a Modbus RTU Relay using the Modbus Protocol
The primary purpose of the Modbus protocol is to facilitate communication in industrial systems. This example demonstrates reading from a Modbus RTU Relay connected to the /dev/ttyS1 serial port.
The relay used in this example: https://www.waveshare.com/modbus-rtu-relay.htm
Copy this JSON code and import it as the Node-RED flow:
[{"id":"557beabce6821e78","type":"inject","z":"5e1b0393890554df","name":"Read Coil statuses",
"props":[{"p":"payload"}],"repeat":"","crontab":"","once":false,"onceDelay":0.1,"topic":"",
"payload":"","payloadType":"date","x":470,"y":1220,"wires":[["909c4b126be4dfbb"]]},
{"id":"909c4b126be4dfbb","type":"modbus-getter","z":"5e1b0393890554df","name":"Relay read Coils",
"showStatusActivities":true,"showErrors":true,"logIOActivities":false,"unitid":"1","dataType":"Coil",
"adr":"0","quantity":"8","server":"6e1c00798d661717","useIOFile":false,"ioFile":"",
"useIOForPayload":false,"emptyMsgOnFail":false,"keepMsgProperties":false,"x":680,"y":1220,
"wires":[["e4e2479f8a53143d"],[]]},
{"id":"e4e2479f8a53143d","type":"modbus-response","z":"5e1b0393890554df","name":"",
"registerShowMax":20,"x":910,"y":1220,"wires":[]},
{"id":"6e1c00798d661717","type":"modbus-client","name":"RTU","clienttype":"simpleser",
"bufferCommands":false,"stateLogEnabled":false,"queueLogEnabled":false,"tcpHost":"127.0.0.1",
"tcpPort":"1188","tcpType":"DEFAULT","serialPort":"/dev/ttyS1","serialType":"RTU-BUFFERD",
"serialBaudrate":"9600","serialDatabits":"8","serialStopbits":"1","serialParity":"none",
"serialConnectionDelay":"100","serialAsciiResponseStartDelimiter":"0x3A","unit_id":"1",
"commandDelay":"1","clientTimeout":"1000","reconnectOnTimeout":true,"reconnectTimeout":"2000",
"parallelUnitIdsAllowed":true}]
The following flow of nodes will appear:

The Modbus Response node will report the Coil status upon pressing the button. The node configuration uses Modbus function code 1, which reads a specified number of coil statuses from the starting address. In this case, the configuration reads eight coils from address 0 — the only permitted read operation of the hardware. The node returns an array of eight Boolean values.
Example 11: Writing Coil Status to a Modbus RTU Relay using the Modbus Protocol
This example demonstrates how to write to the Modbus RTU Relay, showcasing two different forms of writing: single and multiple values.
The relay used in this example: https://www.waveshare.com/modbus-rtu-relay.htm
Copy this JSON code and import it as the Node-RED flow:
[{"id":"ab51a98b8cff324d","type":"modbus-write","z":"5e1b0393890554df","name":"Relay write Coils",
"showStatusActivities":true,"showErrors":true,"unitid":"1","dataType":"MCoils","adr":"0","quantity":"8",
"server":"6e1c00798d661717","emptyMsgOnFail":false,"keepMsgProperties":false,"x":730,"y":1040,
"wires":[["c055b132ecc35311"],[]]},
{"id":"c055b132ecc35311","type":"modbus-response","z":"5e1b0393890554df","name":"","registerShowMax":20,
"x":950,"y":1040,"wires":[]},
{"id":"91b38740c3c8a991","type":"inject","z":"5e1b0393890554df",
"name":"Write Coil statuses [0,0,0,0,1,1,1,1]","props":[{"p":"payload"}],"repeat":"","crontab":"",
"once":false,"onceDelay":0.1,"topic":"","payload":"[0,0,0,0,1,1,1,1]","payloadType":"json",
"x":460,"y":1040,"wires":[["ab51a98b8cff324d"]]},
{"id":"410ce3cd5646aad7","type":"inject","z":"5e1b0393890554df",
"name":"Write Coil statuses [1,1,1,1,0,0,0,0]","props":[{"p":"payload"}],"repeat":"","crontab":"",
"once":false,"onceDelay":0.1,"topic":"","payload":"[1,1,1,1,0,0,0,0]","payloadType":"json",
"x":460,"y":1080,"wires":[["ab51a98b8cff324d"]]},
{"id":"2cef4b3c069dddb0","type":"modbus-write","z":"5e1b0393890554df","name":"Relay write Coil",
"showStatusActivities":true,"showErrors":true,"unitid":"1","dataType":"Coil","adr":"0","quantity":"1",
"server":"6e1c00798d661717","emptyMsgOnFail":false,"keepMsgProperties":false,"x":620,"y":940,
"wires":[["b2aeed12262a9777"],[]]},
{"id":"5a7026bf24f970f7","type":"inject","z":"5e1b0393890554df","name":"Write Coil 0 True",
"props":[{"p":"payload"}],"repeat":"","crontab":"","once":false,"onceDelay":0.1,"topic":"",
"payload":"true","payloadType":"bool","x":400,"y":940,"wires":[["2cef4b3c069dddb0"]]},
{"id":"9cf498a5de01a01e","type":"inject","z":"5e1b0393890554df","name":"Write Coil 0 False",
"props":[{"p":"payload"}],"repeat":"","crontab":"","once":false,"onceDelay":0.1,"topic":"",
"payload":"false","payloadType":"bool","x":400,"y":980,"wires":[["2cef4b3c069dddb0"]]},
{"id":"b2aeed12262a9777","type":"modbus-response","z":"5e1b0393890554df","name":"","registerShowMax":20,
"x":870,"y":940,"wires":[]},
{"id":"6e1c00798d661717","type":"modbus-client","name":"RTU","clienttype":"simpleser",
"bufferCommands":false,"stateLogEnabled":false,"queueLogEnabled":false,"tcpHost":"127.0.0.1",
"tcpPort":"1188","tcpType":"DEFAULT","serialPort":"/dev/ttyS1","serialType":"RTU-BUFFERD",
"serialBaudrate":"9600","serialDatabits":"8","serialStopbits":"1","serialParity":"none",
"serialConnectionDelay":"100","serialAsciiResponseStartDelimiter":"0x3A","unit_id":"1",
"commandDelay":"1","clientTimeout":"1000","reconnectOnTimeout":true,"reconnectTimeout":"2000",
"parallelUnitIdsAllowed":true}]
The following flow of nodes will appear:
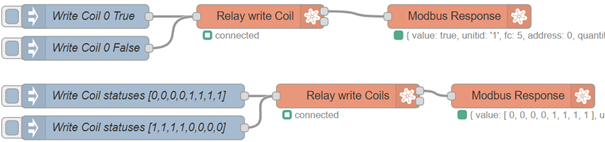
The flow consists of multiple buttons which set different values on coils inside the Modbus registers upon pressing. The "Relay write Coil" node is set up with function code 5, "force single coil," to force the predefined coil (here, the coil on address 0) to take a value from the "inject" node.
The "Relay write Coils" node is set up with function code 15, "force multiple coils," which forces coils from the starting address to the passed values. The "inject" node passes eight values, which the Modbus-write node expects.
Example 12: Reading from a Real Sensor using the Modbus Protocol
This example demonstrates how to read, convert, and display values in the correct format from an actual industrial sensor.
The sensor used in this example: https://www.seeedstudio.com/RS485-Temperature-and-Humidity-Sensor-p-5235.html
Copy this JSON code and import it as the Node-RED flow:
[{"id":"e607447884854120","type":"inject","z":"5e1b0393890554df","name":"Read sensor",
"props":[{"p":"payload"}],"repeat":"","crontab":"","once":false,"onceDelay":0.1,"topic":"",
"payload":"","payloadType":"date","x":390,"y":700,"wires":[["19e80878f8c78e3c"]]},
{"id":"19e80878f8c78e3c","type":"modbus-getter","z":"5e1b0393890554df","name":"Read registers",
"showStatusActivities":false,"showErrors":false,"logIOActivities":false,"unitid":"1",
"dataType":"HoldingRegister","adr":"0","quantity":"3","server":"6e1c00798d661717",
"useIOFile":false,"ioFile":"","useIOForPayload":false,"emptyMsgOnFail":false,"keepMsgProperties":false,
"x":580,"y":700,"wires":[["0108ead1ab83428b"],[]]},
{"id":"babda427f8a3e094","type":"change","z":"5e1b0393890554df","name":"(temp / 100)°C",
"rules":[{"t":"set","p":"payload","pt":"msg","to":"payload/100&\"°C\"","tot":"jsonata"}],
"action":"","property":"","from":"","to":"","reg":false,"x":780,"y":740,"wires":[["4a7a960f.6d3108"]]},
{"id":"1c09c60136890bc1","type":"change","z":"5e1b0393890554df","name":"(hum / 100)%RH",
"rules":[{"t":"set","p":"payload","pt":"msg","to":"payload/100&\"%RH\"","tot":"jsonata"}],
"action":"","property":"","from":"","to":"","reg":false,"x":790,"y":780,"wires":[["4a7a960f.6d3108"]]},
{"id":"4170818c5d915ca6","type":"change","z":"5e1b0393890554df","name":"(dew / 100)%RH",
"rules":[{"t":"set","p":"payload","pt":"msg","to":"payload/100&\"°C\"","tot":"jsonata"}],
"action":"","property":"","from":"","to":"","reg":false,"x":780,"y":820,"wires":[["4a7a960f.6d3108"]]},
{"id":"0108ead1ab83428b","type":"split","z":"5e1b0393890554df","name":"split array","splt":"\\n",
"spltType":"str","arraySplt":1,"arraySpltType":"len","stream":false,"addname":"","x":380,"y":780,
"wires":[["c660eb7af293a9c0"]]},
{"id":"c660eb7af293a9c0","type":"switch","z":"5e1b0393890554df","name":"route elements",
"property":"parts.index","propertyType":"msg",
"rules":[{"t":"eq","v":"0","vt":"num"},{"t":"eq","v":"1","vt":"num"},{"t":"eq","v":"2","vt":"num"}],
"checkall":"true","repair":false,"outputs":3,"x":560,"y":780,
"wires":[["babda427f8a3e094"],["1c09c60136890bc1"],["4170818c5d915ca6"]]},
{"id":"4a7a960f.6d3108","type":"join","z":"5e1b0393890554df","name":"","mode":"custom",
"build":"array","property":"payload","propertyType":"msg","key":"topic","joiner":"\\n",
"joinerType":"str","accumulate":false,"timeout":"","count":"3","reduceRight":false,
"x":990,"y":780,"wires":[["2a0d287b.23a8e8"]]},
{"id":"2a0d287b.23a8e8","type":"function","z":"5e1b0393890554df","name":"message",
"func":"const currentTime = new Date();\nconst [temperature, humidity, dewPoint] = msg.payload;\nmsg.payload = `At ${currentTime} (UTC), the temperature was ${temperature} with humidity ${humidity} and dew point ${dewPoint}`;\nreturn msg;\n",
"outputs":1,"noerr":0,"initialize":"","finalize":"","libs":[],"x":1140,"y":780,"wires":[["42e91c83.8d5084"]]},
{"id":"42e91c83.8d5084","type":"debug","z":"5e1b0393890554df","name":"Output","active":true,
"tosidebar":true,"console":false,"tostatus":false,"complete":"payload","targetType":"msg",
"statusVal":"","statusType":"auto","x":1090,"y":840,"wires":[]},
{"id":"6e1c00798d661717","type":"modbus-client","name":"RTU","clienttype":"simpleser",
"bufferCommands":false,"stateLogEnabled":false,"queueLogEnabled":false,"tcpHost":"127.0.0.1",
"tcpPort":"1188","tcpType":"DEFAULT","serialPort":"/dev/ttyS1","serialType":"RTU-BUFFERD",
"serialBaudrate":"9600","serialDatabits":"8","serialStopbits":"1","serialParity":"none",
"serialConnectionDelay":"100","serialAsciiResponseStartDelimiter":"0x3A","unit_id":"1",
"commandDelay":"1","clientTimeout":"1000","reconnectOnTimeout":true,"reconnectTimeout":"2000",
"parallelUnitIdsAllowed":true}]
The following flow of nodes will appear:

The flow consists of a button which reads registers from the Modbus device upon pressing. The Modbus-read node uses function code 3 to read three holding registers from address 0. The node returns an array of three values that are split, routed, converted, joined, and formatted into an output message.
Example of output:
On Thu Apr 13, 2023, 11:48:04 GMT+0000 (UTC), the temperature was 23.16°C with humidity of 37.39%RH and dew point of 7.83°C
Resources
When implementing your own flows, you will find a wealth of resources provided by Node-RED here: