FRR
Caution
This Router App has been tested on a router with firmware version 6.3.10. After updating the router firmware to a higher version, check whether a newer version of the Router App has also been released and update it accordingly for compatibility.
Introduction
FRRouting (FRR) is a robust and versatile IP routing protocol suite designed for Linux and Unix platforms. It offers a comprehensive range of protocol daemons, empowering users to implement sophisticated routing solutions with ease.
Building on the power and flexibility of FRR, Advantech has developed the FRR Router App. This application enhances the router's capabilities by supporting an extensive array of routing protocols, including BGP, IS-IS, LDP, MPLS, NHRP, OSPF, OSPF6, PIM-SM, RIP, RIPNG, Static, VRF, and Zebra.
Installation
This Router App is not installed on Advantech routers by default. The *.tgz installation file is available on the FRR Router App page.
The Router App can be installed via the router's web interface: Customization → Router Apps → Add or Update.
Web Interface
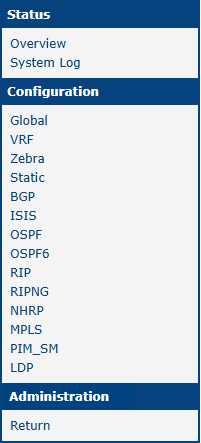
Once the FRR Router App is installed, access its web interface by clicking the Router App name on the Router Apps page of the router's web interface. The left pane contains a menu with Status, Configuration, and Information sections. The Administration section contains only the Return item, which switches back to the router's web configuration pages.
Status
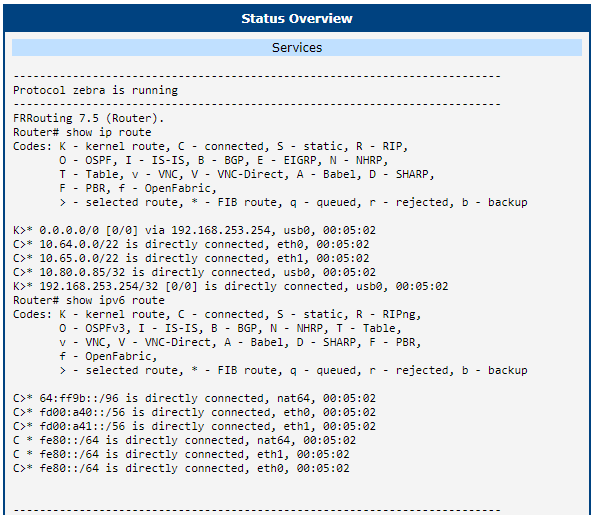
In the Overview section, you can see the status of all protocols configurable via the FRR Router App. The figure below shows an example with the Zebra protocol running.
In the System Log section, you can view a copy of the system log, also available at Status → System Log in the router's web interface.
Configuration
Global
All FRR settings can be configured by clicking the Global item in the main menu. An overview of configurable items is given below.

| Item | Description |
|---|---|
| Enable GLOBAL | Enables FRR functionality. |
| Log Level | Select the level of information that will appear in the log. |
Global configuration items
VRF
In IP-based networks, Virtual Routing and Forwarding (VRF) is a technology that allows multiple instances of a routing table to co-exist within the same router simultaneously. More about this protocol and examples can be found in the FRR documentation.
The VRF configuration is available under Configuration → VRF. The first page is for global VRF configuration, where you can enable/disable VRF globally and enable TCP/UDP L3 master device (l3mdev) access.

The following pages allow configuration of individual VRF interfaces.

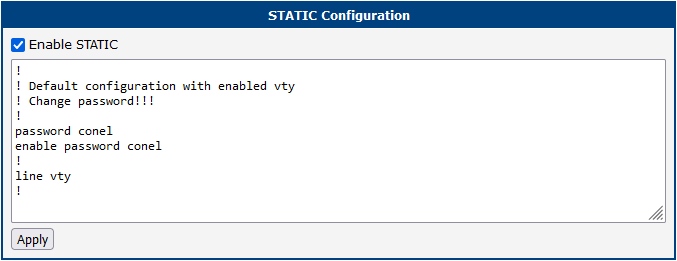
Static
Static routing uses manually configured routing entries rather than dynamic routing information. More about configuring static routes can be found in the FRR documentation.
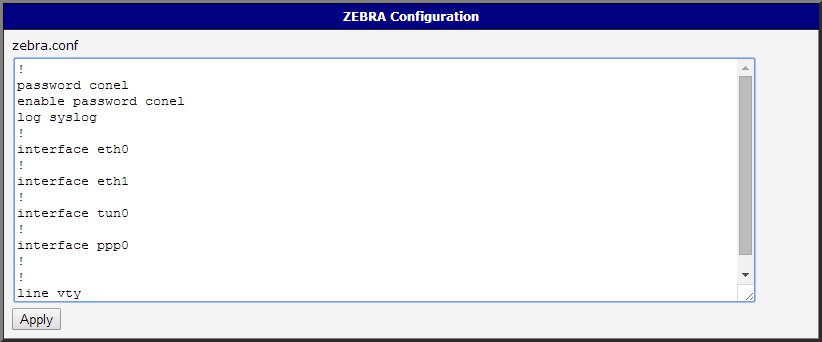
Zebra
Zebra is an IP routing manager. It provides kernel routing table updates, interface lookups, and redistribution of routes between different routing protocols. More about configuring Zebra can be found in the FRR documentation.
An example of the zebra.conf configuration file:
!
password conel
enable password conel
log syslog
!
interface eth0
!
interface eth1
!
interface tun0
!
interface ppp0
!
!
line vty
!
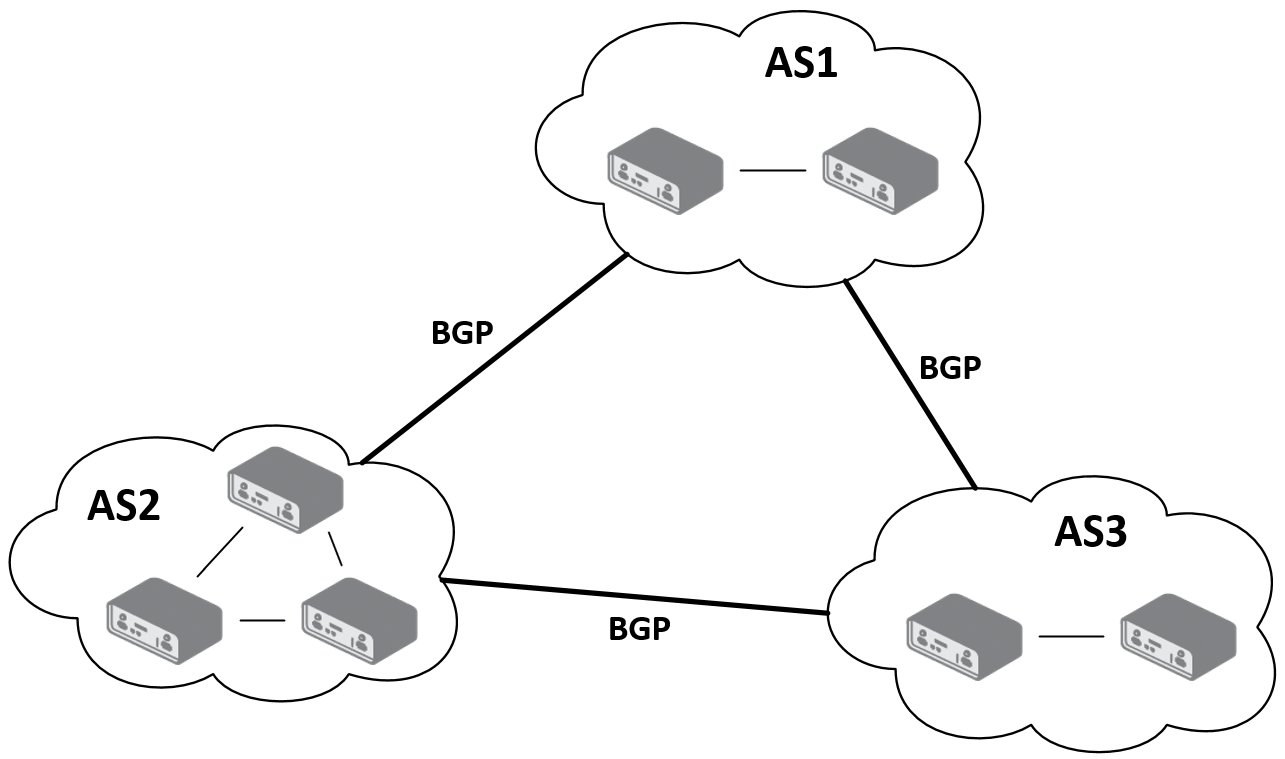
BGP
Border Gateway Protocol (BGP) is a standardized exterior gateway protocol designed to exchange routing and reachability information between autonomous systems (AS) on the Internet. More about configuring BGP can be found in the FRR documentation.
This Router App enables routing between autonomous systems — groups of IP networks and routers under the control of one or more network operators sharing a common routing policy. Routing information is exchanged between autonomous systems via border gateways.
Caution
Important notices:
- The telnet VTY interface of the Zebra and BGP daemons is accessible only via the loopback interface 127.0.0.1.
- New configuration files should be created only by an experienced user.
Example of Configuration
The figure below shows a model scenario for using the BGP protocol. Configuration file examples for the zebra and bgpd daemons follow. These are entered in the BGP or ZEBRA configuration forms in the web interface.
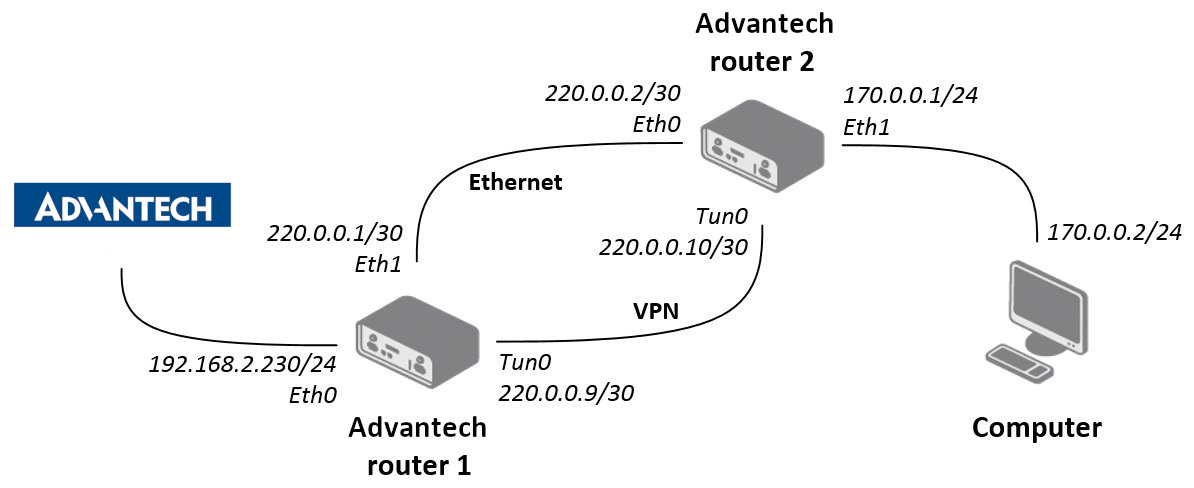
An example of the bgpd.conf configuration file for the device referred to as Advantech router 1 in the figure above:
!
password conel
enable password conel
log syslog
!
router bgp 11111
bgp router-id 220.0.0.1
bgp log-neighbor-changes
network 192.168.2.0/24
!
neighbor 220.0.0.2 remote-as 12345
neighbor 220.0.0.2 next-hop-self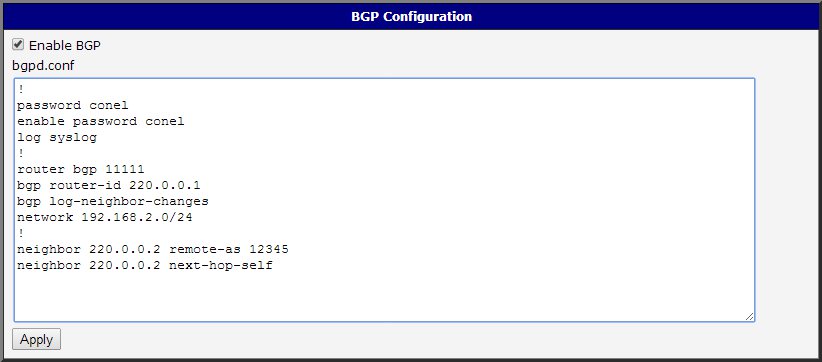
An example of the bgpd.conf configuration file for the device referred to as Advantech router 2 in the figure above:
!
password conel
enable password conel
log syslog
!
router bgp 12345
bgp router-id 220.0.0.2
bgp log-neighbor-changes
network 170.0.0.0/24
!
neighbor 220.0.0.1 remote-as 11111
neighbor 220.0.0.1 next-hop-self
BGP Basic Commands
The following table lists basic commands for editing the bgpd.conf file:
| Command | Description |
|---|---|
router bgp <ASN> | Configures the BGP routing process for the specified autonomous system number. |
no router bgp <ASN> | Removes the routing process from the ASN. |
bgp router-id <ip-address> | Configures a fixed router ID for a BGP-speaking router. |
no bgp router-id <ip-address> | Removes the bgp router-id command and restores the default router ID. |
distance bgp <1-255> <1-255> <1-255> | Sets external, internal, and local distances for BGP routes. |
no distance bgp | Returns distances to the default values (20, 200, 200). |
network <network-number> | Specifies the list of networks for the BGP routing process. |
no network <network-number> | Removes a network from the list. |
aggregate-address <address> | Creates an aggregate entry in the BGP routing table. |
no aggregate-address <address> | Disables aggregation. |
bgp log-neighbor-changes | Enables logging of BGP neighbor resets. |
no bgp log-neighbor-changes | Disables logging of neighbor changes. |
neighbor <ip-address/peer> remote-as <number> | Adds an entry to the BGP neighbor table. |
no neighbor <ip-address/peer> remote-as <number> | Removes an entry from the BGP neighbor table. |
neighbor <ip-address/peer> next-hop-self | Disables next-hop processing of BGP updates on the router. |
no neighbor <ip-address/peer> next-hop-self | Disables this feature. |
neighbor <ip-address/peer> version <version> | Sets the neighbor's BGP version (4, 4+, 4-). |
neighbor <name> peer-group | Defines a new BGP peer group. |
no neighbor <name> peer-group | Removes the peer group and all its members. |
show ip bgp | Displays entries in the BGP routing table. |
BGP basic commands
IS-IS
IS-IS (Intermediate System – Intermediate System) is a routing protocol designed for exchanging routing information between routers. More about this protocol can be found in the IS-IS Application Note or in the FRR documentation.
OSPF & OSPF6
OSPF and OSPF6 (the IPv6 version) are designed for exchanging routing information within an autonomous system. OSPF is a link-state protocol — routers maintain a map of the network (link-state database) that is updated after any topology change. Dijkstra's algorithm computes the shortest path between the router and all networks, and the results are placed in the routing table. More about this protocol can be found in the FRR documentation for OSPF and OSPF6.
Caution
Important notices:
- The telnet VTY interface of the Zebra and OSPF daemons is accessible only via the loopback interface 127.0.0.1.
- New configuration files should be created only by an experienced user.
Example of Configuration
The figure below shows a model scenario for using OSPF. Configuration file examples for the zebra and ospfd daemons follow. These are entered in the OSPF or ZEBRA configuration forms in the web interface.
IPv4 Configuration
An example of the ospfd.conf configuration file for Advantech router 1:
!
password conel
enable password conel
!
log syslog
!
interface eth1
ip ospf cost 1
ip ospf dead-interval 40
ip ospf hello-interval 10
!
interface tun0
ip ospf cost 100
ip ospf dead-interval 40
ip ospf hello-interval 30
!
router ospf
ospf router-id 220.0.0.1
redistribute connected metric-type 1
redistribute static metric-type 1
!
network 220.0.0.0/24 area 0
!
line vty
!
An example of the ospfd.conf configuration file for Advantech router 2:
!
password conel
enable password conel
!
log syslog
!
interface eth0
ip ospf cost 1
ip ospf dead-interval 40
ip ospf hello-interval 10
!
interface tun0
ip ospf cost 100
ip ospf dead-interval 40
ip ospf hello-interval 30
!
router ospf
ospf router-id 220.0.0.2
redistribute connected metric-type 1
redistribute static metric-type 1
!
network 220.0.0.0/24 area 0
!
line vty
!
IPv6 Configuration
An example of the ospf6d.conf configuration file for Advantech router 1:
!
password conel
enable password conel
!
log syslog
!
interface eth1
ipv6 ospf6 instance-id 1
ipv6 ospf6 cost 1
ipv6 ospf6 dead-interval 40
ipv6 ospf6 hello-interval 10
ipv6 ospf6 retransmit-interval 5
!
interface tun0
ipv6 ospf6 instance-id 2
ipv6 ospf6 cost 1
ipv6 ospf6 dead-interval 40
ipv6 ospf6 hello-interval 10
ipv6 ospf6 retransmit-interval 5
!
router ospf6
router-id 220.0.0.1
redistribute connected
redistribute static
interface eth0 area 0.0.0.0
interface eth1 area 0.0.0.0
An example of the ospf6d.conf configuration file for Advantech router 2:
!
password conel
enable password conel
!
log syslog
!
interface eth0
ipv6 ospf6 instance-id 1
ipv6 ospf6 cost 1
ipv6 ospf6 dead-interval 40
ipv6 ospf6 hello-interval 10
ipv6 ospf6 retransmit-interval 5
!
interface tun0
ipv6 ospf6 instance-id 2
ipv6 ospf6 cost 1
ipv6 ospf6 dead-interval 40
ipv6 ospf6 hello-interval 10
ipv6 ospf6 retransmit-interval 5
!
router ospf6
router-id 220.0.0.2
redistribute connected
redistribute static
interface eth0 area 0.0.0.0
interface eth1 area 0.0.0.0
OSPF Basic Commands
The following table lists basic commands for editing the ospfd.conf and ospf6d.conf files:
| Command | Description |
|---|---|
router ospf | Enables the OSPF process. |
no router ospf | Disables the OSPF process. |
ospf router-id <ip-address> | Sets the router ID of the OSPF process. |
no ospf router-id | Forces OSPF to use the previous router-id behavior. |
log-adjacency-changes | Sends a syslog message when an OSPF neighbor goes up or down. |
no log-adjacency-changes | Disables adjacency-change logging. |
network <address> area <areaid> | Defines the interfaces on which OSPF runs and assigns an area ID. |
no network <address> area <area-id> | Disables OSPF routing for interfaces defined by the address. |
area <area-id> range <address mask> | Consolidates and summarizes routes at an area boundary. |
no area <area-id> range <address mask> | Disables this function. |
area <area-id> authentication | Enables authentication for an OSPF area. |
no area <area-id> authentication | Removes an area's authentication. |
ip ospf authentication-key <password> | Assigns a password for OSPF simple password authentication. |
no ip ospf authentication-key <password> | Removes a previously assigned OSPF password. |
ip ospf cost <cost> | Specifies the cost of sending a packet on an interface. |
no ip ospf cost | Resets the path cost to the default value. |
ip ospf dead-interval <seconds> | Sets how long hello packets must be absent before the router is declared down. |
no ip ospf dead-interval | Returns to the default time. |
ip ospf hello-interval <seconds> | Specifies the interval between hello packets sent on the interface. |
no ip ospf hello-interval | Returns to the default time. |
ip ospf priority <number> | Sets the router priority (0–255). |
redistribute <protocol> | Redistributes routes from one routing domain into another. |
no redistribute <protocol> | Disables redistribution. |
default-metric | Sets default metric values for the OSPF routing protocol. |
no default-metric | Returns to the default state. |
show ip ospf | Displays general information about OSPF routing processes. |
show ip ospf interface | Displays OSPF-related interface information. |
show ip ospf neighbor | Displays OSPF neighbor information. |
OSPF basic commands
RIP & RIPNG
RIP and RIPNG (the IPv6 version) allow routers to communicate and react to changes in network topology. RIP is a distance-vector protocol — routers exchange routing tables without knowing the full network topology. The shortest path is determined using the Bellman-Ford algorithm, based on hop count, which is limited to 15 hops. More about this protocol can be found in the FRR documentation for RIP and RIPNG.
Caution
Important notices:
- The telnet VTY interface of the Zebra and RIP daemons is accessible only via the loopback interface 127.0.0.1.
- New configuration files should be created only by an experienced user.
Example of Configuration
The figure below shows a model scenario for using RIP. Configuration file examples for the zebra and ripd daemons follow. These are entered in the RIP or ZEBRA configuration forms in the web interface.
IPv4 Configuration
An example of the ripd.conf configuration file for Advantech router 1:
!
password conel
enable password conel
log syslog
!
interface eth0
!
interface eth1
!
interface ppp0
!
interface tun0
!
router rip
version 2
network eth0
network eth1
network tun0
passive-interface eth0
!
line vty
!
An example of the ripd.conf configuration file for Advantech router 2:
!
password conel
enable password conel
log syslog
!
interface eth0
!
interface eth1
!
interface ppp0
!
interface tun0
!
router rip
version 2
network eth0
network eth1
network tun0
! passive-interface eth1
!
line vty
!
IPv6 Configuration
An example of the ripngd.conf configuration file for Advantech router 1:
!
password conel
enable password conel
log syslog
!
router ripng
!
network eth0
network eth1
!
passive-interface eth0
!
An example of the ripngd.conf configuration file for Advantech router 2:
!
password conel
enable password conel
log syslog
!
router ripng
!
network eth0
network eth1
!
! passive-interface eth1
!
RIP Basic Commands
The following table lists basic commands for editing the ripd.conf and ripngd.conf files:
| Command | Description |
|---|---|
router rip | Enables RIP. |
no router rip | Disables RIP. |
network <network> | Enables RIP on the interface matching the specified network. |
no network <network> | Disables RIP for the specified network. |
network <ifname> | Enables sending and receiving RIP packets on the specified interface. |
no network <ifname> | Disables RIP on the specified interface. |
neighbor <ip-address> | Defines a neighboring router for routing information exchange. |
no neighbor <ip-address> | Disables the RIP neighbor. |
passive-interface <ifname> | Sets the interface to passive mode, disabling routing update transmissions. |
passive-interface default | Sets all interfaces to passive mode. |
no passive-interface <ifname> | Sets the specified interface to normal mode. |
ip split-horizon | Enables the split horizon mechanism (routing information is never sent back on the same interface). |
no ip split-horizon | Disables the split horizon mechanism (enabled by default on each interface). |
version <version> | Specifies the RIP version used globally (1 or 2). |
no version | Resets the global version setting to the default. |
ip rip send version <version> | Specifies the RIP version to send on an interface. |
ip rip receive version <version> | Specifies the RIP version to receive on an interface. |
show ip rip | Shows RIP routes. |
show ip protocols | Displays parameters and current state of active routing protocol processes. |
RIP basic commands
NHRP
Caution
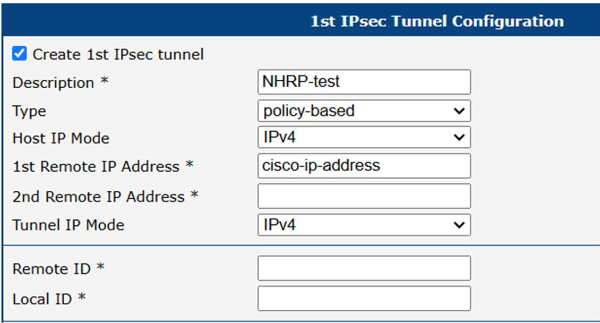
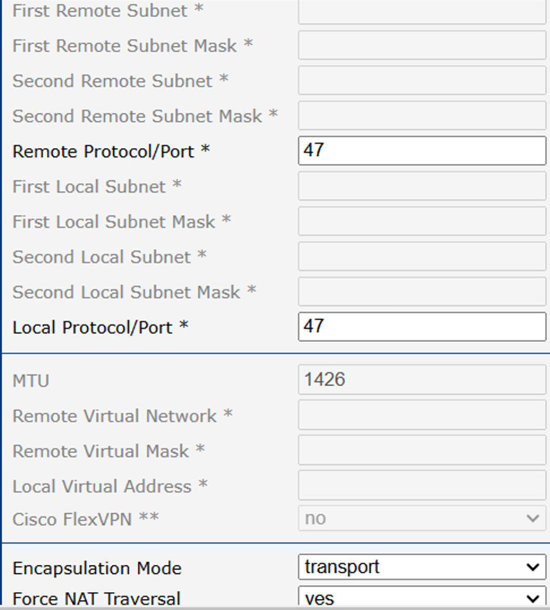
The NHRP implementation in this Router App does not support some proprietary Cisco extensions. If you want to use NHRP in conjunction with Cisco devices, consider the following options:
- Use FlexVPN by configuring it on the IPsec configuration page. See the FlexVPN application note for details.
- Install the dedicated Protocol NHRP (DMVPN) Router App.
The Next Hop Resolution Protocol (NHRP) is an extension of the ATM ARP routing mechanism used to improve routing efficiency over Non-Broadcast, Multiple Access (NBMA) networks. It can be used by a sender to determine the route with the fewest hops to a receiver. More about this protocol can be found in the FRR documentation.
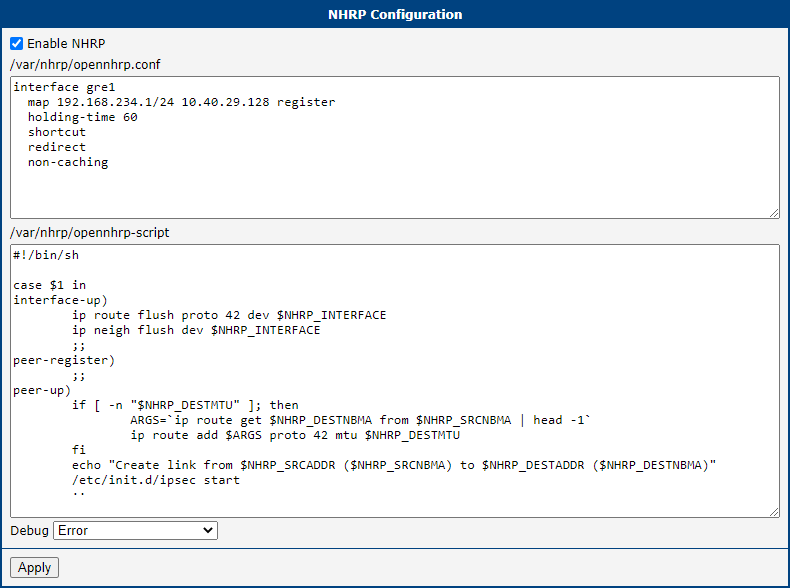
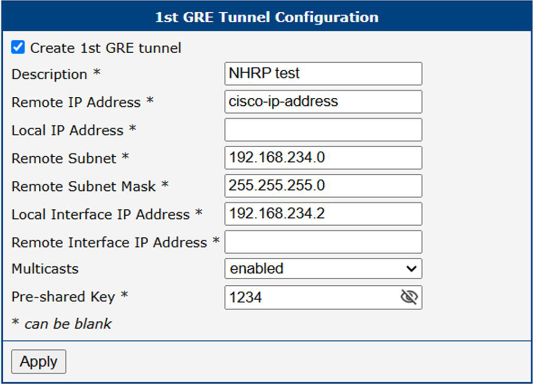
In the /var/nhrp/opennhrp.conf field, insert the following configuration to register the proper interface with the NHRP hub router (edit to your own needs):
interface gre1
map 192.168.234.1/24 10.40.29.128 register
holding-time 60
shortcut
redirect
non-caching
The /var/nhrp/opennhrp-script field contains the OpenNHRP script that defines behavior in various situations. You can leave it unchanged. If you accidentally edit it, you can restore it with the following content:
#!/bin/sh
case $1 in
interface-up)
ip route flush proto 42 dev $NHRP_INTERFACE
ip neigh flush dev $NHRP_INTERFACE
;;
peer-register)
;;
peer-up)
if [ -n "$NHRP_DESTMTU" ]; then
ARGS=`ip route get $NHRP_DESTNBMA from $NHRP_SRCNBMA | head -1`
ip route add $ARGS proto 42 mtu $NHRP_DESTMTU
fi
echo "Create link from $NHRP_SRCADDR ($NHRP_SRCNBMA) to $NHRP_DESTADDR ($NHRP_DESTNBMA)"
/etc/init.d/ipsec start
;;
peer-down)
echo "Delete link from $NHRP_SRCADDR ($NHRP_SRCNBMA) to $NHRP_DESTADDR ($NHRP_DESTNBMA)"
if [ "$NHRP_PEER_DOWN_REASON" != "lower-down" ]; then
/etc/init.d/ipsec stop
fi
ip route del $NHRP_DESTNBMA src $NHRP_SRCNBMA proto 42
;;
route-up)
echo "Route $NHRP_DESTADDR/$NHRP_DESTPREFIX is up"
ip route replace $NHRP_DESTADDR/$NHRP_DESTPREFIX proto 42 via $NHRP_NEXTHOP dev $NHRP_INTERFACE
ip route flush cache
;;
route-down)
echo "Route $NHRP_DESTADDR/$NHRP_DESTPREFIX is down"
ip route del $NHRP_DESTADDR/$NHRP_DESTPREFIX proto 42
ip route flush cache
;;
esac
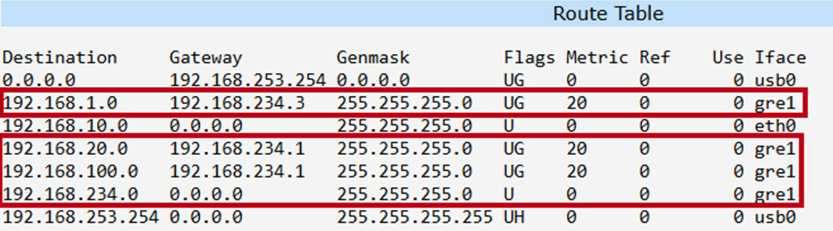
exit 0Press Apply to save the changes. Use the same procedure for all spokes — the NHRP configuration is the same for all spoke routers.
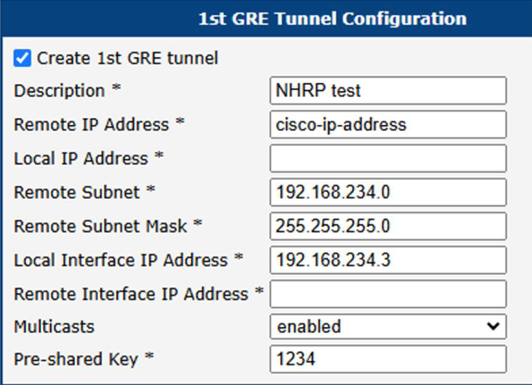
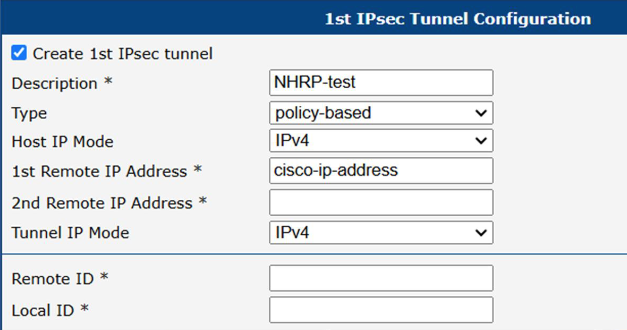
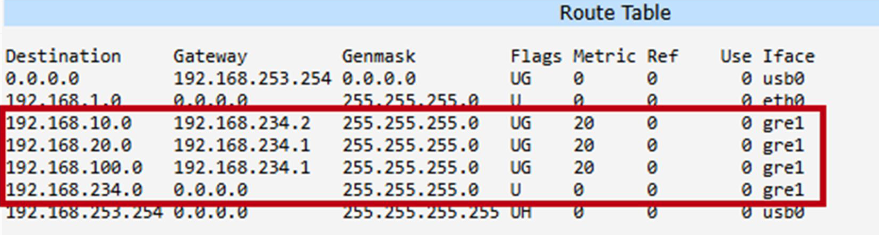
NHRP Configuration Example
This example shows how to configure the scenario in the diagram below using FRR + IPsec + NHRP + BGP protocols.
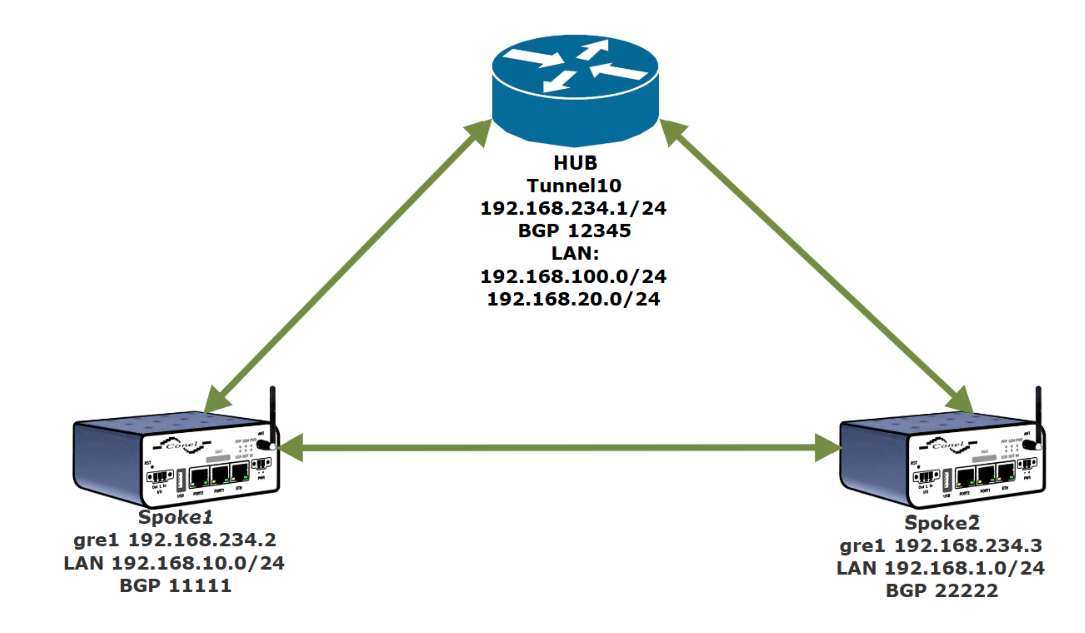
HUB — Cisco 819
!
crypto isakmp policy 1
encr 3des
hash md5
authentication pre-share
group 2
lifetime 3600
crypto isakmp key test address 0.0.0.0 0.0.0.0
!!
crypto ipsec transform-set ESP-3DES-MD5 esp-3des esp-md5-hmac
mode transport
!
crypto ipsec profile DMVPN-P
set transform-set ESP-3DES-MD5
!
interface Tunnel10
ip address 192.168.234.1 255.255.255.0
no ip redirects
ip nhrp authentication 1234
ip nhrp network-id 1234
no ip nhrp record
no ip nhrp cache non-authoritative
ip nhrp redirect
ip ospf 1 area 0
tunnel source FastEthernet4
tunnel mode gre multipoint
tunnel key 1234
tunnel protection ipsec profile DMVPN-P
!
router bgp 12345
no synchronization
bgp router-id 192.168.234.1
bgp log-neighbor-changes
network 192.168.20.0
network 192.168.100.0
neighbor 192.168.234.2 remote-as 11111
neighbor 192.168.234.3 remote-as 22222
neighbor 192.168.234.4 remote-as 33333
no auto-summary
Spoke1 — GRE:
Spoke1 — ZEBRA:
!
! Default configuration with enabled vty
! Change password!!!
!
password conel
enable password conel
!
line vty
!
log syslog
!
interface eth0
!
interface eth1
!
interface gre1
!
interface usb0
!
Spoke1 — BGP:
!!
! Default configuration with enabled vty
! Change password!!!
!
password conel
enable password conel
!
line vty
!!
!
router bgp 11111
bgp router-id 192.168.234.2
no bgp ebgp-requires-policy
neighbor 192.168.234.1 remote-as 12345
neighbor 192.168.234.1 disable-connected-check
!
address-family ipv4 unicast
network 192.168.10.0/24
!neighbor 192.168.234.1 soft-reconfiguration inbound
redistribute nhrp
exit-address-family
Spoke1 — NHRP:
! Default configuration with enabled vty
! Change password!!!
!
password conel
enable password conel
!
line vty
!!
nhrp nflog-group 1
interface gre1
description DMVPN Tunnel Interface
ip nhrp network-id 1234
tunnel key 1234
ip nhrp redirect
ip nhrp registration no-unique
ip nhrp shortcut
no link-detect
tunnel mode gre multipoint
tunnel source usb0
!
ip nhrp nhs dynamic nbma cisco-ip-address
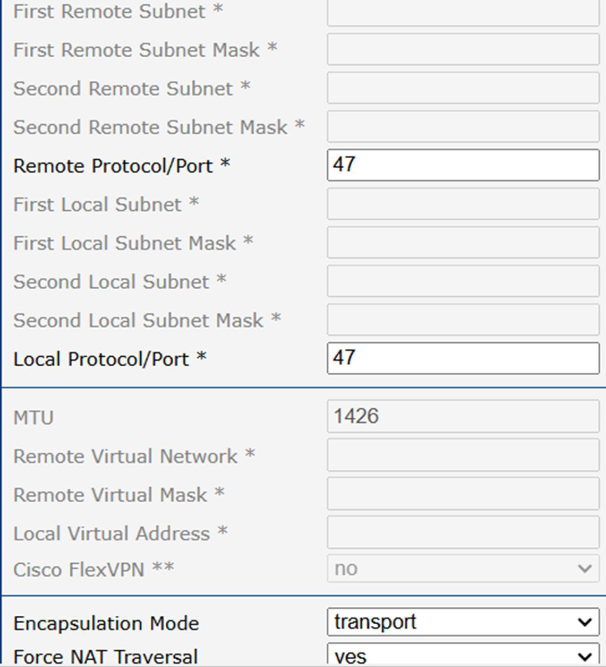
ip nhrp authentication 1234Spoke1 — IPsec:
Spoke2 — GRE:
Spoke2 — ZEBRA:
!!
! Default configuration with enabled vty
! Change password!!!
!
password conel
enable password conel
!
line vty
!
log syslog
!
interface eth0
!
interface eth1
!
interface gre1
!
interface usb0
!
Spoke2 — BGP:
!
!!
! Default configuration with enabled vty
! Change password!!!
!
password conel
enable password conel
!
line vty
!!
router bgp 22222
bgp router-id 192.168.234.3
no bgp ebgp-requires-policy
neighbor 192.168.234.1 remote-as 12345
neighbor 192.168.234.1 disable-connected-check
!
address-family ipv4 unicast
network 192.168.1.0/24
!neighbor 192.168.234.1 soft-reconfiguration inbound
redistribute nhrp
exit-address-family
Spoke2 — NHRP:
! Default configuration with enabled vty
! Change password!!!
!
password conel
enable password conel
!
line vty
!!
nhrp nflog-group 1
interface gre1
description DMVPN Tunnel Interface
ip nhrp network-id 1234
tunnel key 1234
ip nhrp redirect
ip nhrp registration no-unique
ip nhrp shortcut
no link-detect
tunnel mode gre multipoint
tunnel source usb0
!
ip nhrp nhs dynamic nbma cisco-ip-address
ip nhrp authentication 1234
Spoke2 — IPsec:
MPLS
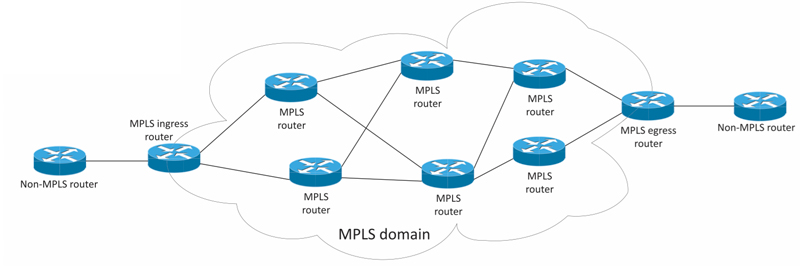
Multiprotocol Label Switching (MPLS) is a routing technique that directs data from one node to the next based on short path labels rather than long network addresses. MPLS can encapsulate packets of various network protocols and supports a range of access technologies including T1/E1, ATM, Frame Relay, and DSL.
The figure below shows a simplified MPLS domain. Routers within the MPLS network communicate with each other via a label distribution protocol to set up Label Switched Paths (LSPs). Routers outside the MPLS domain forward IP traffic like normal routers.
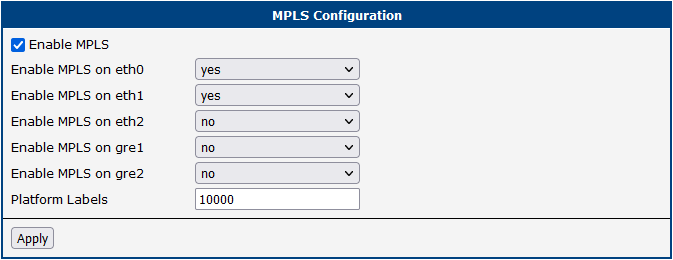
To enable MPLS routing, install the FRR router app first. Then navigate to Configuration → MPLS, enable the MPLS service, and select the interfaces on which MPLS should be enabled. You can also set the Platform Labels value here.
LDP
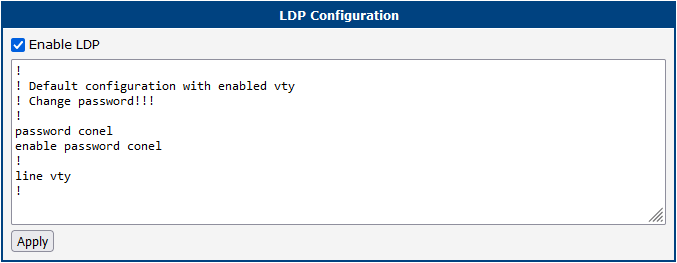
Label Distribution Protocol (LDP) is used by MPLS-capable routers to exchange label mapping information. Two routers with an established LDP session are called LDP peers, and information exchange is bi-directional. LDP builds and maintains LSP databases for forwarding traffic through MPLS networks. More about this protocol can be found in the FRR documentation.
PIM-SM
PIM-SM (Protocol Independent Multicast – Sparse Mode) is the most commonly used multicast routing protocol. It assumes that recipients for any particular multicast group are sparsely distributed throughout the network. Routers must explicitly tell their upstream neighbors about their interest in particular groups. PIM-SM uses shared trees rooted at a selected Rendezvous Point (RP).
The PIM-SM configuration is split across three pages.

| Item | Description |
|---|---|
| RP Address | IP address of the Rendezvous Point. Must be the same on all routers in the routing domain. May be left empty if RP is selected using BSR. |
PIM-SM configuration items
When a device starts sending multicast traffic, the First Hop Router (FHR) registers with the RP and starts forwarding multicast traffic to it. When a client requests multicast traffic, the Last Hop Router (LHR) requests the traffic from the RP, which then forwards it to all LHRs that requested it.
As an optimization, after the LHR starts receiving multicast from the RP, it may request the traffic directly from the FHR, reducing latency and load on the RP.
BSR — BootStrap Router

BSR is a mechanism that allows routers to automatically elect which router(s) will become RP. All candidate BSRs (C-BSRs) advertise themselves; the C-BSR with the highest priority is elected as BSR.
Once a BSR is elected, candidate RPs (C-RPs) advertise themselves to the BSR. The BSR selects the C-RP with the lowest priority and announces it as the RP to the rest of the network. The BSR may select multiple C-RPs if they advertise different groups. A router can be a C-BSR, C-RP, or both.
When a C-RP advertises itself, it includes the range of multicast groups (specified in the Advertised group field) for which it is willing to act as RP.
Interface Configuration
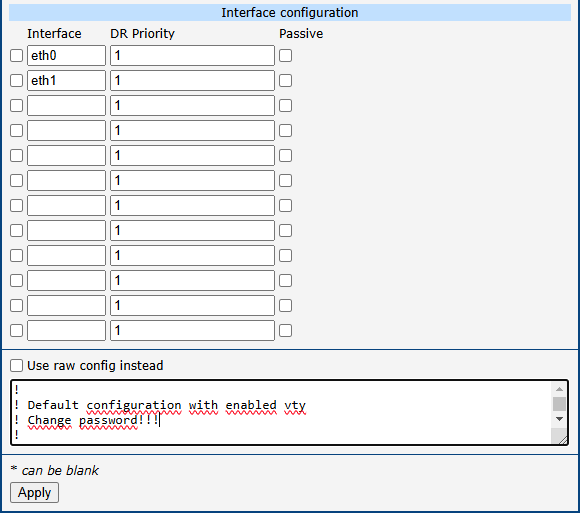
The first checkbox determines whether the interface is included in the PIM-SM topology; the second field is the interface name.
If multiple routers are connected to the same network segment:
All routers send PIM Hello messages to announce themselves. The router with the highest DR priority becomes the Designated Router (DR). Only the DR registers multicast sources with the RP and requests multicast from the RP.
Because hello messages are not authenticated, a bad actor could spoof a PIM Hello to become the elected DR. The Passive checkbox addresses this: a passive interface does not send or process hello/BSR messages.
Interface behavior summary:
- Not enabled: router will not request multicast from RP, nor send hello messages on that interface.
- Enabled, not passive: router sends hello messages and requests multicast from RP when a client requests it.
- Enabled and passive: router does not send hello messages, but will request multicast from RP when a client requests it.
If Use raw config instead is checked, the above configuration is ignored and the content of the text field below it is used directly.
An example configuration with a manually configured RP and BSR enabled. PIM is enabled in passive mode on eth0, and with a modified DR priority on eth1. Additional options are described in the FRR documentation.
!
router pim
rp 192.0.2.0 224.0.0.0/4
bsr candidate-bsr source any priority 64
bsr candidate-rp source any priority 192
bsr candidate-rp group 224.0.0.0/4
!
interface eth0
ip pim
ip igmp
ip pim passive
!
interface eth1
ip pim
ip igmp
ip pim drpriority 20
!