WebAccess/VPN (VPN Portal)
Introduction
What Is WebAccess/VPN
WebAccess/VPN (VPN = Virtual Private Network) is a complementary management and monitoring tool for the secure interconnection of Advantech routers and the LANs behind them. It provides services such as clustering routers into separate groups (called Networks, which allow selected routers to communicate with each other), accessing the router's web interface from the Internet, and accessing devices behind the routers.
The architecture of WebAccess/VPN was designed to be:
- Scalable — can handle thousands of routers.
- Flexible — easily manageable and can be hosted by the customer.
- Secure — the architecture withstands common attack vectors. Network traffic runs through OpenVPN tunnels.
Other capabilities include:
- 1:1 NAT can be used to permit public hosts to access internal servers.
- Firewall filtering rules can be created separately for individual devices and for entire groups of devices (Networks).
- The Standalone VPN Clients service enables external secured connections to WebAccess/VPN.
- User management with different user roles is supported.
- Both v2 and v3 Advantech routers are supported. Router configuration is straightforward — upload the Router App. OpenVPN settings are then pushed to the router automatically after validation.
Technical Concept
All routers connect directly to WebAccess/VPN via OpenVPN tunnels. Rules for mutual access (Networks — groups of devices) can also be created. Additional VPN tunnels (Standalone VPN Clients) allow any other device (Windows, Linux, smartphone, etc.) to access the secured network.
Parts of the WebAccess/VPN System
The elements of a WebAccess/VPN instance are:
- Devices — Routers or Standalone VPN Clients are the leaf elements. The VPN Portal Router App must be uploaded to the router. Routers then connect to the following two entities:
- Dispatch Server (DS) — A registration service that holds the current IP address of the Customer Server (CS). Whenever routers have difficulty locating their CS, they contact the DS for its current address and credentials. The DS is used only when routers do not know the Customer Server address.
- Customer Server (CS) — The central traffic point for interconnected devices. Routers are organized into groups called Networks, which prescribe which routers may interconnect with which others.
Caution
In version 1.1.0, the Dispatch Server (DS) and Customer Server (CS) both run on the same machine. In later versions, it will be possible to run them separately.
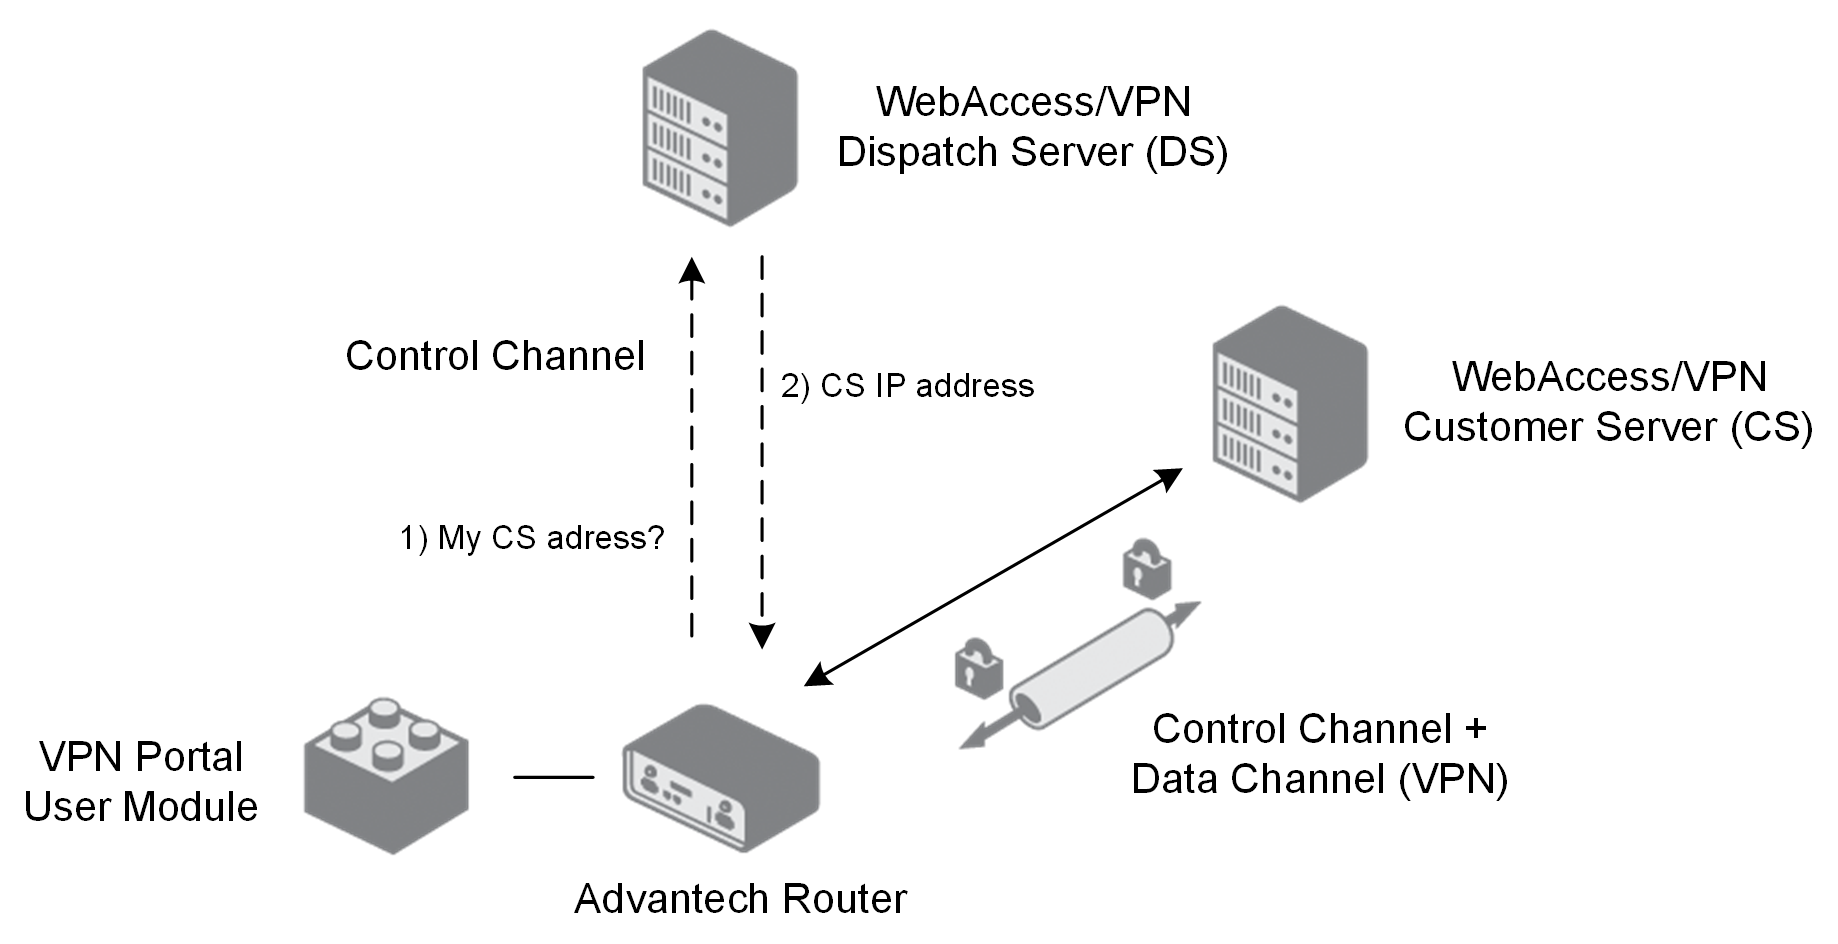
How the Router Connects to the System
As shown in the figure below, the router first contacts the Dispatch Server (DS). The DS provides the router with the Customer Server (CS) address. The router then connects directly to the Customer Server, an OpenVPN server with a Web UI that controls traffic. The CS lists the router as a new router waiting for validation.
After the router is manually validated (granted access) by the administrator on the Customer Server, the CS provides OpenVPN credentials to the router and can force the configuration of LAN addresses if set manually by the administrator. The router (and its LANs) can then be manually added by an administrator to a Network, where it can access networked peers and their LANs.
Security of Communication Channels
All web user interaction is secured by HTTPS (accessing WebAccess/VPN, managing a single router's web interface where CS serves as proxy). When a router connects to WebAccess/VPN for the first time (for validation), a temporary SSL/TLS channel is used for registration and exchange of OpenVPN credentials. After the OpenVPN tunnel is established, both the control channel and all network traffic are transmitted within the tunnel.
Networks — Groups of Devices
The local network behind a router is called a LAN. A group of devices (routers and Standalone VPN Clients) that can communicate with each other is called a Network. All validated routers (and the Customer Server) are part of the "VPN Network". See the example below, including example IP addresses.
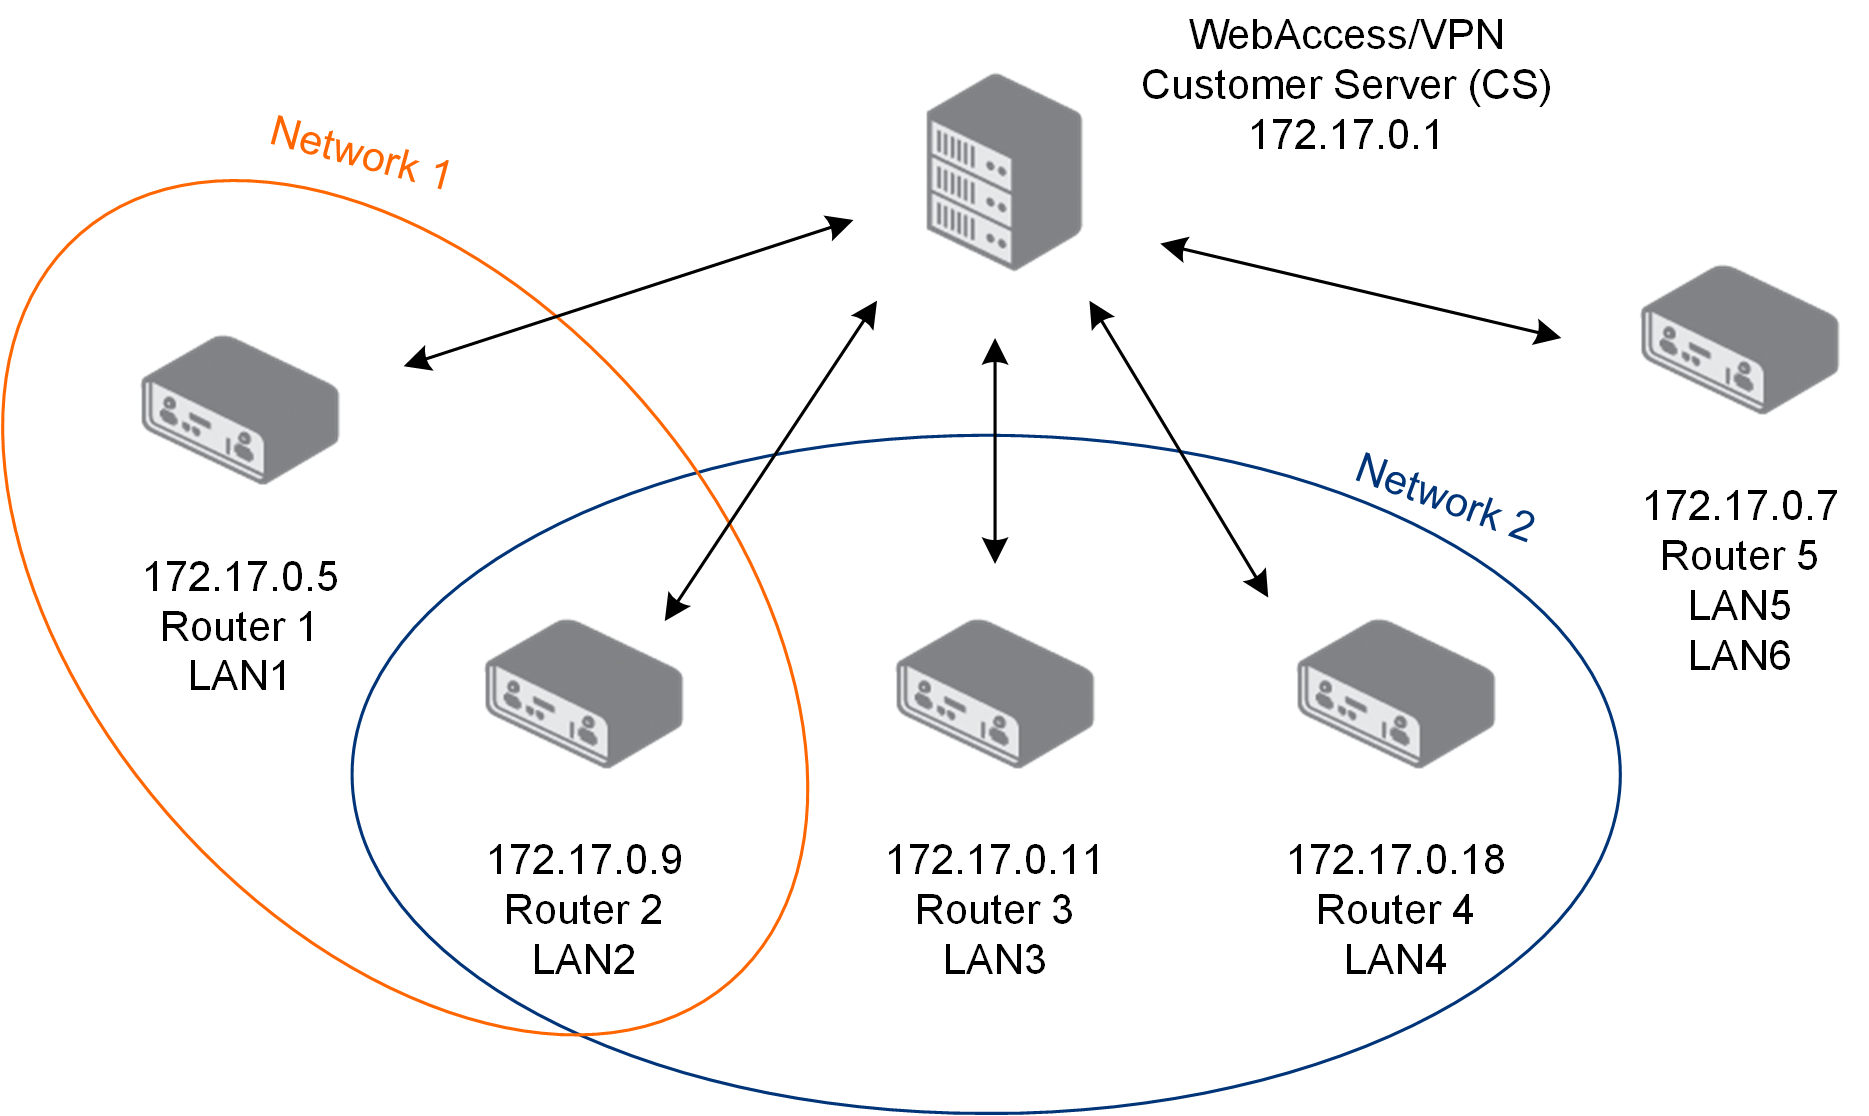
Routers' LANs can be configured at the Customer Server. Networks are also configured on the Customer Server. Any router can be a member of multiple Networks. Configuration changes (LAN ranges, network routing) are propagated to routers when possible.
Licensing
Tips
A default license is installed with WebAccess/VPN. It allows connecting 5 devices and creating 2 VPN standalone clients, so all features can be tested.
To order a license, contact your local Sales Representative. The license can be updated at any time on the Administration — Application page of WebAccess/VPN.
Installation
Free Demo Installation on Amazon AWS
Caution
The free demo version from Amazon AWS is limited to 5 routers, including 2 standalone VPN clients (for example, 3 routers and 2 standalone VPN clients). This version is not intended for production use and cannot be upgraded or licensed to the production version.
The free version of the product is no longer available on Amazon Marketplace. Follow the installation guide in the section below, then proceed to the Installation Wizard section.
Tips
For use with a purchased license, choose one of the following installation options:
- A customer-managed installation from an image on Amazon AWS — follow the Amazon AWS Installation section, then the Installation Wizard section.
- On-premises installation as a VirtualBox appliance — follow the On-Premises Installation section, then the Installation Wizard section.
Installation on Amazon AWS
Installation is done from a shared AWS (Amazon Web Services) image that includes an install wizard. The customer manages all certificates and keys; Advantech has no access.
Caution
Prerequisites:
- An Amazon AWS account is required to launch your instance from the image provided. A free account is sufficient for a trial, but fees may apply.
- A domain name for your WebAccess/VPN installation is needed. This enables the Link (Proxy) feature. Advantech can provide a domain name (a subdomain of the
vpnportal.clouddomain).
Note that interaction with Advantech is required before installation so that Advantech can share the installation image — see step 1 below.
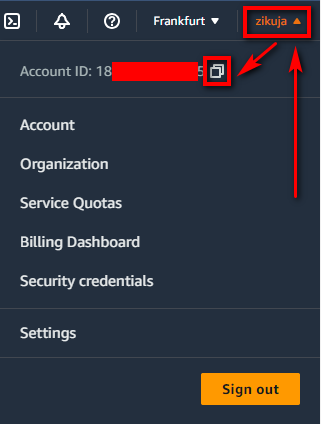
Log in to your Amazon AWS account (https://aws.amazon.com) and select My Account from the profile menu.
Copy your Account ID and send it along with your Region to Advantech at: AEU.CZ-VPN-aws@advantech.com
AWS Account ID Wait for a confirmation email that the installation image has been shared with your account.
Log in to your Amazon AWS account and select Services → EC2.
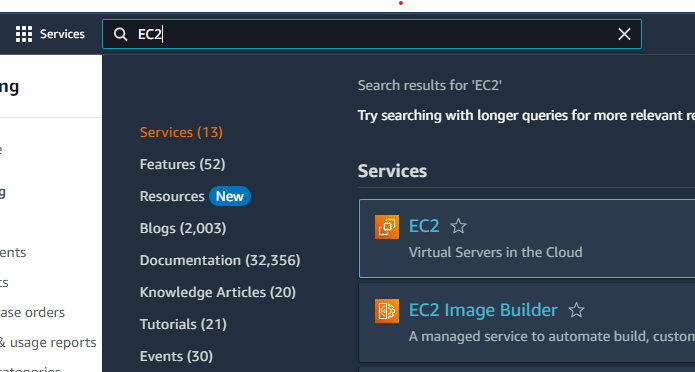
EC2 in AWS Services Select AMIs from the Images menu on the left.

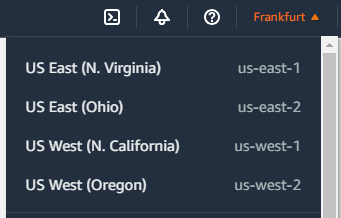
AMIs menu Switch your location to Frankfurt in the top-right corner. To use a different region, contact Advantech at AEU.CZ-VPN-aws@advantech.com to have the image copied to your location.
Region selection Change the image filter to Private images.
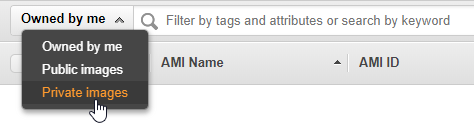
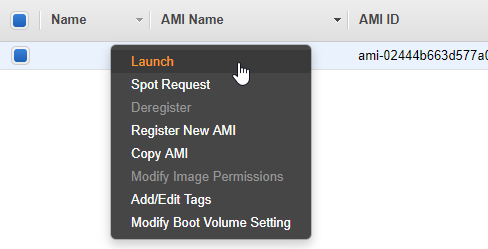
Private images filter The shared image from Advantech should appear under the name WebAccess/VPN. You can verify that the owner ID is
686278836833.Right-click the image and select Launch to create the instance.
Caution
Do not stop the instance once it is running. Stopping the instance may cause loss of the public IP address and WebAccess/VPN data.
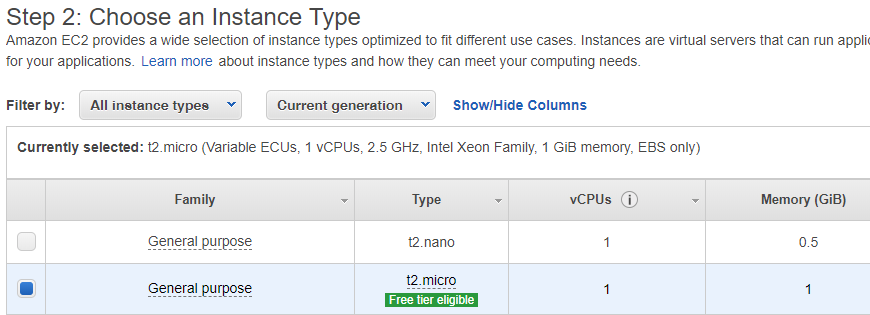
Launch the instance In Step 2: Choose an Instance Type, select t2.micro (for a free account) or follow the Performance Scaling Recommendations.
Choose instance type You can use default settings for the next steps until Step 6.
In Step 6: Configure Security Group, configure the firewall rules for the instance. Do not remove the SSH rule added by the system. Add the following additional rules:
- Allow HTTP traffic on port 80.
- Allow HTTPS traffic on port 443.
- Allow TCP port 8881.
- Allow ICMP protocol — all traffic.
- Allow TCP ports from 42000 to 42009.
- Allow UDP ports from 42010 to 42019.
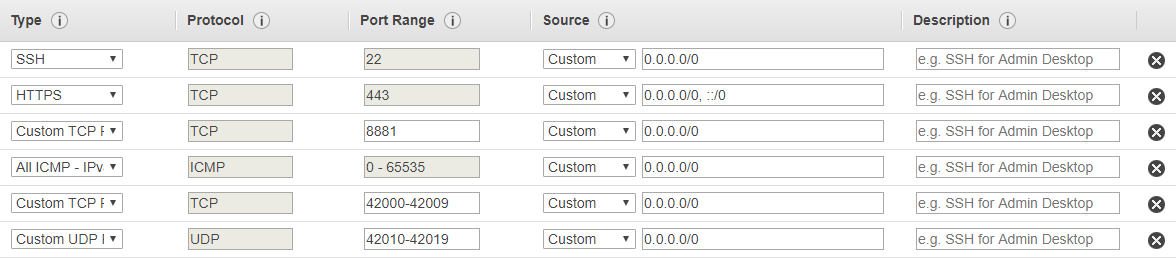
Security group configuration Review and launch the instance. You can create a new key pair or select an existing one. This key is required for SSH login to the instance if needed.
View your instances in the left menu under Instances. Wait for the instance to initialize. Select the instance and look at the Description section below the table. Find the Public DNS or IP address and copy it.

Instance description To access the WebAccess/VPN installation wizard, paste the IP address of your instance into your browser's address bar with
https://prefix and:8881port suffix. Example:https://IP-OR-DNS-OF-YOUR-INSTANCE:8881
Installation wizard URL HTTPS is required since HTTP is not redirected. Ignore the invalid certificate authority notice and proceed to the site (the CA will be configured in the first step of installation).
Continue with the wizard — see the Installation Wizard section.
On-Premises Installation — VirtualBox
Tips
Both the Dispatch Server and Customer Server are installed on-premises as VirtualBox appliances. The provided appliance uses Ubuntu 20.04 LTS and contains the WebAccess/VPN installer. Since this is an on-premises version, the customer is solely responsible for running the WebAccess/VPN system, its security, and all updates, including the operating system.
Caution
Prerequisites:
- A computer with Internet access and VirtualBox installed.
- WebAccess/VPN .ova file (VirtualBox appliance).
- Domain name for your WebAccess/VPN installation. If your instance has a public IP address, Advantech can provide and manage a domain name automatically (ending with ".vpnportal.cloud" suffix).
- Recommended: A DHCP server that will lease a fixed IP address to the bridged VirtualBox machine running WebAccess/VPN.
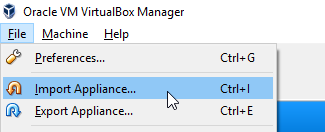
In VirtualBox Manager, go to File → Import Appliance...
Import Appliance Choose the WebAccess-VPN
.ovafile to import.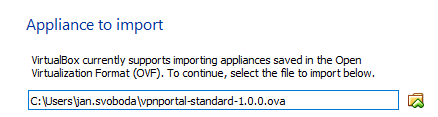
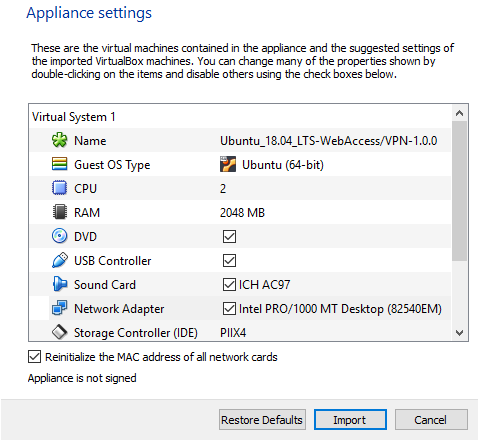
Choose OVA file Review the imported settings. Recommended parameters:
- CPU: 2
- RAM: 2 GB
- Video RAM (display): 64 MB (accessible later in settings)
- Network: bridged (accessible later in settings)
- HDD storage size: 20 GB (accessible later in settings)
Check the Reinitialize the MAC address of all network cards option, then click Import.
Review appliance settings Wait while the appliance file is imported.
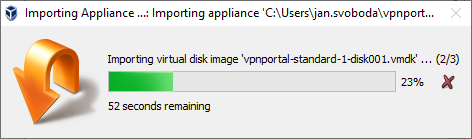
Importing appliance After the import, do not run the appliance immediately — go to Settings and check the Network settings.

Open VM settings In Network Settings, verify that Bridged Adapter is selected under Attached to: and choose your physical network interface.
Caution
A bridged network is required so that WebAccess/VPN is directly accessible in your network. The WebAccess/VPN IP address must be reachable from all routers and clients you want to add.
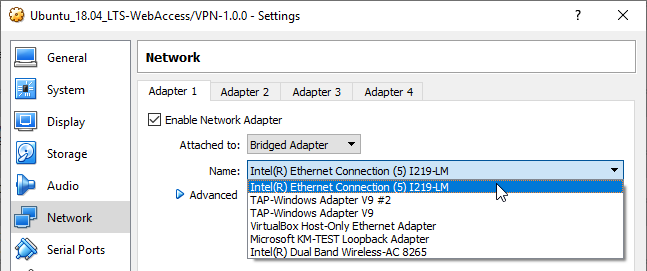
Bridged adapter configuration Run the appliance.
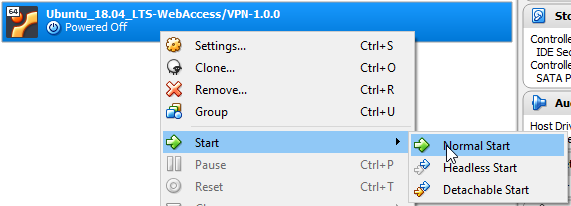
Run the appliance Wait for the system to boot and log in to Ubuntu with:
- Username:
ubuntu - Password:
wavpn123
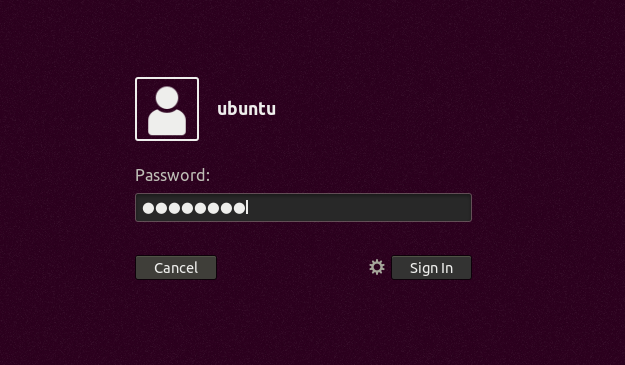
Ubuntu login screen - Username:
Find the IP address of the appliance's bridged network interface using one of the following methods:
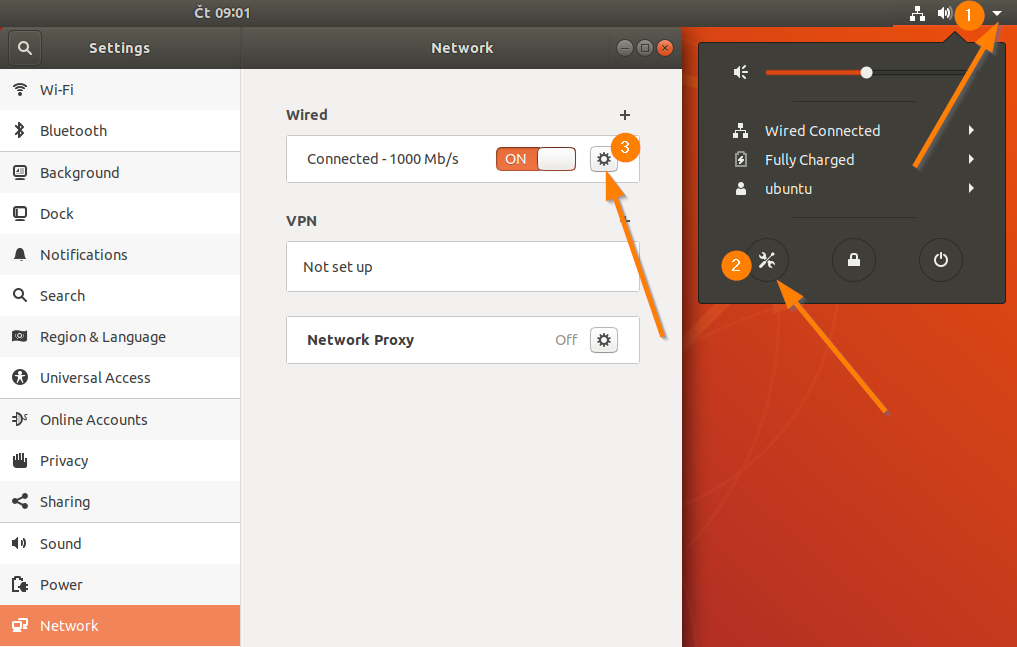
In GUI system settings: Open Settings by clicking the top-right area of the top bar, select the Settings icon, then choose Network settings. Click the settings icon and read the IP address from the IPv4 Address field.
Find IP address via GUI Via terminal: Right-click the desktop and select Open Terminal. Use
ip a sorifconfigto find the IP address of the physical interface (enp0s3).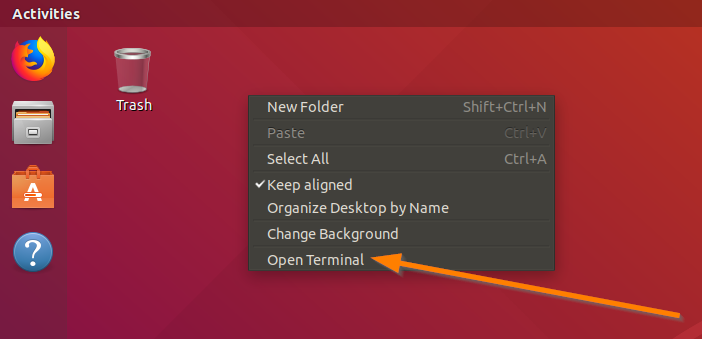
Find IP address via terminal 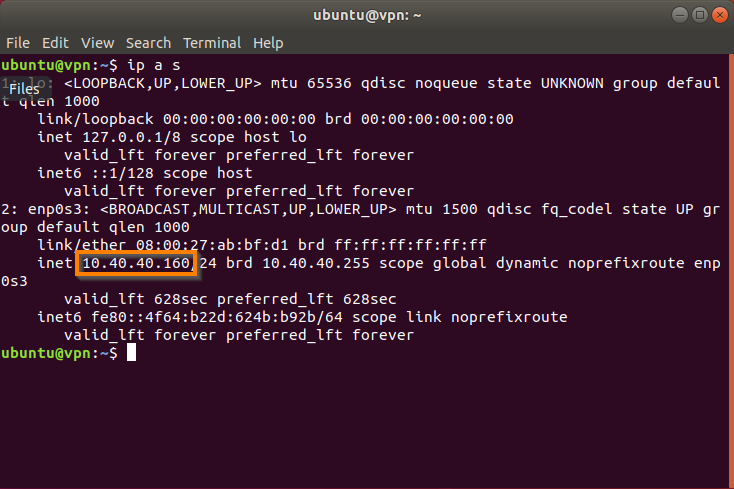
ifconfig output In a browser on the host system (or any computer that can reach the appliance), access the WebAccess/VPN installation wizard: type
https://followed by the appliance's IP address and port8881. Example:https://IP-OF-APPLIANCE:8881
Installation wizard URL HTTPS is required since HTTP is not redirected. Ignore the invalid certificate authority notice and proceed (the CA will be configured in the first installation step).
Continue with the wizard — see the Installation Wizard section.
VPN-BOX-UNO Installation
Caution
The license file is stored in the Desktop folder of the VPN-BOX-UNO23 device.
The VPN-BOX-UNO23 product is an Advantech Embedded Automation Computer UNO-2372G with pre-installed WebAccess/VPN software. This device acts as the WebAccess/VPN server. A Linux distribution based on Ubuntu 20.04 LTS is installed on this computer.
Caution
Do not upgrade the Linux distribution to a version newer than 20.04 LTS; WebAccess/VPN software does not support newer versions.
Connect the VPN-BOX-UNO23 to all peripherals and the power supply. See the printed Start Guide for details.
When the device boots, a login screen appears. Log in as the
ubuntuuser with passwordwavpn123.Open the Mozilla Firefox web browser by clicking the icon on the left panel.
The first page of the WebAccess/VPN Installation Wizard should appear automatically. If not, navigate to
https://localhost:8881.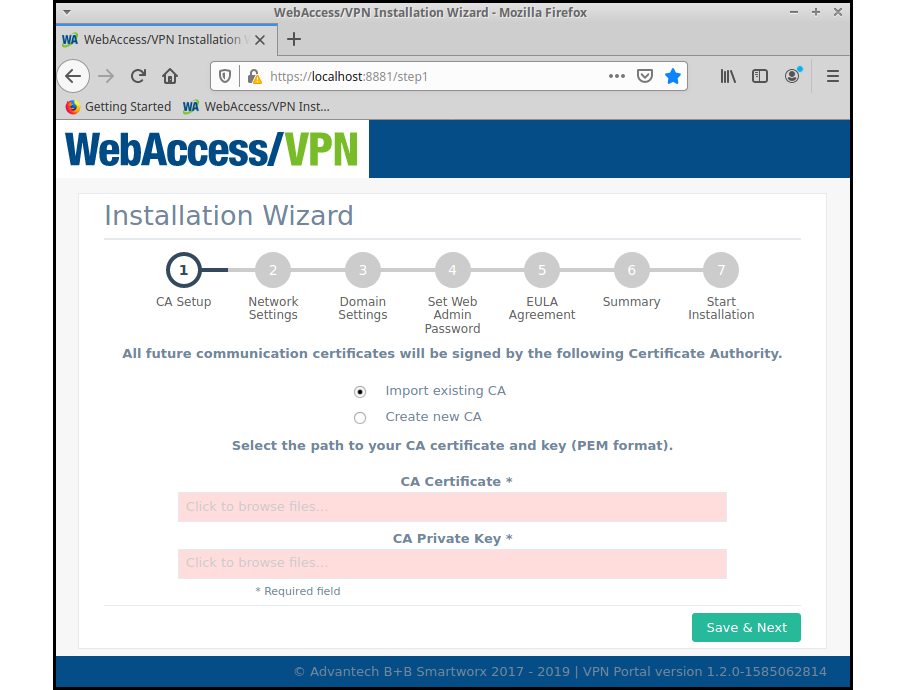
VPN-BOX Installation Wizard Caution
If you encounter the Potential Security Risk Ahead warning, select Advanced... and then Accept the Risk and Continue to access the application interface.
Continue with the wizard — see the Installation Wizard section.
Tips
The maximum overall throughput (all active VPN connections combined) of the WebAccess/VPN server installed on UNO-2372G is approximately 85 Mbps for both license variants (VPN-BOX-UNO23-100 and VPN-BOX-UNO23-500).
Installation Wizard
Follow the instructions in the installation wizard. If you do not have a Certification Authority to import (CRT certificate file and PEM key file), use the wizard to create one.
Note: If using your own Certificate Authority, the key file to be imported must not be password-protected.

Wizard Step 1 — Certificate Authority In Step 2, configure the virtual internal network for OpenVPN connections with routers. The recommended values are network
10.8.0.0with a mask prefix chosen from the available options. The mask determines the maximum number of devices that can connect to WebAccess/VPN; the calculated number of routers is shown below the field. The number of devices per router is always 254 and cannot be changed. The virtual network address and mask can be changed later in Settings, but only when no validated routers exist.The External IP is either the IP address of the Amazon instance (detected automatically and cannot be changed in an Amazon image installation) or the IP address of the VirtualBox appliance.

Wizard Step 2 — Virtual Network In Step 3, either enter your own domain name for WebAccess/VPN (recommended for on-premises installations) or create a new Advantech-managed subdomain (available for public IP only; subdomain of
vpnportal.cloud).
Wizard Step 3 — Domain Name Warning: On AWS, do not use the instance's AWS DNS domain name (for example,
ec2-35-156-197-5.eu-central-1.compute.amazonaws.com). Note that the AWS instance may change its public IP when stopped and restarted — either avoid stopping the instance or purchase a fixed public IP from Amazon.Using your own domain name: When directing your domain's DNS records to the installation IP, add an additional "A" record:
*.mydomain.com(or*.sub.mydomain.comfor a subdomain installation). This wildcard record is required for some WebAccess/VPN features.Using a domain name from Advantech: Suitable for AWS. For on-premises use, the VirtualBox appliance must have a public IP. Choose an unused subdomain on
vpnportal.cloud— the field turns red if the name is already taken. Advantech will set and manage the DNS records.In Step 4, set the password and enter your EC2 instance ID for admin web user access.
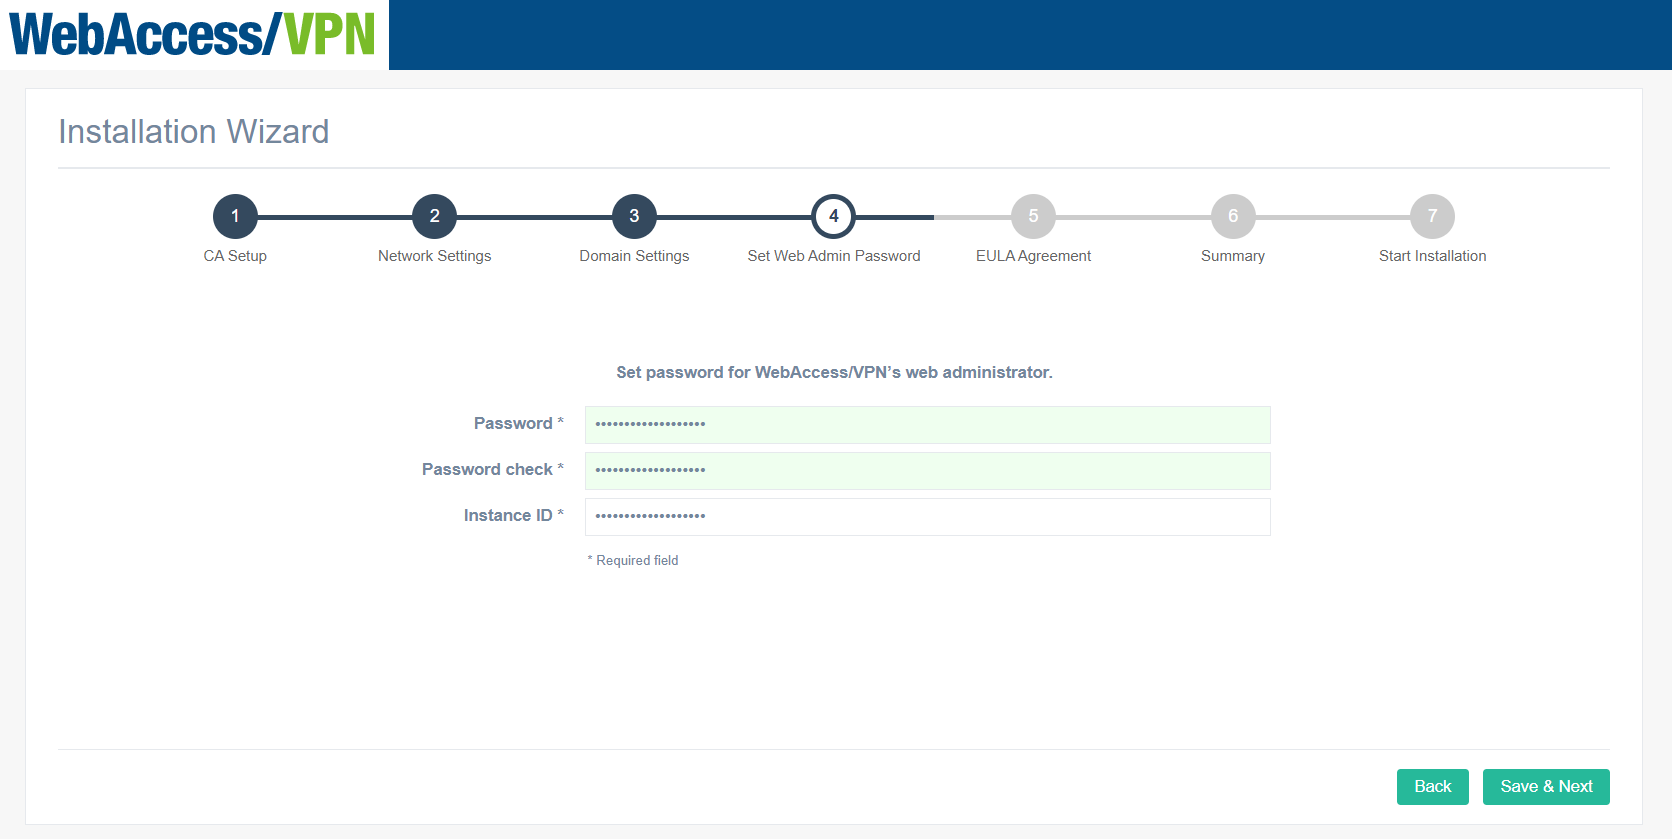
Wizard Step 4 — Admin Password In Step 5, read and agree to the EULA.
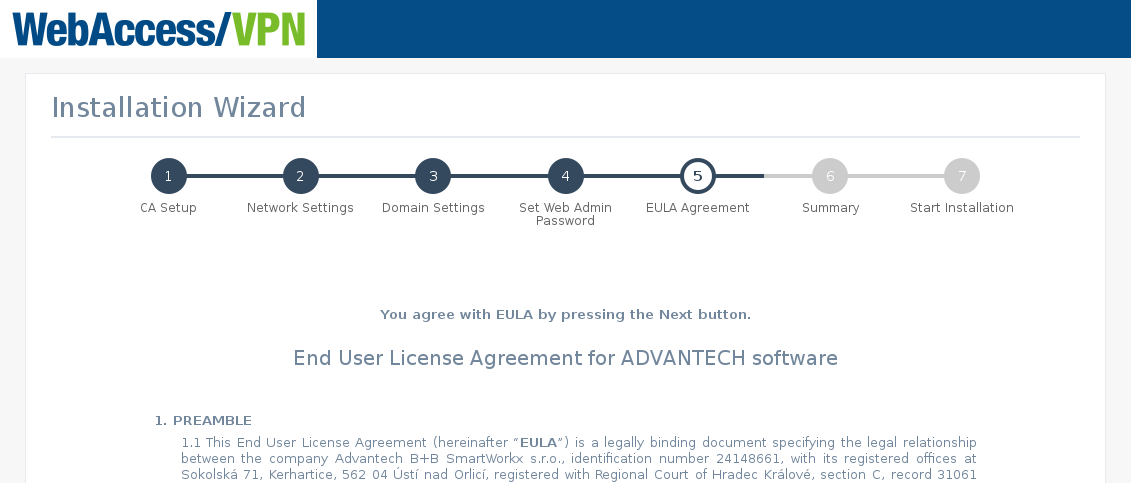
Wizard Step 5 — EULA In Step 6, review the installation parameters.
Caution
The installation wizard can be run only once and will be deactivated after the installation completes.
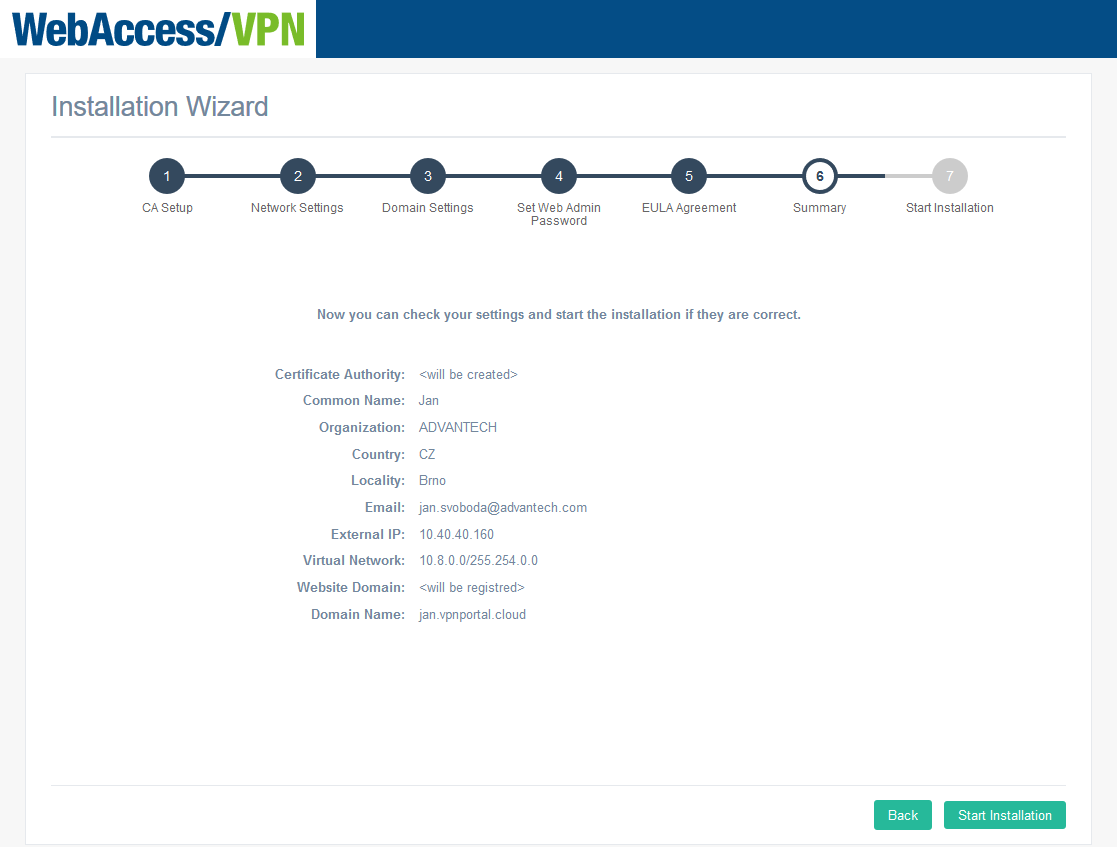
Wizard Step 6 — Review Parameters Click Start installation. A progress bar shows the installation status. After the installation, the message "Installation is completed, you can continue to login" appears and the Go to Login button becomes active.
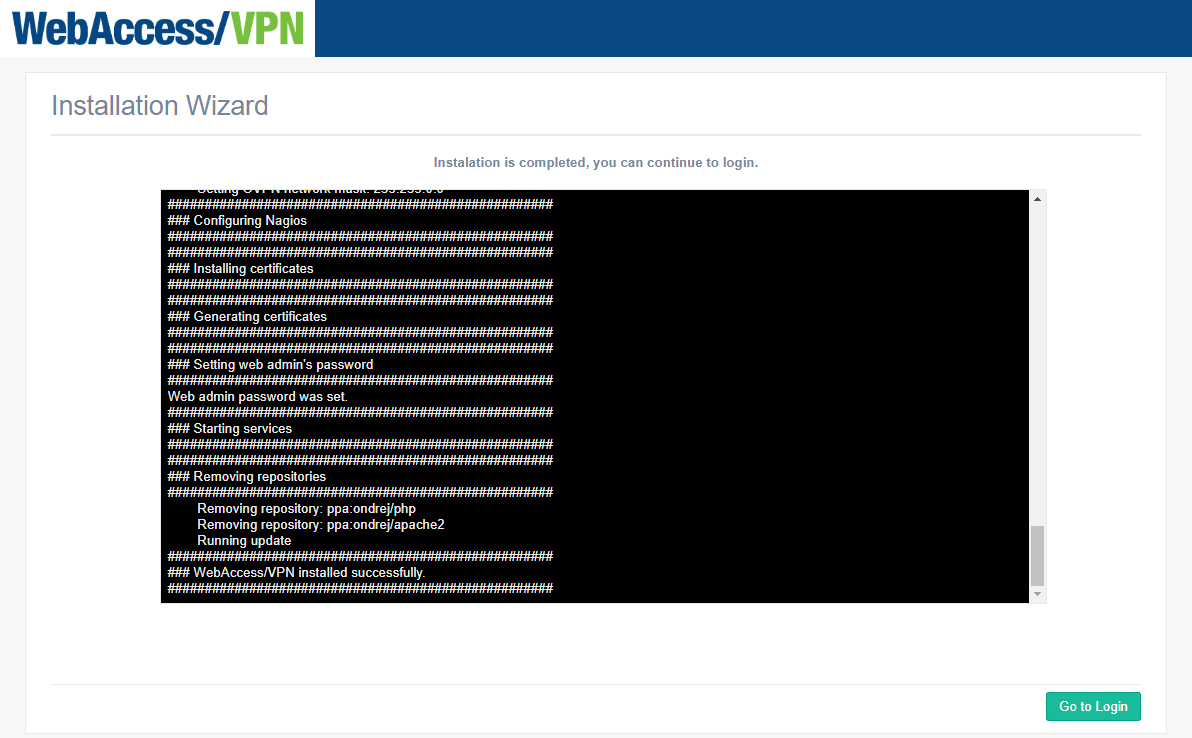
Wizard Step 7 — Installation Progress Click Go to Login, or navigate to
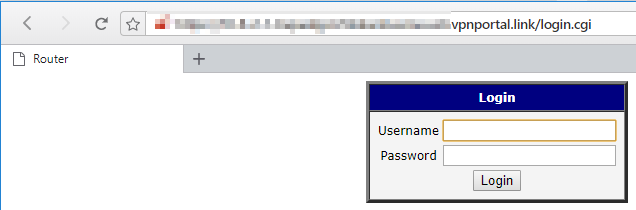
https://IP-OR-DOMAIN-OF-INSTANCE-OR-APPLIANCEand log in with usernameadminand the password you set in the wizard. The installation wizard is now deactivated.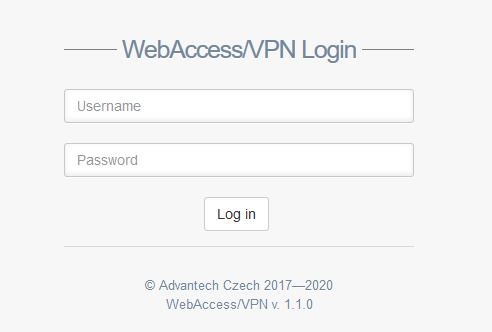
WebAccess/VPN Login
The default license is active after installation. You can download router apps for the next step from WebAccess/VPN — see the Application section under Administration.
Performance Scaling Recommendations
Amazon Instance Type
For production use, choose an instance with at least 2 CPUs and 4 GB of RAM. The t2.medium or a higher AWS instance type is recommended.
Standalone Hardware
A standalone hardware test was carried out with the following findings and recommendations:
- The test shows a total throughput cap of approximately 200 Mbps for an Intel Xeon E3-1245 v5 CPU. Since the primary limitation for OpenVPN is CPU performance, a stronger CPU would likely provide a higher cap. The overall number of devices does not significantly affect throughput — overall traffic volume is what matters (for example, 1000 devices each with 20 kbps traffic produces 20 Mbps total).
- OpenVPN is currently not capable of using more than one CPU core for traffic, so additional cores do not help. Two CPU cores are sufficient for most applications (one for OpenVPN, one for the rest).
Security Update Patch for Frontend
Tips
This security patch applies to 1.1.x versions of WebAccess/VPN installations only.
This update patches all known security vulnerabilities in the Frontend component of WebAccess/VPN. To apply it, log in to the WebAccess/VPN system (Ubuntu on a standalone VirtualBox / AWS / UNO PC installation, optionally via SSH) and run the following commands in a terminal:
# Download the patch
curl https://icr.advantech.com/support/router-models/download/1036/patch-wavpn.tar.gz --output patch-wavpn.tar.gz

# Extract the patch
tar -xzvf patch-wavpn.tar.gz

# Go to the extracted directory
cd patch-wavpn

# Run the patch script
sudo ./patch-wavpn.sh
Provide your password when prompted. The script reports progress in the console.
The script patches the following CVEs:
- CVE-2019-10910: https://symfony.com/blog/cve-2019-10910
- CVE-2019-10911: https://symfony.com/blog/cve-2019-10911
- CVE-2019-10912: https://symfony.com/blog/cve-2019-10912
- CVE-2019-10913: https://symfony.com/blog/cve-2019-10913
- CVE-2019-18887: https://symfony.com/blog/cve-2019-18887
- CVE-2019-18888: https://symfony.com/blog/cve-2019-18888
- CVE-2019-18889: https://symfony.com/blog/cve-2019-18889
Router Configuration
Caution
Firmware version 6.2.1 or higher is required in the router for WebAccess/VPN to work properly.
Upload Router App VPN Portal
Upload the VPN Portal Router App to the router to connect it to WebAccess/VPN. This can be done on the Router Apps page in the router's web interface.
Tips
The VPN Portal Router App is not installed on Advantech routers by default. It can be downloaded from within WebAccess/VPN (see the Application section under Administration). See the manual of your router, section Customization Pages → Router Apps, for instructions on how to upload a Router App. The Router App is compatible with both v2 and v3 routers.

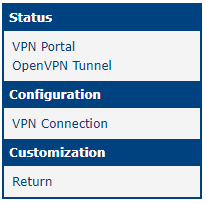
The Router App web interface is accessible by clicking the Router App's name. The left menu contains sections for Status (including the VPN Portal Status landing page and the OpenVPN Tunnel page) and Configuration (with the VPN Connection page). The Return button in Customization takes you back to the router's main web interface.
Connect the Router to WebAccess/VPN
Ensure that WAN is configured in the router so that the Dispatch Server (Internet) is reachable through the WAN interface. Set the IP address or URL of the Dispatch Server on the VPN Connection configuration page. Verify that the Enable checkbox is checked, then click Apply.
Caution
In most cases, the DS is installed on the same server as the CS (for example, in customer-managed cloud installations). Enter your WebAccess/VPN IP address or domain name in the Primary Local DS field. The Secondary and Tertiary DS fields are optional.
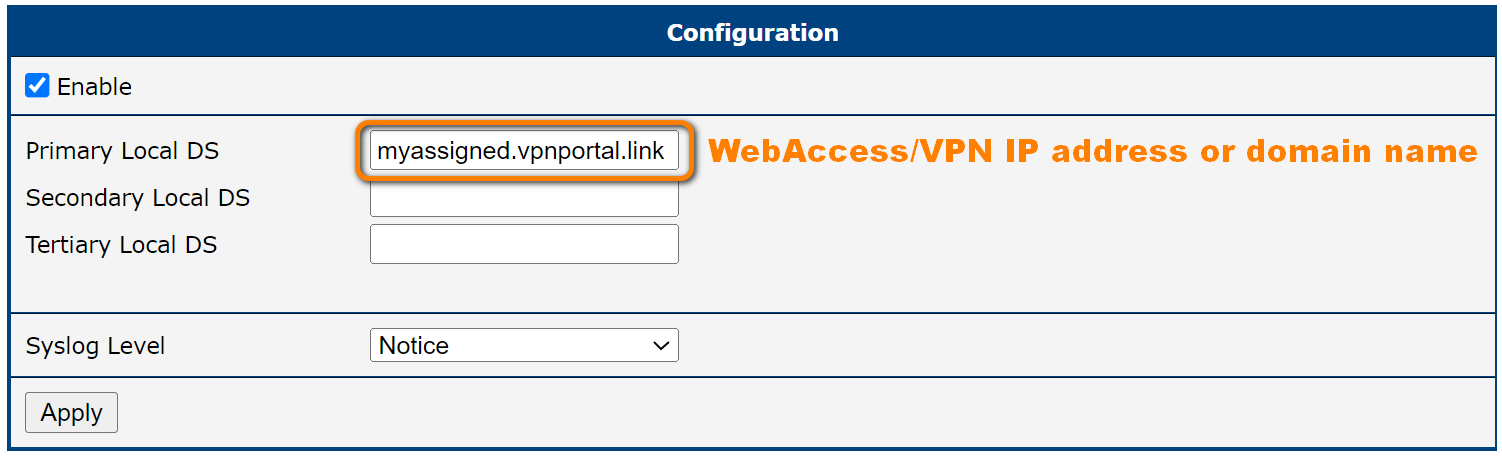
Three Dispatch Servers can be configured: Primary, Secondary, and Tertiary Local DS. The router tries to connect to the Primary first; if unsuccessful, it tries the Secondary, then the Tertiary. This allows a backup Dispatch Server to be configured for maintenance scenarios. Both URLs and IP addresses can be used in the DS configuration fields.
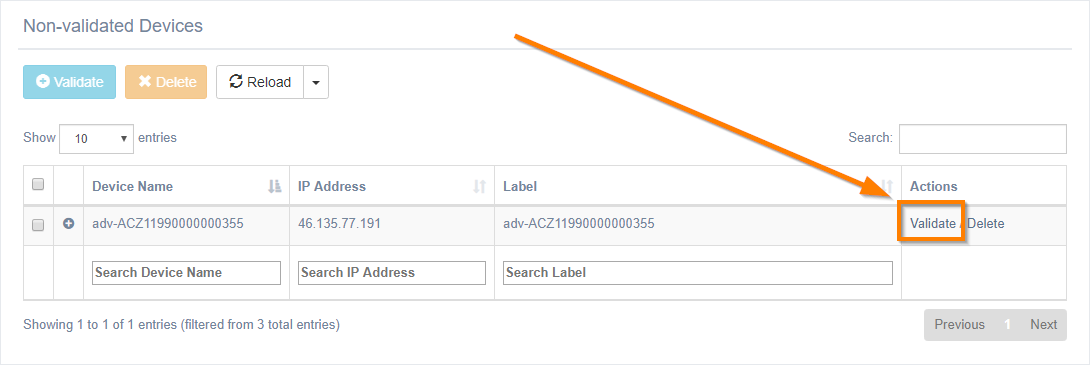
Validate the Router on WebAccess/VPN
Log in to the WebAccess/VPN web UI and validate the router as shown in the figure below.
Set the Router Access Policy
Caution
Validating a router in WebAccess/VPN does not automatically make it visible to other routers. Routers must be added to a Network to communicate with each other through the VPN tunnel.
Devices connected to the router can access the VPN tunnel only after the router's LAN interface is set to one of the VPN modes — go to Router, Edit, LANs. For more details, see the Routers: Edit section.
Router App Status and Log Messages
After the router is validated in WebAccess/VPN, the Ready for incoming messages notice appears on the VPN Portal status page in the router.

On the OpenVPN Tunnel page, Initialization Sequence Completed appears if the tunnel was established successfully.

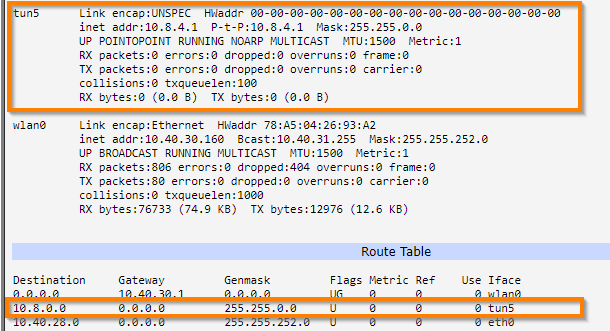
In the router's main web interface, a new tunnel network interface is created and the Route Table is updated accordingly.
You can now use the WebAccess/VPN web UI to create networks, configure router LANs, and add them to networks so they can see each other.
Router App Log Messages
The Router App starts automatically when the router boots (if enabled). The router attempts to obtain the Customer Server's IP address from the Dispatch Server. There are two possible outcomes:
"Failed to connect to the Dispatch Server."— The Dispatch Server is unreachable or stopped."CS's IP was successfully obtained."— The Router App received the necessary address and proceeds to the next phase.
If the router obtains the Customer Server's (CS) IP address, it contacts the CS to request access to the WebAccess/VPN network. There are three possible outcomes:
"Failed to connect to the Customer Server."— The Customer Server is unreachable or stopped."Negative response to a request for OVPN certificates."— The router has not yet been validated on the Customer Server."Ready for incoming messages"— A tunnel between the router and the Customer Server has been established. A ping to the CS's virtual IP address (10.8.0.1) should now be possible.
WebAccess/VPN User Interface
Login to WebAccess/VPN
After installation, navigate your browser to the server URL and log in.
Dashboard
After login, the Dashboard is the landing page.
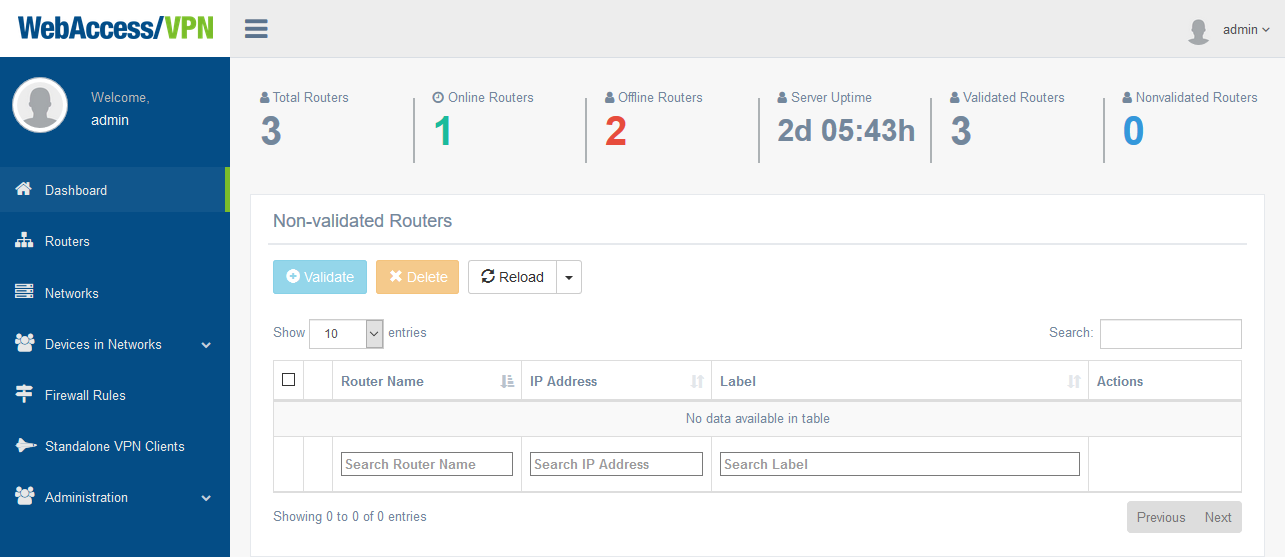
The top of the Dashboard shows an overview and basic statistics: total Total Routers, Online Routers, Offline Routers, Server Uptime, Validated Routers, and Non-validated Routers.
Below the overview is the list of non-validated routers. You can validate or delete individual routers, or perform bulk actions using the checkboxes and buttons at the top of the list. The Dashboard is the only place to manually validate routers in WebAccess/VPN. An automatic option — pre-validation — is also available; see the Pre-validation section.
Caution
Validating routers in WebAccess/VPN does not automatically make them visible to each other. Routers must be added to a network, and each router's LAN interface (accessible via Routers → Edit) must be set to one of the VPN modes.
The WebAccess/VPN main menu is on the left. All menu items are described in the following sections.
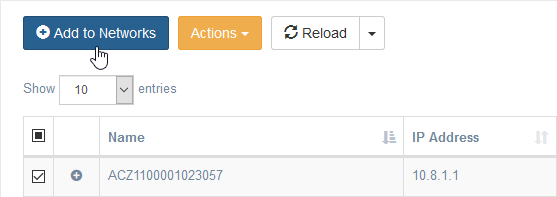
Routers
The Routers section shows a table of all validated routers. Buttons at the top allow bulk operations: add to networks (Add to Networks), enable/disable VPN access, and delete routers (via the Actions dropdown). You can reload the page or enable auto-refresh (every 5, 10, or 30 seconds) using the Reload dropdown. Router properties are explained in the table below.
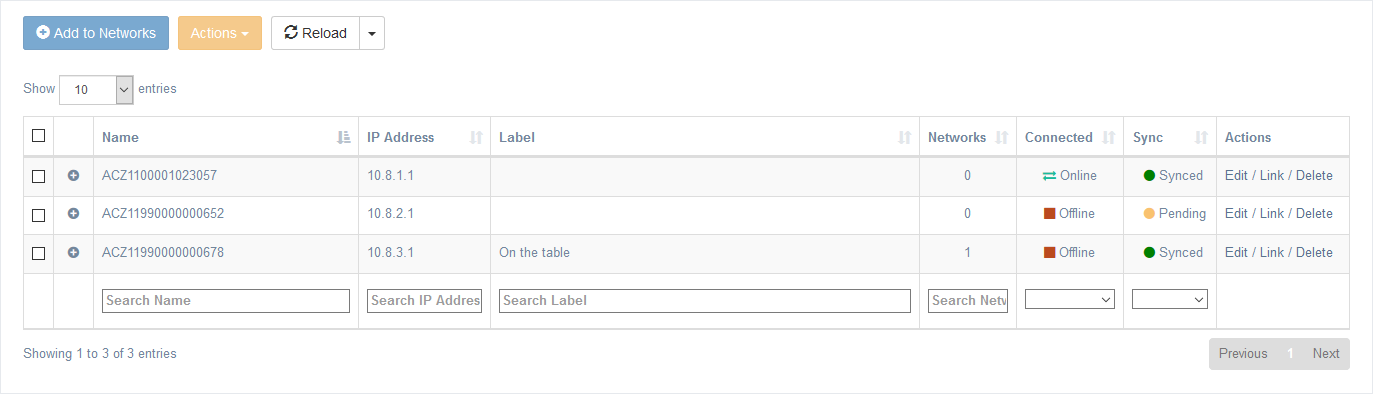
| Router Property | Description |
|---|---|
| Name | Automatically obtained name of the router. Based on Serial Number in most cases (if SN is unavailable, based on MAC address or a random number). Can be changed on the General tab via Edit. |
| IP Address | The IP address of the router's end of the OpenVPN tunnel. |
| Label | An editable label for the device. Can be changed on the General tab via Edit. |
| Networks | The number of networks the device belongs to. |
| Connected | Online (green arrows) — connected to WebAccess/VPN. Offline (red square) — not connected to WebAccess/VPN. Disabled (grey square) — not allowed to connect to WebAccess/VPN. Editable via the Actions dropdown or on the General tab in Router Edit. |
| Sync | Synced (green) — all requested settings have been applied; no pending operations. Pending (yellow) — some changes have not yet been propagated to the router. Failed (red) — some settings caused an error on the router. Check the Router App log for details. |
| Actions | Edit — Access the router's main page with more information and available actions. Link — Redirect to the router's login page (via WebAccess/VPN proxy). Delete — Permanently remove the router. |
Routers properties
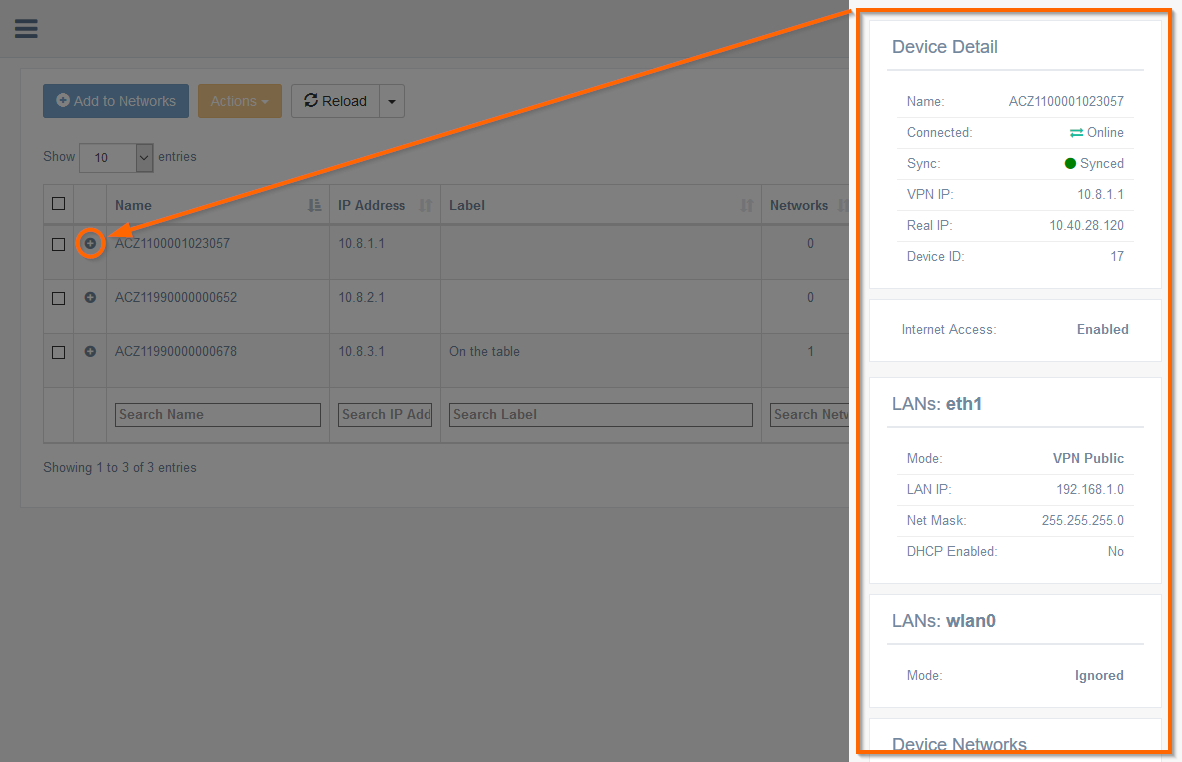
A quick overview of a router's details can be accessed by clicking the plus icon next to the Name. The overview appears as a panel on the right, showing Device Detail, LANs details, Device Networks, and Device Statistics. This is a read-only shortcut to the same information available via the Edit link.
Routers: Edit
The Edit page provides controls for a router's general settings, LANs, network membership, proxy settings, and firewall rules, as well as views for actual settings and connection log.
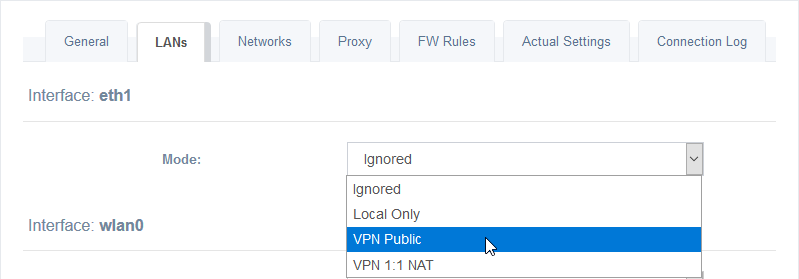
LANs Tab
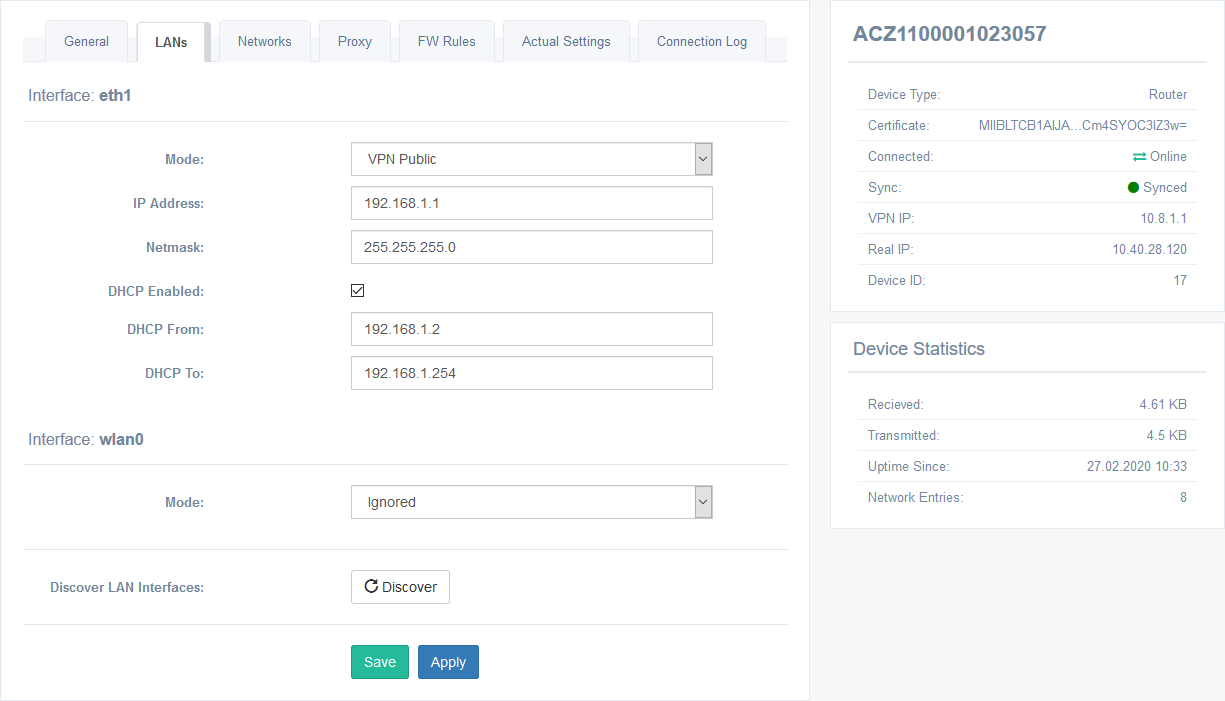
| Interface Mode | Description |
|---|---|
| Ignored | The Customer Server does not manage the router's LAN. |
| Local Only | The administrator can configure the LAN, but it is invisible to all other devices in WebAccess/VPN. IP address, netmask, and DHCP can be configured. |
| VPN Public | The administrator can configure the LAN, which is visible to all routers (and devices behind them) that share at least one network with this router. IP address, netmask, and DHCP can be configured. |
| VPN 1:1 NAT | LAN addresses are translated to the virtual address space. Devices within the LAN are accessible via virtual addresses to all devices that share at least one network with this router. |
Devices — LANs Interface Modes
Interfaces: Each LAN interface can be configured, including wlan0 and eth2 if present. Both Save and Apply propagate changes to the router; Save also returns you to the device table.
Discover: Rescans the router's interfaces — useful after an interface change on the router (for example, when Backup Routes configuration has changed) without needing to delete and re-validate the router. Discover can only be requested when the router is online.
Caution
The Discover button will reset the LAN modes assigned to interfaces back to the default (Ignored). Values are maintained, but modes are reset.
General Tab
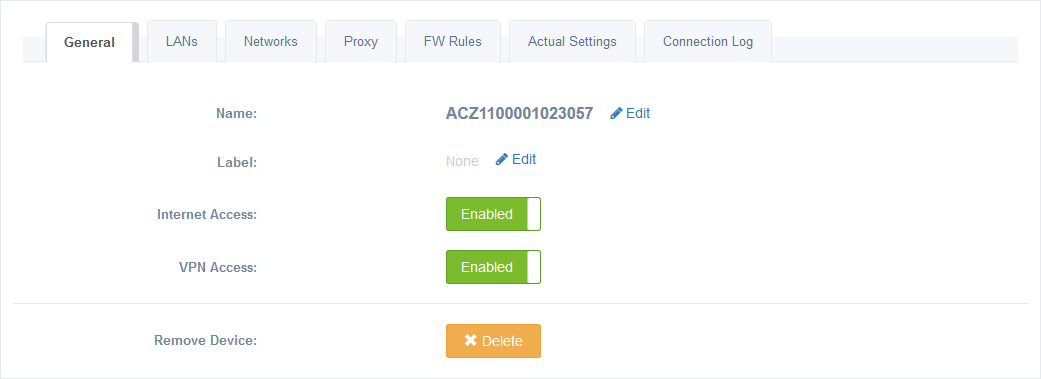
Name, Label: Rename the router or change the label using the Edit link (pencil icon).
Internet Access: Use the toggle switch to disable or re-enable internet access for the router. This request is propagated to the router; the router may enter a Pending state if it is offline or disabled. The actual propagated state is shown on the Actual Settings tab.
VPN Access: Disable or re-enable VPN access for the router. This disconnects the router from the VPN tunnel immediately and changes its Connected status to Disabled. Useful as a temporary ban or for physical administration changes.
Remove Device: Removes the device from WebAccess/VPN (after a confirmation dialogue). The validation process must be repeated to re-add the device in the future.
Networks Tab
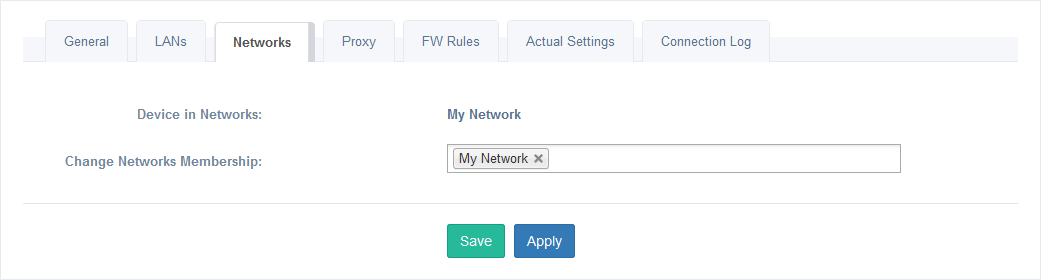
Add the router to one or more Networks on this tab. Both Save and Apply save the new membership; Save also returns you to the device table.
Proxy Tab
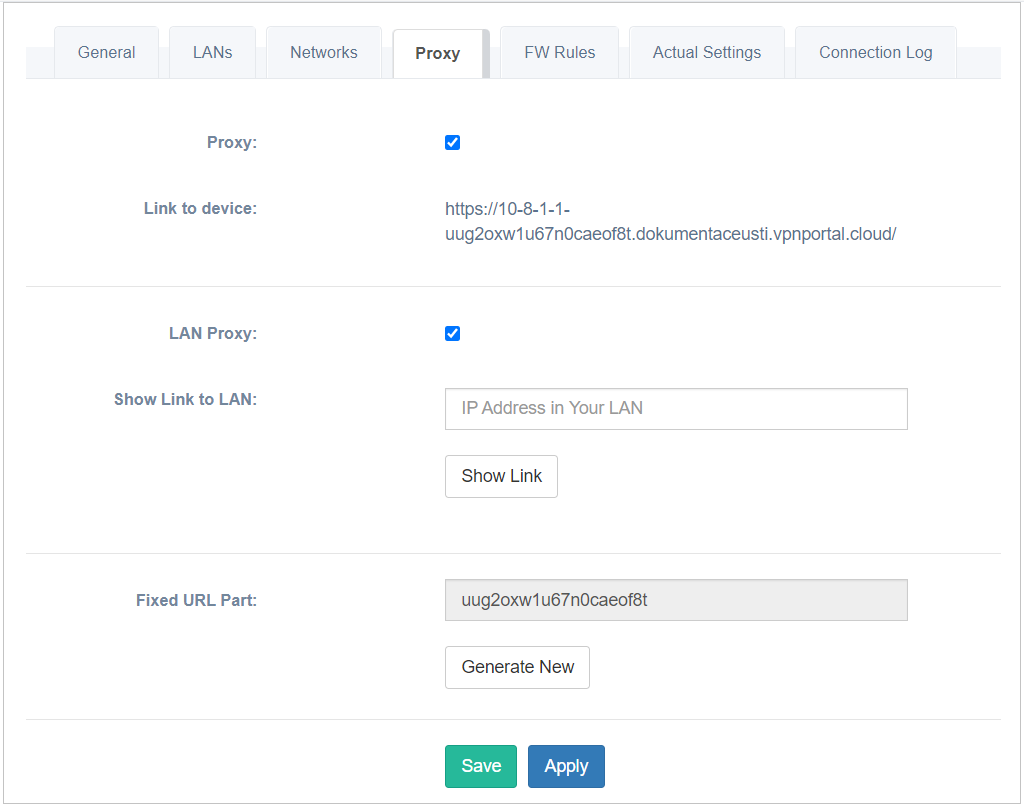
Proxy: Enable or disable the proxy Link to the router (access via VPN tunnel). If enabled, the link is shown below the checkbox. The default state is determined by Proxy settings in Administration → Settings.
LAN Proxy: Enable or disable proxy access for devices in LANs behind the router (access via VPN tunnel). If enabled, an address creator appears — fill in the device's local IP address and click Show Link to generate a link. LAN Proxy works with both HTTP and HTTPS URLs.

The default state is determined by Proxy settings in Administration → Settings.
Fixed URL Part: Visible only when at least one proxy is enabled. Click Generate New to regenerate all proxy links for the router. This can serve as a security reset — existing shared links stop working after regeneration.
FW Rules Tab
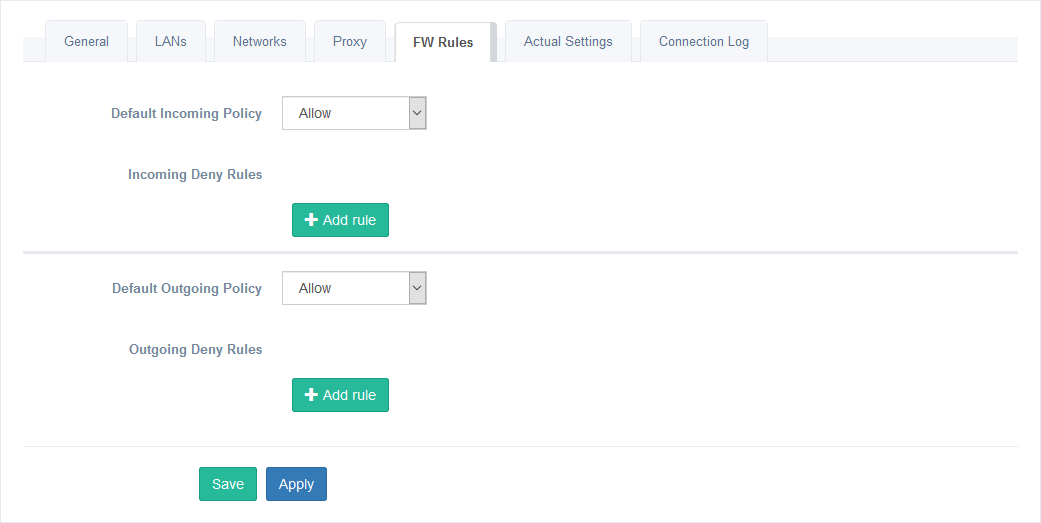
Custom filtering rules can be created on the FW Rules tab. Use the green Add rule button to create a rule. For details on rule options and syntax, see the Firewall Rules for Router section below.
Actual Settings Tab
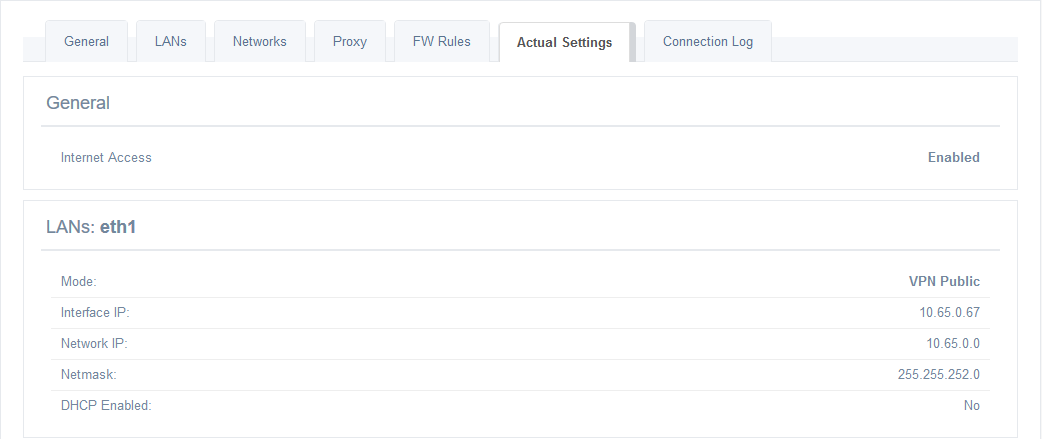
Tips
Displays settings that are currently applied on the router. This information may be inaccurate for LANs in Ignored mode, since they may have been changed manually on the router.
Connection Log Tab
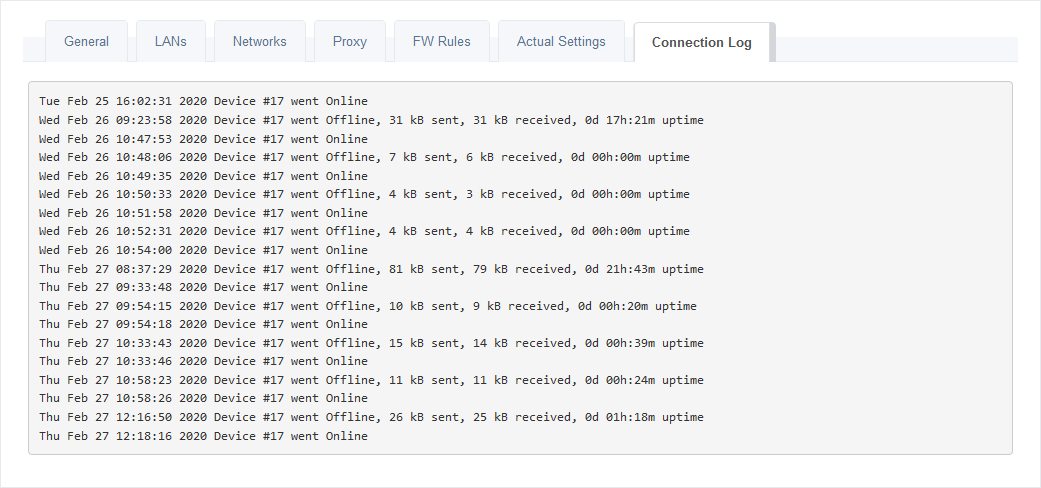
Displays connection logs for this router. This is a filtered view of the overall Connection Log accessible in Administration → Logs.
1:1 NAT
WebAccess/VPN supports 1:1 NAT. Devices in the router's LAN become visible in WebAccess/VPN under assigned virtual IP addresses. To configure 1:1 NAT on an interface, select the VPN 1:1 NAT interface mode and configure:
- Local Network — the address pool under which the device is known locally (IP address, netmask).
- Virtual Network — the address pool under which the device will be known (accessible) in WebAccess/VPN (Virtual IP, Virtual Netmask).
In VPN 1:1 NAT mode, the Customer Server reserves a pool of 254 virtual IP addresses per router. This amount cannot be changed in the current version.
For example, if two routers are connected:
- Virtual IP of the first router is
10.8.1.1; the virtual IP pool for its LAN devices is10.8.1.2–10.8.1.254. - Virtual IP of the second router is
10.8.2.1; the virtual IP pool for its LAN devices is10.8.2.2–10.8.2.254.
1:1 NAT Example 1
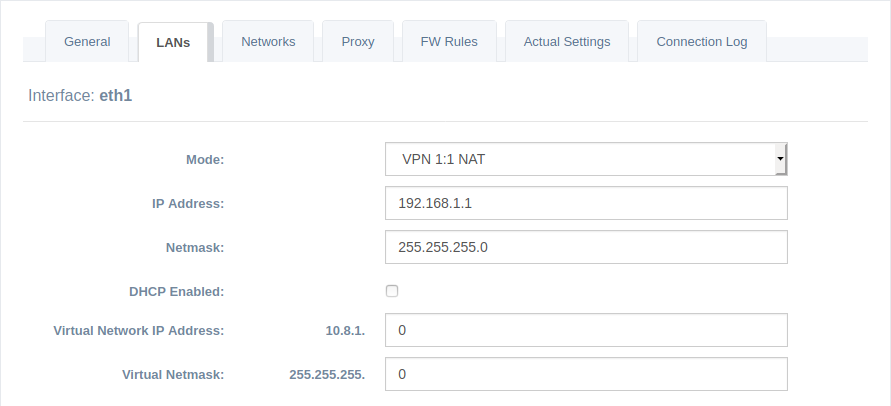
- Router has LAN
192.168.15.0/24oneth0. - Virtual IP of the router is
10.8.2.1. - 1:1 NAT configuration on
eth0:- (Local) IP Address:
192.168.15.1 - (Local) Netmask:
255.255.255.0 - Virtual Network IP Address:
10.8.2.0 - Virtual Netmask:
255.255.255.0
- (Local) IP Address:
The router translates the local network to the virtual network: a device with local IP 192.168.15.10 is visible under virtual IP 10.8.2.10.

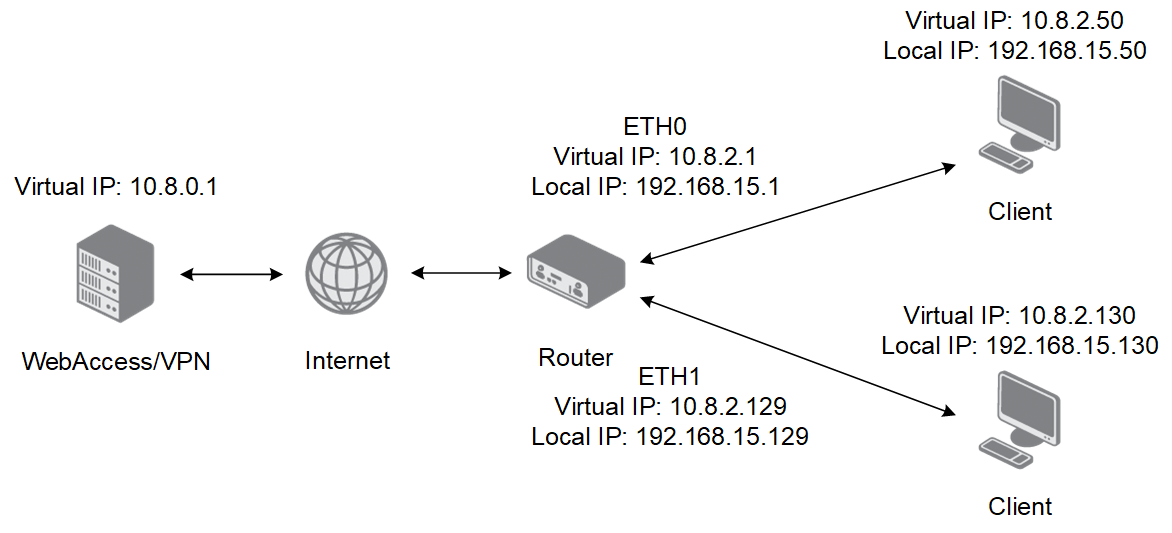
1:1 NAT Example 2
More than one 1:1 NAT can be configured for one device. All such LANs must be subnetted to fit within the virtual address range reserved for the router.
- Router has LAN
192.168.15.0/25oneth0and192.168.15.128/25oneth1. - Virtual IP of the router is
10.8.2.1. - 1:1 NAT on
eth0: Local192.168.15.1/255.255.255.128, Virtual10.8.2.0/255.255.255.128. - 1:1 NAT on
eth1: Local192.168.15.129/255.255.255.128, Virtual10.8.2.128/255.255.255.128.
A ping to 10.8.2.50 reaches device 192.168.15.50 (behind eth0). A ping to 10.8.2.130 reaches device 192.168.15.130 (behind eth1).
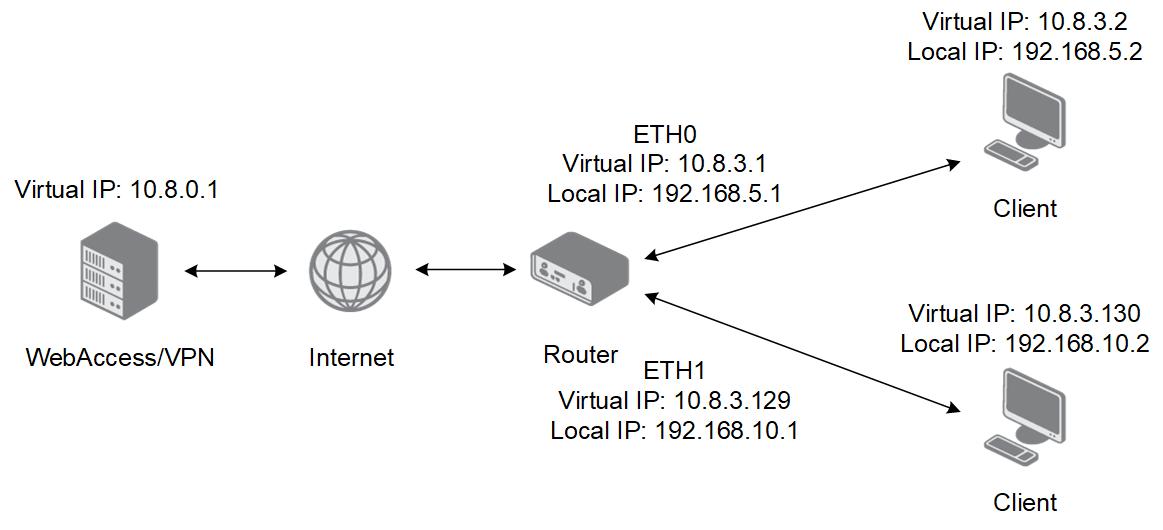
1:1 NAT Example 3
Networks can also be divided so that local networks differ per physical interface while the virtual network spans the same address range.
- Router has LAN
192.168.5.0/24oneth0and192.168.10.0/24oneth1. - 1:1 NAT on
eth0: Local192.168.5.1/255.255.255.0, Virtual10.8.3.0/255.255.255.128. - 1:1 NAT on
eth1: Local192.168.10.1/255.255.255.0, Virtual10.8.3.128/255.255.255.128.
Translations: 10.8.3.2 → 192.168.5.2, 10.8.3.3 → 192.168.5.3, 10.8.3.129 → 192.168.10.1, 10.8.3.130 → 192.168.10.2, etc.
Firewall Rules for Router
Caution
The Router/Standalone VPN Client firewall is part of WebAccess/VPN. These rules are not propagated to the routers themselves and apply only to traffic through WebAccess/VPN.
- Firewall rules are divided by traffic direction:
- Incoming — applied to packets destined for the router or one of its LANs.
- Outgoing — applied to packets originating from the router or one of its LANs.
- Each direction has its own default policy: Allow or Deny.
- When the default policy changes, rules associated with the old policy are deactivated and rules for the new policy are activated.
- Filters are not applied to already established connections. For example, adding a rule denying ICMP while a ping is running does not stop the running ping — only new connections are affected.
Tips
Example: Default Incoming policy is Allow. Deny incoming traffic from IPs 10.40.20.1, 10.40.20.2, 10.40.20.3 to destination network 192.168.1.0/24 on TCP ports 50000–60000:
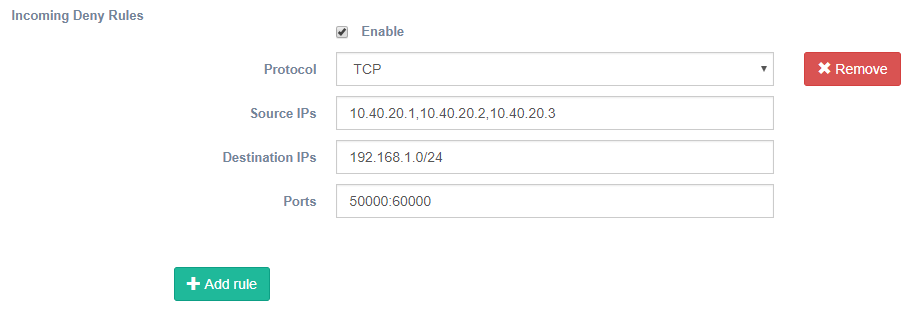
| Field | Options and Syntax |
|---|---|
| Protocol | TCP, UDP, or ICMP. |
| Source IPs, Destination IPs | A standalone IP address, a comma-separated list of IPs, CIDR notation (e.g., 192.168.1.0/24), or a range (e.g., 192.168.1.1-192.168.1.50). |
| Ports | A standalone port, a comma-separated list of ports, or a range using a colon (e.g., 120:130). |
Device Firewall rule — options and syntax
Routers: Link
Clicking Link in the Actions column opens a new browser tab with direct login to the router via HTTPS, using WebAccess/VPN as a proxy.
Tips
The following preconditions must be met for the Link to work correctly:
- DNS records for the WebAccess/VPN domain name must be configured.
- The HTTPS service must be enabled in the router (Configuration → Services → HTTP).
- Proxy must be enabled for the router (Router Edit → Proxy tab).
Routers: Delete
Clicking Delete in the Routers table removes the router from WebAccess/VPN after a confirmation dialogue. The router loses access to the WebAccess/VPN network. The validation process must be repeated to re-add the device.
Networks
Tips
Routers and Standalone VPN Clients added to WebAccess/VPN can see each other only after they are added to the same Network. Networks can be created or deleted on the Networks page.
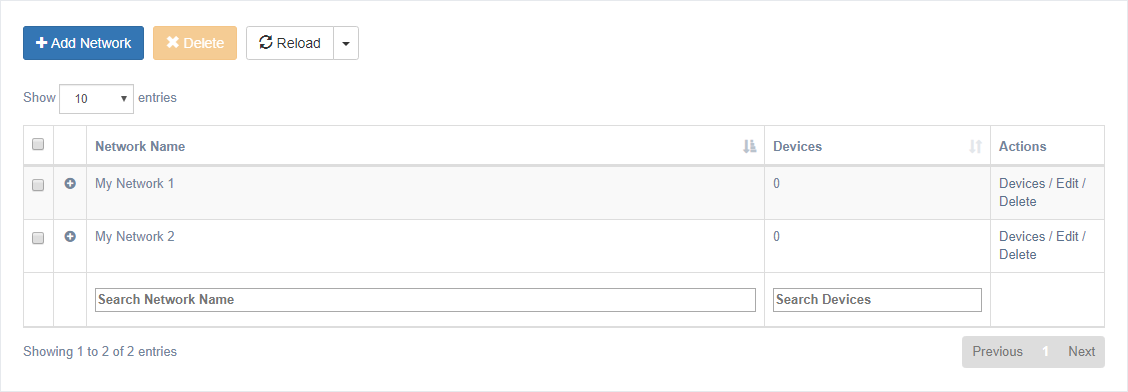
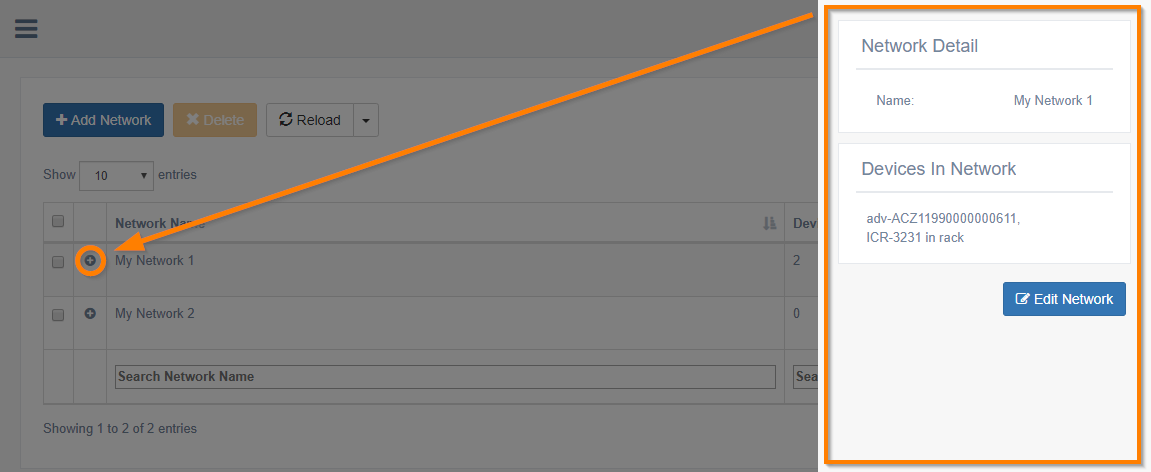
Use the blue Add Network button to create a new network. After creation, firewall rules can be added via Edit. The Delete button enables bulk deletion. The Reload button works the same way as on the Routers page. Click the plus icon next to a network name to see an overview.
The Devices column shows the number of devices in the network. The following Actions are available:
- Detail — shows the network's main page, where you can add or remove devices. This is the same page as Devices in Networks for the selected network.
- Edit — displays a page for setting up firewall rules or changing the network name.
- Delete — removes the network after a confirmation dialogue.
Edit — Firewall Rules for Network
Custom firewall rules for the network can be created via the Edit action. Use the green Add rule button to create a filtering rule.
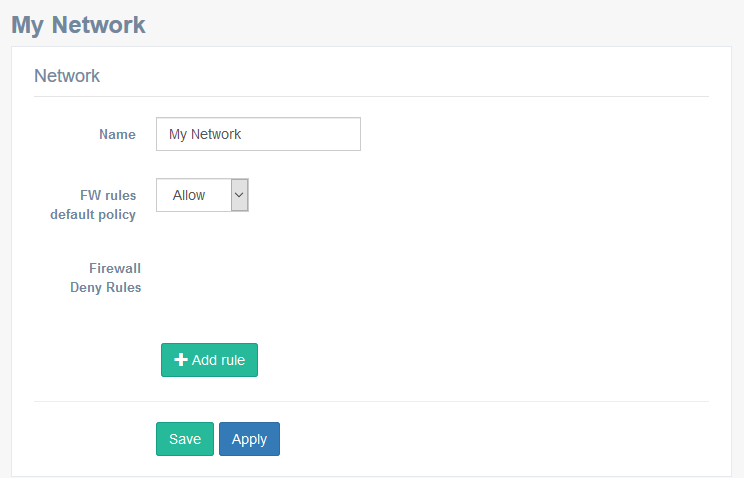
- Network firewall rules apply only to traffic where both the source and destination IP addresses belong to the same network.
- Each network has its own default policy and firewall rules.
- The default policy defines the action when no rule matches: Allow or Deny.
- There are always two sets of rules for each network: the Deny set is active when the default policy is Allow; the Allow set is active when the default policy is Deny. Both sets cannot be active simultaneously.
Tips
Example of a Network Firewall rule: Default policy is Allow. This rule denies all UDP traffic in the network (ports 1–65535).
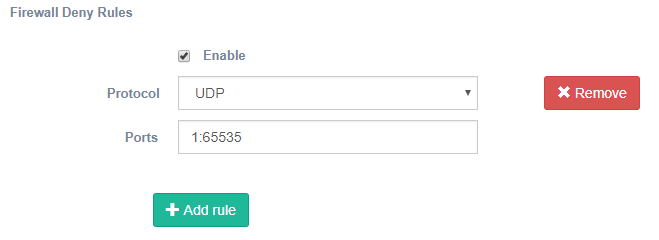
| Field | Options and Syntax |
|---|---|
| Protocol | TCP, UDP, or ICMP. |
| Ports | A standalone port, a comma-separated list of ports, or a range using a colon (e.g., 120:130). |
Network firewall rule — options and syntax
Devices in Networks
Add or remove Routers and Standalone VPN Clients from Networks on the Devices in Networks page. Select the network to edit from the dropdown menu on the left.
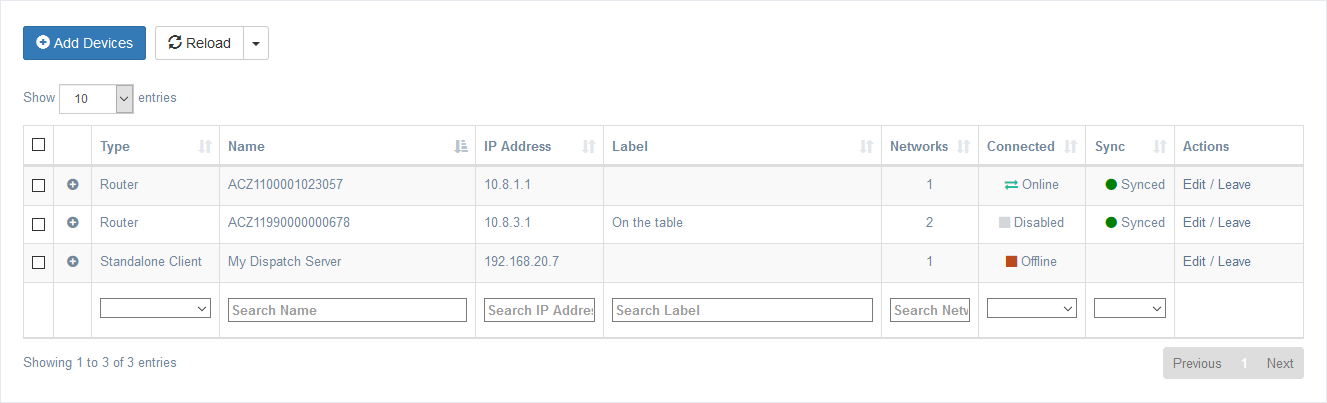
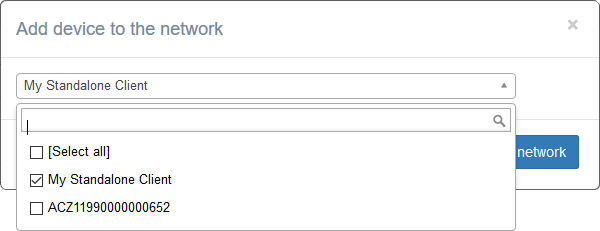
To add a device to a network, click the blue Add Devices button. A pop-up appears where you can select devices (from both Standalone VPN Clients and Routers) and confirm by clicking Add to network.
The columns in the list are nearly identical to the Routers page (with an additional Type column; the Sync column is empty for Standalone VPN Clients). Click the plus icon next to a Device Name to view device details. The Edit link in Actions opens the device edit page. Use the Leave link to remove a device from the network (a confirmation dialogue appears).
Firewall Rules
The Firewall Rules page provides an overview of all firewall rules created for devices (both Routers and Standalone VPN Clients) and networks, including their enabled/disabled status. There are two separate types: Device Firewall and Network Firewall.
Tips
Device Firewall and Network Firewall rules may both be applied to the same packet. When two devices share more than one network and communicate, firewall rules from multiple networks may apply.
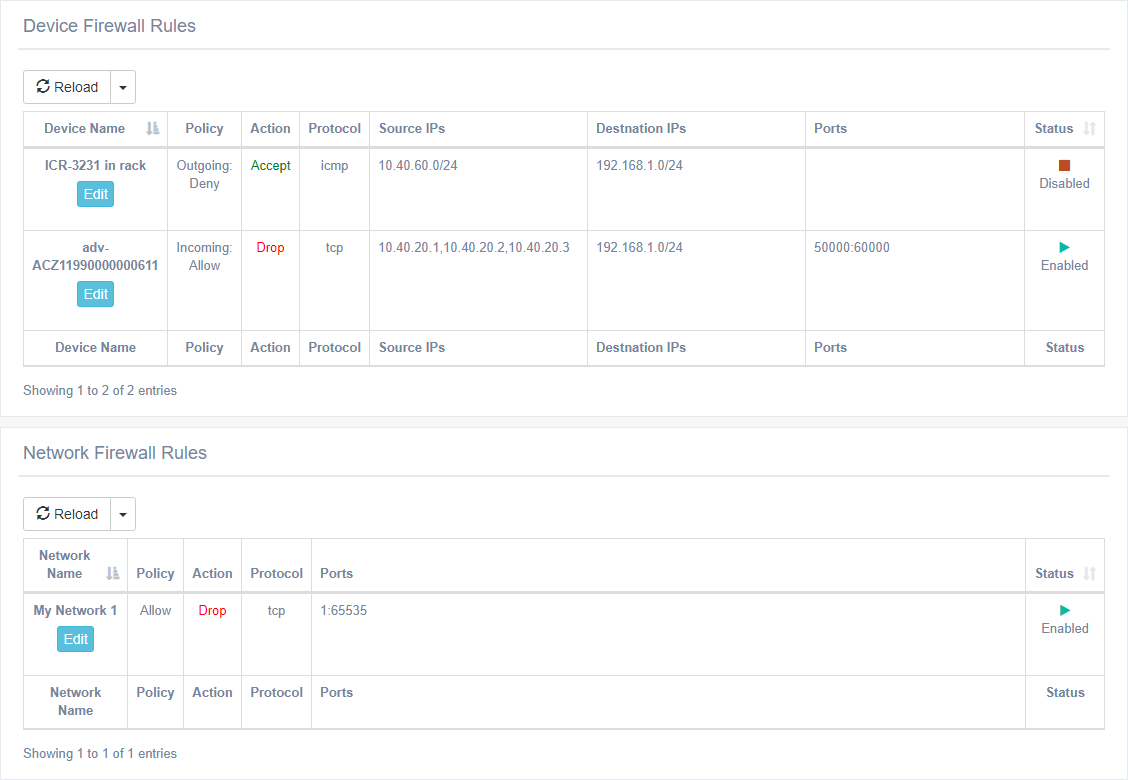
All rule details are visible in the table columns. Use the blue Edit button to navigate directly to the Device/Network Edit page where a rule can be modified.
Caution
If a created rule does not appear in the overview, check whether the default policy conflicts with the rule. Rules that cannot be activated due to the current policy are not shown on this page.
Standalone VPN Clients
The Standalone VPN Clients service is based on OpenVPN. Clients connected as Standalone VPN Clients can be added to Networks in the same way as Routers.
Caution
A newly added Standalone VPN Client does not automatically see any other routers or Standalone VPN Clients. It must be added to a Network to communicate with other devices in that Network (with network firewall rules applied). Firewall rules can be set for Standalone VPN Clients in the same way as for Routers.
Prerequisites for using a Standalone VPN Client:
- The VPN Client Service on the Customer Server must be running (Online) — see the Application section.
- A new Standalone VPN Client must be created via the WebAccess/VPN web UI.
- The OpenVPN configuration file for this client can be downloaded via a link in the web UI and then used to initiate an OpenVPN connection.

Select Standalone VPN Clients in the menu to manage clients. Expired clients are shown with a red-colored date. You can add new clients, delete them, edit properties, or download the OpenVPN configuration file.
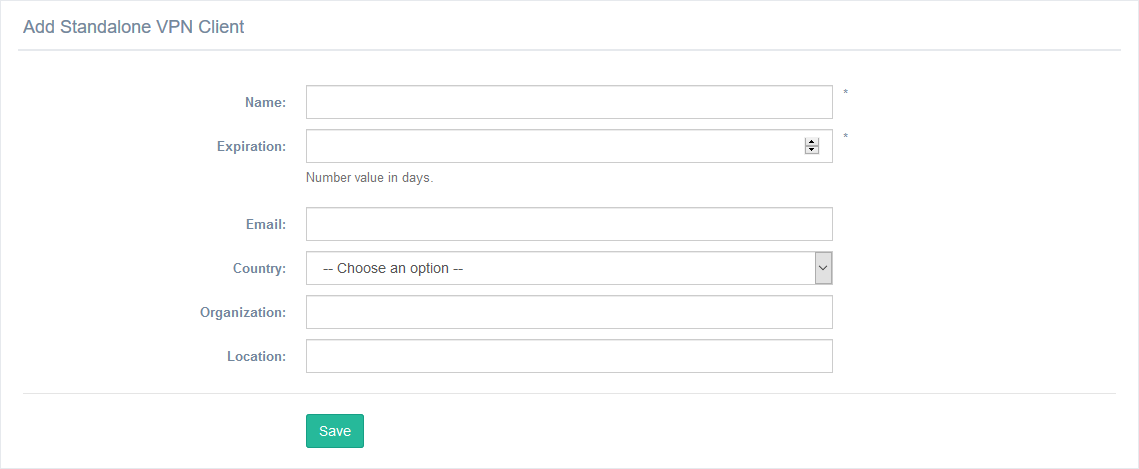
To create a Standalone VPN Client: Click the blue Add Standalone VPN Client button. Fill in the required information and optionally set an expiration period in days. The provided information (except the Name) cannot be changed later — it is used to create the certificate, private key, and configuration file.
To connect as a Standalone VPN Client: Download the client configuration file (a standard .ovpn file containing all keys and certificates) via the Download Config File link in the Actions column.
To delete a Standalone VPN Client: Click Delete in the table or in the client's General tab. Bulk deletion is available via checkboxes and the Actions dropdown. A confirmation dialogue appears. After deletion, the certificate is revoked and the client can no longer connect. To temporarily disable access without deleting, use the VPN Access toggle.
Standalone VPN Clients: Edit
Editing a Standalone VPN Client is similar to editing a Router, except that the expiration date and other non-configurable properties cannot be changed.
General Tab
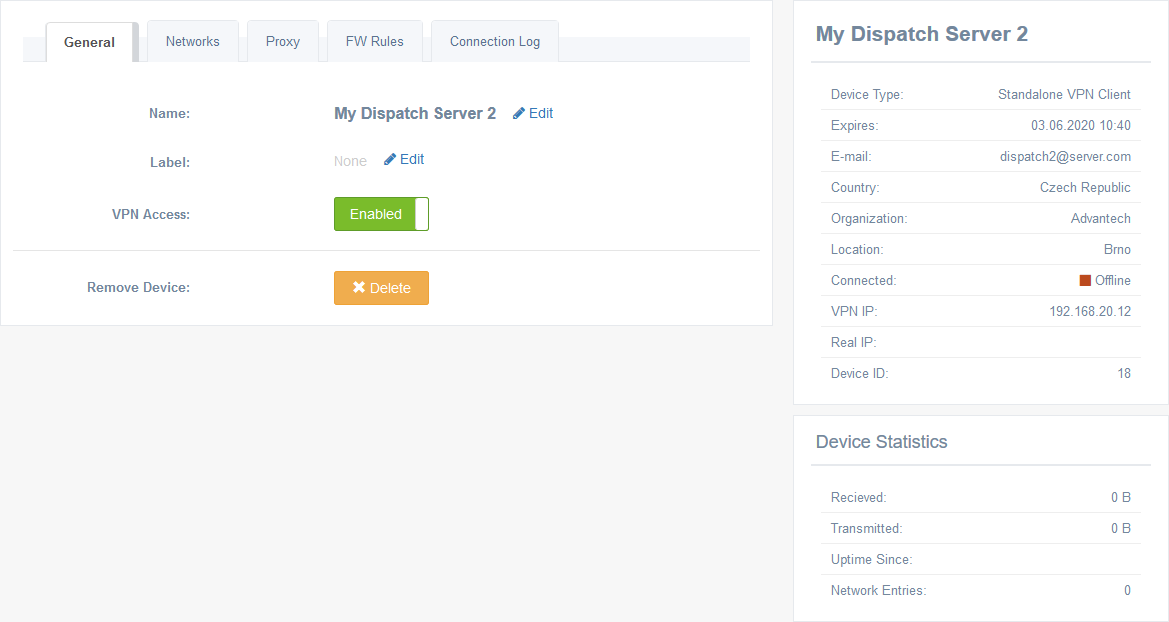
The General tab is the same as for Routers (except for Internet Access enable/disable). The right side reflects the device type and shows the expiration date and other properties.
Networks Tab
Add the Standalone VPN Client to a Network. Works the same way as described for Routers.
Proxy Tab
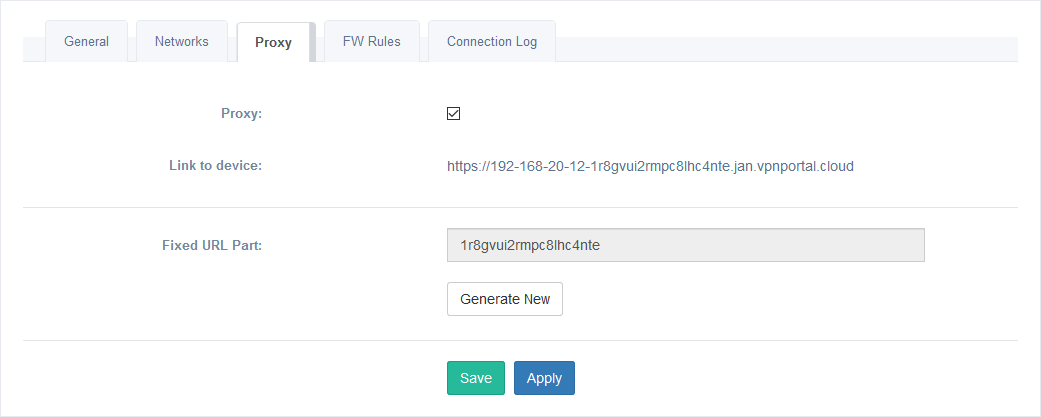
Enable or disable the proxy for the Standalone VPN Client. Works the same way as described for Routers, except that LAN Proxy is not available. Enabling the proxy is useful only if the client has a web interface accessible via the generated Link to device (for example, dispatch servers or intranet servers — less relevant for laptop or smartphone clients). The default state is determined by Proxy settings in Administration → Settings.
FW Rules Tab
Firewall rules for the Standalone VPN Client work the same way as described for Routers. Rules are also visible on the Firewall Rules page.
Connection Log Tab
Connection log for the Standalone VPN Client. Works the same way as described for Routers.
Control Standalone VPN Client Service
Tips
The Standalone VPN Client service is installed and running by default. It is possible to start, stop, or restart the service separately for more control. Go to Administration → Application and manage the service from there.
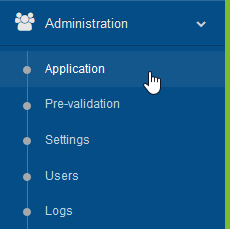
Administration
The Administration section is accessible via the last item in the main menu. Expand the menu item to see the administration pages.
Application
The Administration → Application page shows application information and provides management actions.
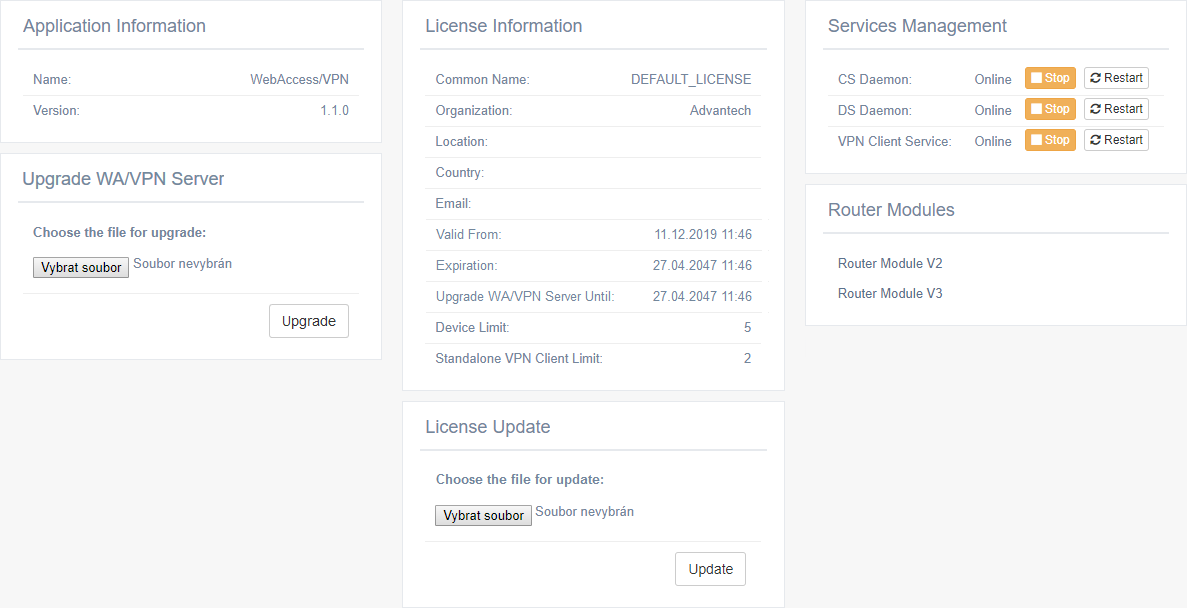
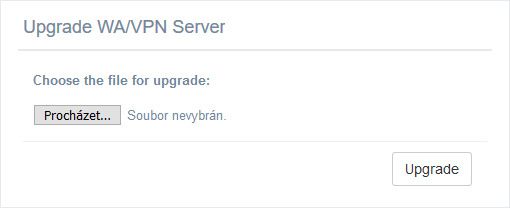
Upgrade WebAccess/VPN Server
Application information, including the version, is shown in the first section. You can upgrade the WebAccess/VPN server by selecting the proper tarball file and clicking Upgrade.
Caution
- Allow WebAccess/VPN a few minutes to complete the upgrade. Do not refresh the browser during the upgrade — there is currently no progress bar showing upgrade state.
- The free demo version from Amazon Marketplace cannot be upgraded or licensed to the production version. Upgrade availability may also be affected by the license (see Upgrade WA/VPN Server Until in the License Information box).
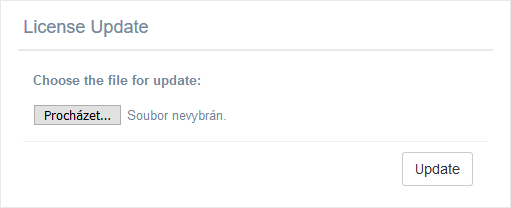
Update License
License information is shown in the middle section, displaying the limits and expiration of the current license. To update, select the .license file and click Update.
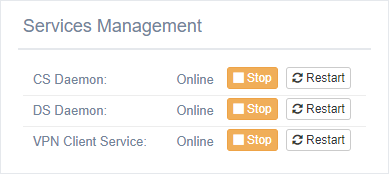
Services Management
The top-right section allows managing the software services (components) of WebAccess/VPN. You can stop, start, or restart individual services:
- CS Daemon — the WebAccess/VPN UI itself.
- DS Daemon — tells routers where to connect, as described in the Introduction.
- VPN Client Service — handles Standalone VPN Clients.
Services management is useful for troubleshooting.
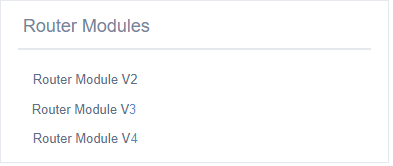
Download Router Apps
Download Router Apps for Advantech routers directly from WebAccess/VPN to add them to your deployment.
Pre-validation
A list of routers can be uploaded on the Administration → Pre-validation page. These routers are validated automatically when they attempt to connect to WebAccess/VPN. Once auto-validated, a router is removed from the pre-validation list and appears on the Routers page. Click Upload New List to upload the list.
Caution
Uploading a new list always overwrites the previous pre-validation list.
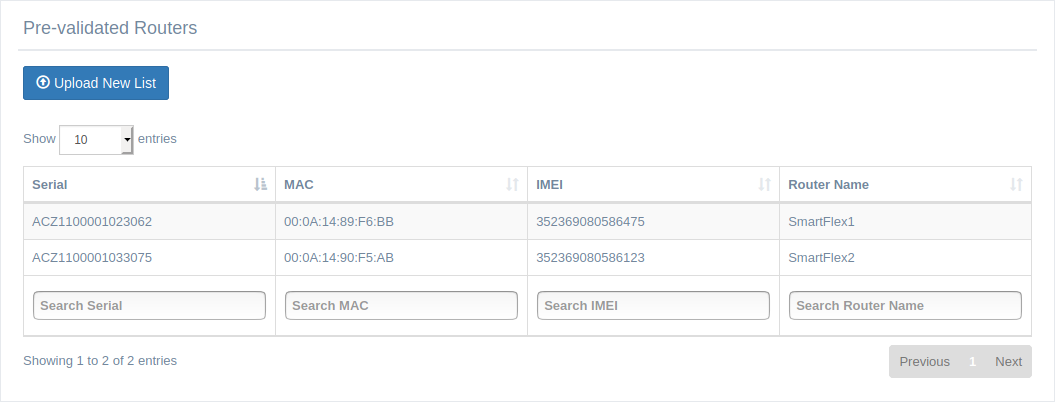
The list file must be a TXT file with the following format. The number of commas on each line must be consistent. A # character can be used for comments.
# SERIAL,                MAC,                 IMEI,         NAME
#############################################################
ACZ1100001023062, 00:0A:14:89:F6:BB, 352369080586475, SmartFlex
ACZ1100001033075, 00:0A:14:90:F5:AB, 352369080586123,
Fields:
- Serial number (mandatory)
- MAC address (mandatory)
- IMEI of the cellular module (mandatory)
- Name (optional)
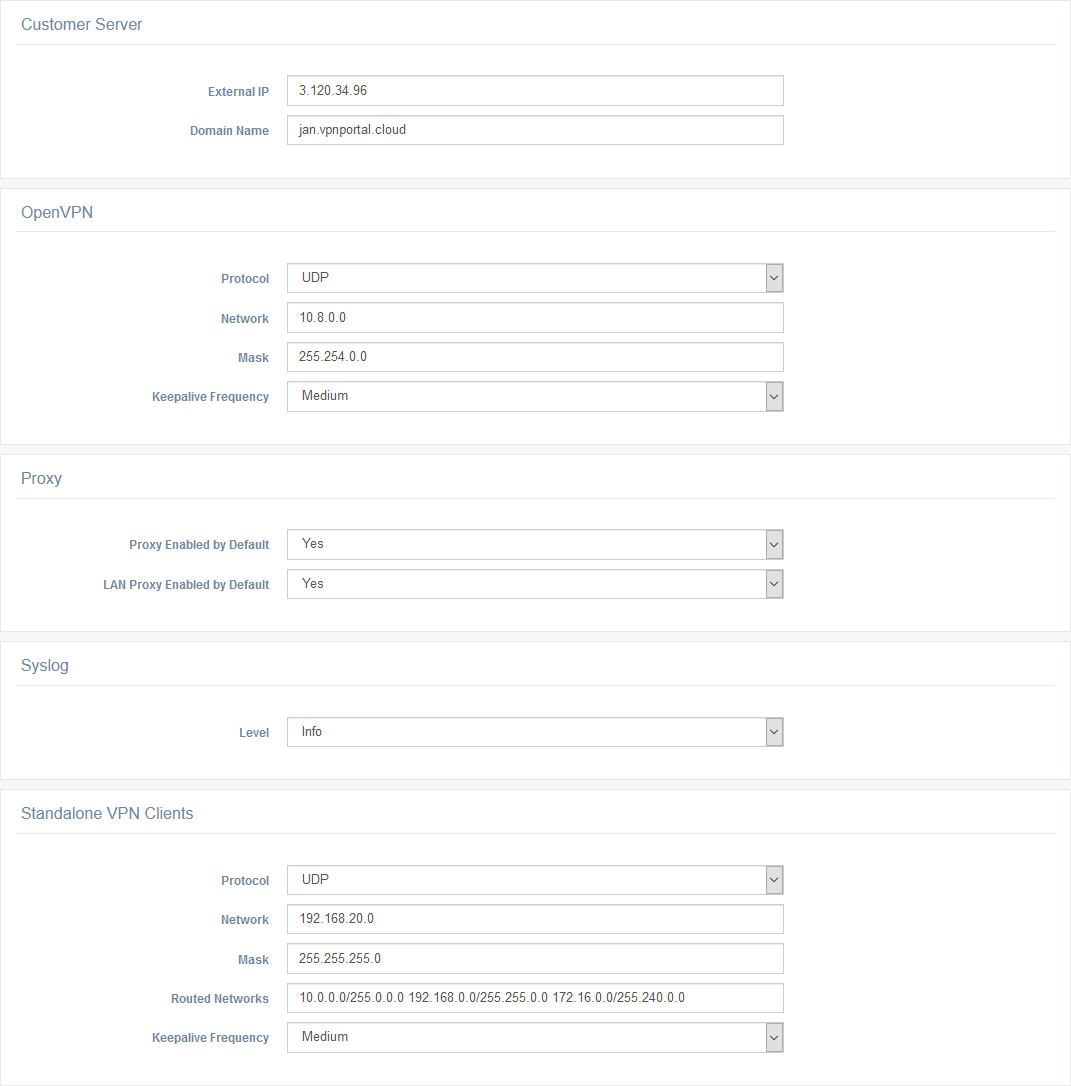
Settings
The Administration → Settings page contains configurable WebAccess/VPN parameters.
| Settings | Description |
|---|---|
| External IP | The IP address of the CS that is given to routers. Must be reachable from routers. Useful when moving WebAccess/VPN to a different IP. |
| Domain Name | The domain name of the CS. Useful when moving WebAccess/VPN to a different domain name. |
| Syslog | |
| Level | Verbosity level of the Syslog. |
| Proxy | |
| Proxy Enabled by Default | The default state of Proxy for newly added devices. Can be changed per device in Device Edit. |
| LAN Proxy Enabled by Default | The default state of LAN Proxy for newly added routers. Can be changed per router in Router Edit. |
| OpenVPN | |
| Protocol | The OpenVPN tunnel with routers is established via UDP (default) or TCP. Use TCP if your firewall blocks UDP. When running on Amazon, update your Security Group firewall rules accordingly. |
| Network Mask | The pool of virtual addresses for routers (and possibly devices behind them). Must be large enough for all your routers (255 addresses are reserved per router). Can only be changed when no validated routers exist. |
| Keepalive Frequency | The interval between pings used to check each device's connection state. A device is marked Offline after 2 consecutive failed ping checks (with no other traffic through the tunnel). Lower frequency reduces data consumption but increases delays in updating connection state. • Very low: once every 300 s • Low: once every 117 s • Medium: once every 40 s (default) • High: once every 15 s |
| Standalone VPN Clients | |
| Protocol | The OpenVPN tunnel with Standalone VPN Clients is established via UDP (default) or TCP. When running on Amazon, update your Security Group firewall rules accordingly. |
| Network Mask | The pool of virtual addresses assigned to Standalone VPN Clients. Both OpenVPN networks (VPN clients and routers) are restarted automatically when this is changed. |
| Routed Networks | IP ranges routed to the tunnel. By default, all private IP ranges are listed. |
| Keepalive Frequency | Same as for OpenVPN. |
WebAccess/VPN Settings items
Users
The Administration → Users page shows a table of all configured users. You can add, edit, or remove user accounts.
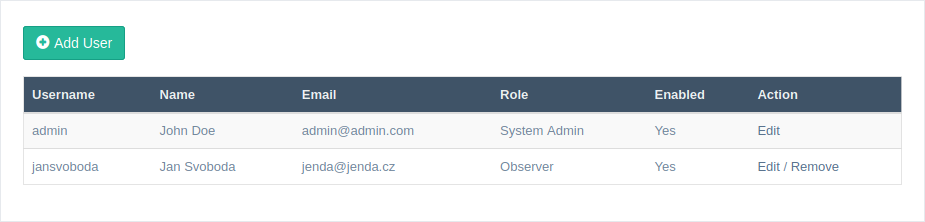
Click Add User to add a new user. A dialogue appears (also used for editing) where you can enter identification information (Username, Name, Email, Password), specify the user role, and enable or disable the account. A disabled account does not allow login, but the information is retained and can be re-enabled by a System Admin.
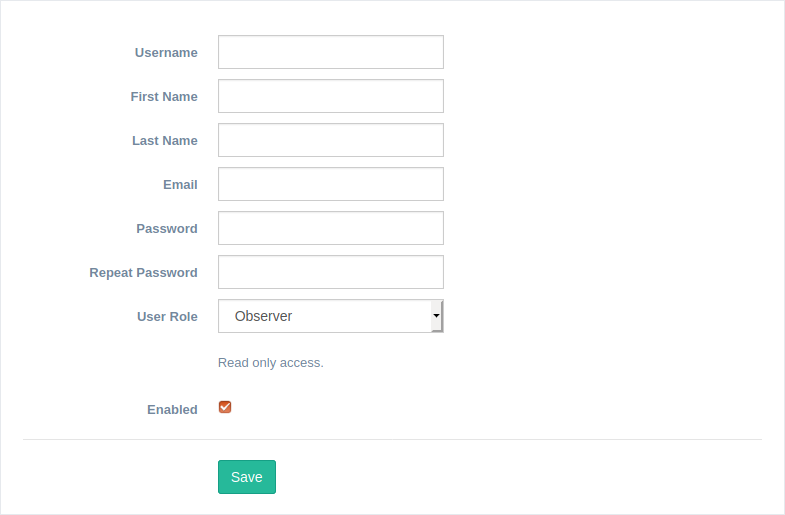
Roles are hierarchical — each higher role includes all rights of the predecessor:
- Observer — read-only access (default role).
- Device Admin — device administration (can validate and edit devices — Routers and Standalone VPN Clients).
- Network Manager — network management (can add/remove devices from networks, add and edit firewall rules for networks).
- Network Admin — network administration (can create, edit, and delete networks).
- System Admin — full access: user management (add, edit, delete users), change settings, and administer the application.
Logs
The Administration → Logs page provides access to system logs.
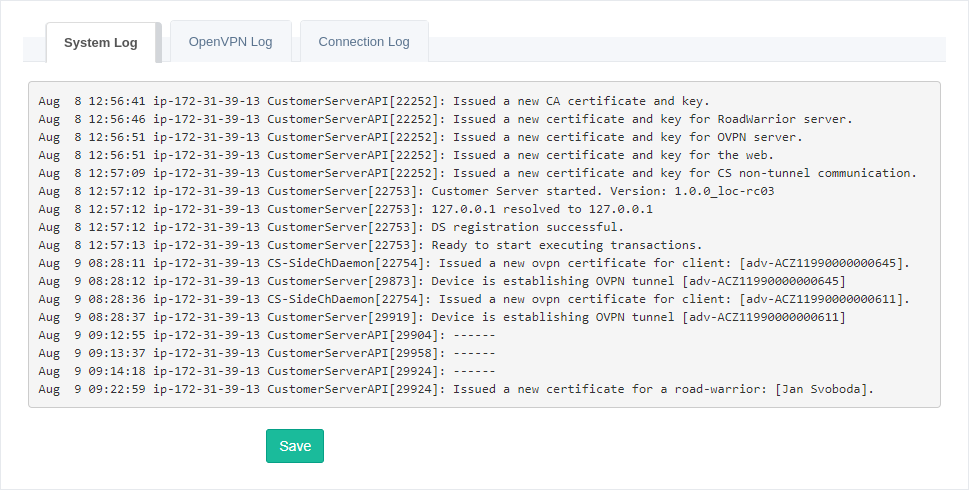
You can switch between the SystemLog, OpenVPN Log, and Connection Log views. The Connection Log consolidates connection information for all devices in one place. All logs can be downloaded as a single TXT file by clicking Save — the file contains sections for all three log types and can be shared with technical support.
Advanced Management
Password Reset
Password reset can only be done via SSH login to the system running WebAccess/VPN. Log in via SSH, navigate to /opt/vpnportal, and run the password reset script:
cd /opt/vpnportal
./reset_admin_passwd.sh
The newly generated password is printed to the console. Copy or note this password. You can change it later in Administration → Users.

Troubleshooting
How to Check WebAccess/VPN Running Services
On the Administration → Application page of the WebAccess/VPN UI, running services can be checked, stopped, started, or restarted. See the Application section for details.
How to Access Logs
Router Logs
On routers, log messages can be viewed on the Router App's VPN Portal web pages:
- OpenVPN Tunnel — shows the status of the OpenVPN tunnel.
- WebAccess/VPN — shows the status of the Router App.
WebAccess/VPN Logs
On the Administration → Logs page of the WebAccess/VPN UI, the System Log, OpenVPN Log, and Connection Log can be viewed. See the Logs section for details.